Master AI photo editing on your iPhone with our step-by-step guide. Discover the best mobile tools to improve colors, fix lighting, and retouch portraits like a pro.
With the development of artificial intelligence, saving time has come to involve numerous nuances, the need to choose the right apps, and constant product improvement. The App Store is overflowing with hundreds of apps, but finding something truly worthwhile is so hard. Artificial intelligence learns from search queries, and you need to learn how to use them effectively.
Don’t feel like reading the whole breakdown? We’ve pulled together a quick summary below.
Key Takeaways
- Preparation. Always create a duplicate of your photo before editing to protect the original image from unexpected results caused by the algorithms.
- Basic Tools. Don’t rush to buy subscriptions—the updated iOS offers powerful free features right in the Photos app: Auto Enhance, Object Isolation, and Smart Styles.
- Background removal. Removing unwanted passersby, wires, or objects now takes seconds thanks to tools like the built-in Clean Up, Adobe Photoshop Express, or Magic Eraser.
- Smart search and organization. Artificial intelligence analyzes content, letting you to search for photos using everyday phrases, automatically merges duplicates, and creates ready-to-watch video memories.
- Troubleshooting. Artifacts can be corrected by reducing the effect’s intensity or the selection area, and app freezes can be resolved by checking your internet connection or restarting the app.
Getting Started with AI Photo Editing on iPhone

Before you download a dozen new apps and buy paid subscriptions, take a moment to pause. Focus on a few options, and get your iPhone ready before you start downloading.
- Define your main goal. AI editing falls into several categories: basic enhancements (color correction, sharpness), object removal (removing wires or people), and generative editing (adding new elements or expanding the background).
- Always create a duplicate of your photo. Although many apps support non-destructive editing, AI algorithms can sometimes produce unpredictable or “plastic-looking” results. Always make a copy of the original photo in the Photos app so that if something goes wrong, you won’t have to regret losing the shot.
- Start with basic, free tools. Don’t rush to buy professional editing apps. Try the iPhone’s built-in features, use the free Snapseed to get the principles of masking, or experiment with basic AI filters in Photomator. Move on to paid solutions only when you feel that the free options are no longer enough for you.
The main mistake beginners make is overusing AI. The best-edited photo is one where you can’t tell it’s been edited. Use artificial intelligence to highlight details. If you want to alter a photo, use AI tools that preserve realism as much as possible, for instance, Luminar Mobile.
Professional Editing. Now in Your Pocket.
Download Luminar on your Mobile Device
Using Apple’s Intelligent Features in the Photos App
IOS is actively integrating Apple Intelligence features directly into the system. Check that your iPhone is running the latest version of iOS. It’s quite possible that tools for background removal or smart search are already available to you completely free of charge in the standard Photos app.
Auto-Improvement
Machine learning algorithms analyze the scene, recognizing faces, the sky, grass, and textures. They brighten shadows on faces without overexposing the sky and make colors more vibrant while preserving natural skin tones.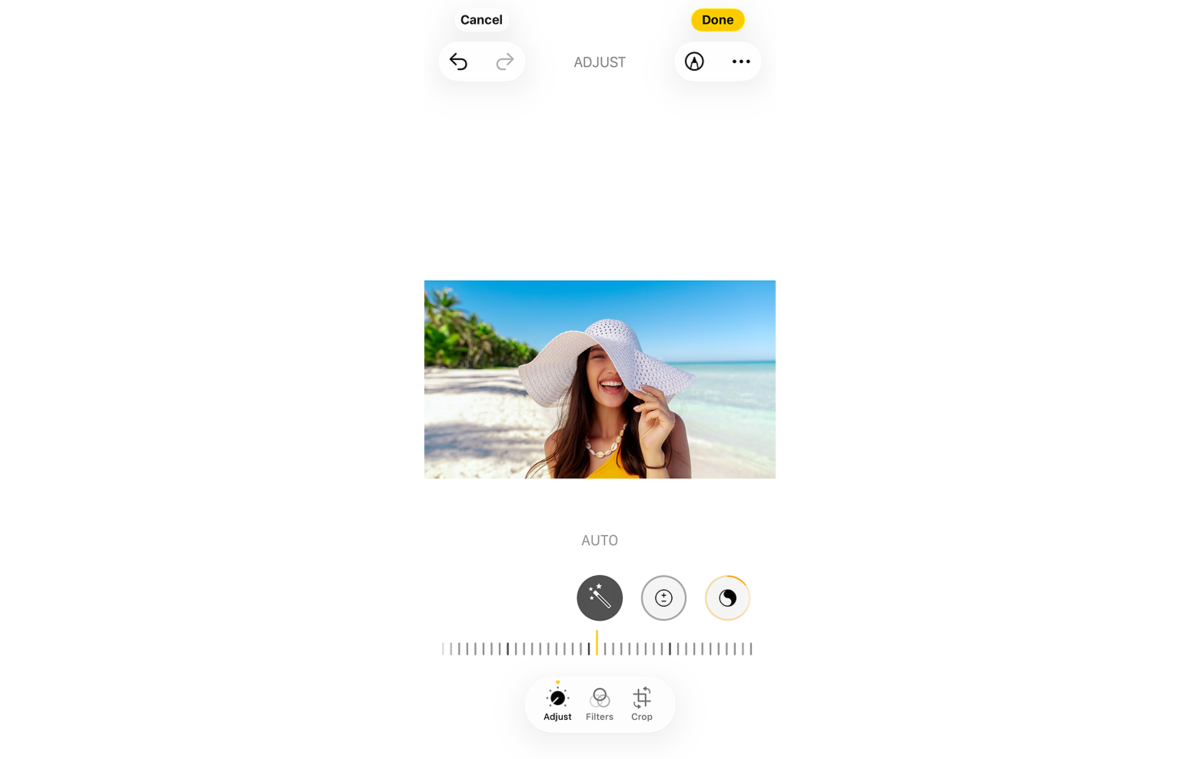
Subject Lift
Although this feature was introduced a little earlier, it’s still going strong. Press and hold your finger on the main subject of the photo (a person, animal, or object). The system instantly cuts it out along the outline, providing to copy it, turn it into an iMessage sticker, or move it to another app to create a collage.
Photographic Styles
Unlike regular filters, which simply apply a color overlay to the entire photo, Apple’s smart styles adjust the tone and warmth of the photo while preserving skin tones so that faces don’t look orange or unnaturally pale.
How to Search for Photos Quickly with AI
Over time, thousands of photos accumulate in your iPhone’s gallery, and finding a specific photo becomes nearly impossible. Fortunately, your smartphone’s neural processor automatically scans every image while the phone is charging.
In addition, you can try searching for a photo in the “Photos” app. Type your search queries as if you were describing the photo to a friend: “cat sleeping on a laptop” or “red dress near the window.” The AI analyzes details, objects, clothing, and even emotions in the photos to deliver accurate results.
In the “Albums” section, the system automatically groups photos of people and pets who appear most often in your shots. You can assign names to them and then combine search terms: for example, enter a person’s name + the word “smile” or “beach” to filter out everything else.
After all, there’s a reason why the well-known Siri comes pre-installed on every iPhone. The smart assistant will instantly open your gallery with the results already filtered. A query could be: “Siri, show me photos from the book fair in Lviv.”
Enhancing Photos by Removing Unwanted Objects

A tourist who wandered into the frame, a manhole cover in the background, or obtrusive power lines cutting across the sky. Before the advent of artificial intelligence, removing such objects required complex manual cloning in Photoshop. Today, your iPhone and specialized apps can do this in a matter of seconds, seamlessly “filling in” the background where the object was removed.
- Clean up. In photo editing mode, select the tool. The AI will automatically analyze the photo and highlight objects it considers unnecessary (such as people in the background). You can simply tap on a highlighted object or manually trace around any other object. The AI will instantly remove it, filling the space with the background texture (grass, a wall, the sky).
- Adobe Photoshop Express. Uses powerful Adobe algorithms to “heal” areas of the photo. The tool recognizes the edges of objects and textures and carefully removes unwanted elements.
- Magic Eraser. It works similarly to Apple’s tool. It finds and removes people and objects, offering options for filling in the background. (iOS users typically need a Google One subscription.)
If you don’t want to fuss with each individual element, you can always leave the work to someone else. For example, an AI-powered tool can enhance your photo on its own. It all depends on your budget and capabilities, so Luminar Mobile is the option that’s right for you.
Creating Personalized Memory Movies Automatically

Machine learning algorithms filter the content automatically. They skip blurry photos, screenshots, receipts, or unwanted duplicates, selecting only those photos and videos where people are smiling, have their eyes open, or are captured from the best angle.
Even if you don’t ask for anything, the iPhone constantly generates collections in the background (when the phone is locked and plugged in). The AI recognizes meaningful events, such as birthdays, trips, get-togethers with friends, or just a nice weekend.
Tips for Improving Photo Quality Using AI Tools

AI does everything with the click of a finger, but it’s not perfect. To know your photos look professional after AI editing—rather than like generated, plastic-looking images—it’s worth following a few rules.
The “plastic skin” effect
The algorithms try to remove noise, though in the process, they also eliminate skin pores, fine wrinkles, and hair details. Remini or Photomator has a slider to adjust the effect’s intensity—never set it to 100%. A value of 30–50% is usually enough to make the face look clean while preserving the person’s natural texture.
AI Upscaling
Today, AI can take a blurry or small photo and enlarge it by 2, 4, or even 8 times, “inventing” the missing pixels. Use Upscale only when it’s truly necessary, for large-format printing or if you need to crop the image. For regular viewing on Instagram, artificially increasing the resolution will only add extra file size and can sometimes create strange artifacts in the background.
Denoising
Photos taken at night or in a dark room often have “grain” or color noise. Always remove it before applying sharpness. If you apply sharpness first, the app will make the grain more pronounced, and the AI denoiser simply won’t be able to handle it afterward.
Managing and Organizing Photos with AI Assistance
The latest iPhone and its app ecosystem use machine learning algorithms to automate the routine tasks of sorting, searching, and storing photos. AI analyzes your gallery and identifies identical or similar photos (for example, a series of 10 shots taken in a single second). The system suggests merging them, keeping only the highest-quality photo, which helps free up gigabytes of storage on your device.
Manage your photos simultaneously on your computer and phone. Large RAW files can take several hours to fully process in post-production. Smart AI tools, such as Luminar for iPhone, eliminate the need to manually transfer files via messaging apps or cables. The original file is never overwritten, so your gallery stays clean and protected from accidental errors.
Troubleshooting Common Issues in AI Photo Editing on iPhone

One of the most common problems is the appearance of visual artifacts or an unnatural texture. When working with complex shadows or attempting to restore details in a portrait, the neural network may overdo it. Reducing the intensity of the effect or applying the tool only to specific, small areas instead of the entire photo usually resolves this issue.
Another common issue involves apps freezing or failing to process changes. Programs that use cloud computing require a stable internet connection to function properly. Editing high-resolution files, such as detailed shots of the night sky or astrophotography, also places heavy demands on your device’s resources. Restarting the app, clearing the cache, or connecting to a faster Wi-Fi network usually restores the apps to normal operation.