Five practical ways to use a drone for photography to capture cleaner angles, stronger composition, and more professional aerial shots that elevate your images without overcomplicating your workflow.
In fact, that may be their main purpose. What can you use a drone for? And photographing skyscrapers or taking photos of a country house—that’s what they were intended for. Although we can’t forget that not all drone use is peaceful. But what should a beginner get when it comes to photography? What camera is best for them? Where should they begin, and what drone photography tips? We compiled this guide for you.
Don’t feel like reading the whole breakdown right now? Here’s a tighter, more practical summary of what actually changed.
Exclusive Tools of Endless Possibilities in One Editor
Key Takeaways
- Pick a drone based on what you shoot most. Travel needs a lightweight and fast setup, while real estate benefits from cleaner shadows at dusk and a focal length that reduces facade distortion.
- Digital camera drones are the practical choice for photo work. “Analog” in drones usually refers to low-latency FPV video, not true film capture.
- Learn smooth control before chasing cinematic moves. Practice takeoff, landing, slow stick inputs, and wide turns. Use Cine/Tripod modes and avoid aggressive yaw to prevent shaky footage.
- Fly for perspective, not altitude. Start with a high establishing shot, then drop lower and shoot at a 20–40° angle to reveal depth, spacing, texture, and shadows.
- Plan a repeatable shot list. Define 5–7 deliverables (context wide, 3/4 facade, entrance/driveway, yard, pano, short video pass) and account for light, reflections, and battery limits.
- Safety and reliability are part of the product. Check weather, connections, return-to-home height, and keep distance from people. Back up footage and review quickly for exposure and motion issues.
- Responsible flying protects you and the client. Follow local rules, respect privacy, coordinate with property owners, and have a signal-loss and wind contingency plan.
Choosing the Right Drone for Photography
First, decide on your goal: do you just want to capture the moment regardless of quality, or do you want a high-quality image? Analog cameras are suitable for the first option, while digital cameras are better for the second. Stay tuned if you’re interested in learning more about the differences between them in one of the following sections.
For drone photography for beginners, it’s easiest to pick a drone based on your main shooting rather than buying “for the future.” Travel and social content depend on low weight, quick setup, and reliable vertical framing. Real estate and architecture usually need cleaner shadows at dusk and a focal length that doesn’t stretch facades.
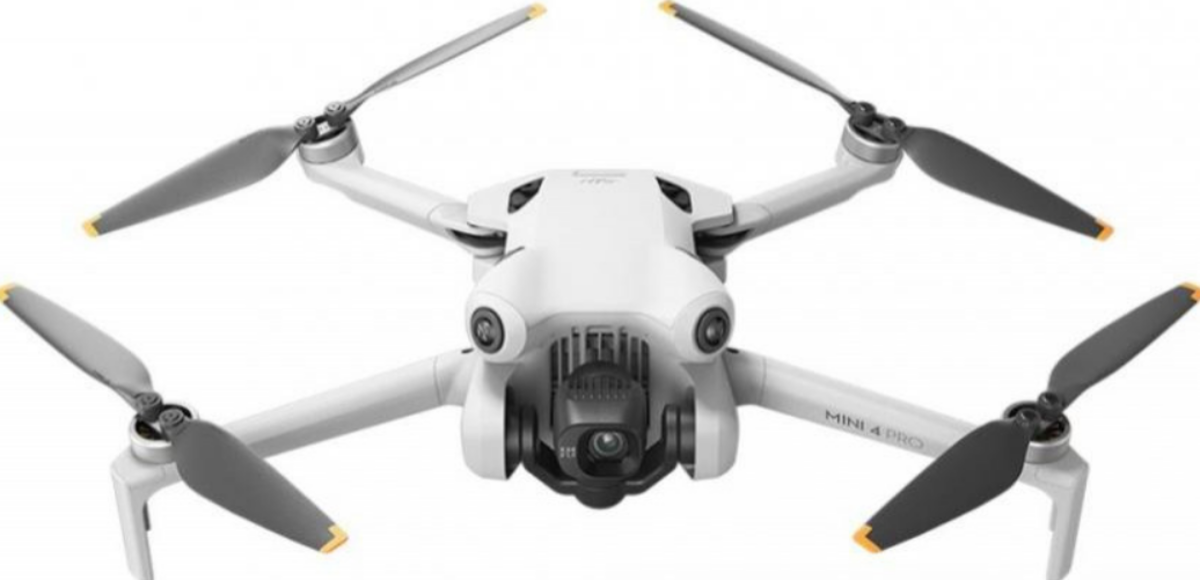
- DJI Mini 4 Pro: space-saving for travel and quick ones. Best for establishing shots, courtyards, rooflines, and everyday listings in reasonable light. Drawback: high winds can inhibit comfort and consistency.
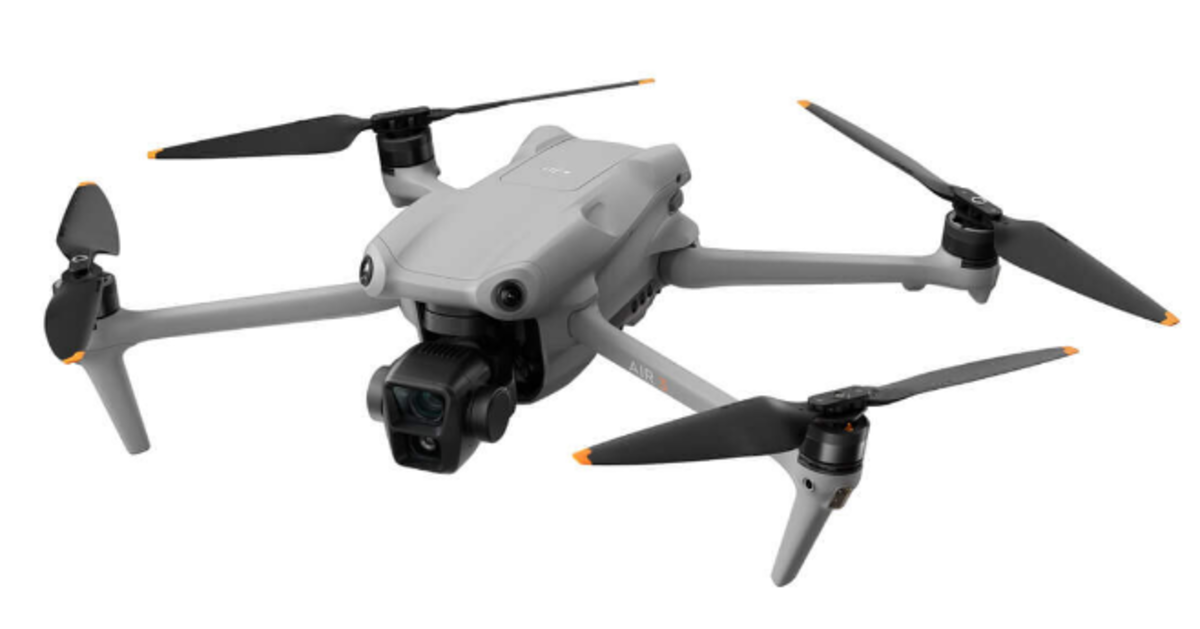
- DJI Air 3: a capable real estate drone with two cameras (wide + 70mm equivalent). The tele view makes the facade appear more natural, with a wide-angle distortion left behind.
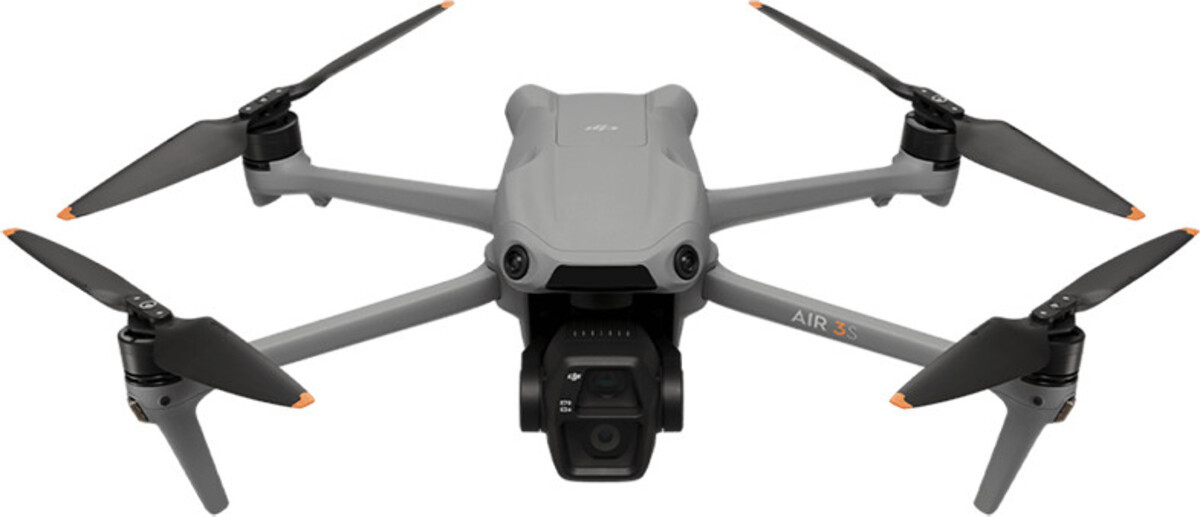
- DJI Air 3S: a strong upgrade for sunset, overcast days, and high-contrast scenes. It also has a 70mm equivalent for cleaner building shots.
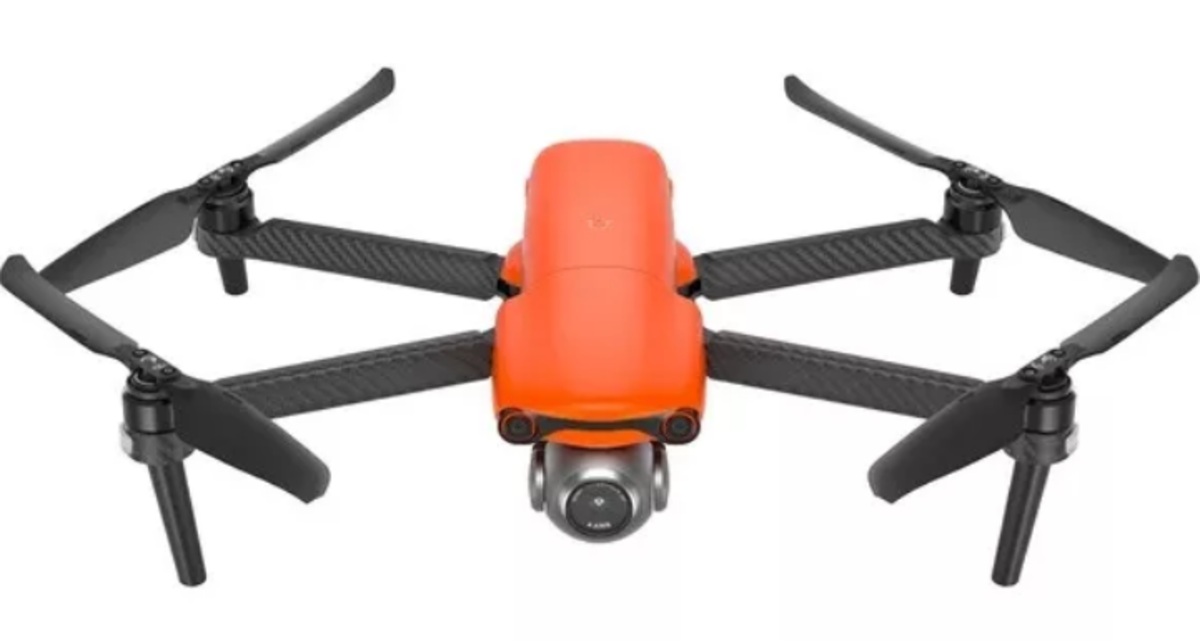
- Autel EVO Lite+: a DJI alternative with a 1-inch sensor and a variable aperture. Useful in bright daylight when you want tighter exposure control without constantly relying on ND filters.


Once the drone is chosen, plan the series like a product: define the angles you’ll always deliver, pick a consistent time window, and set a simple editing baseline. Light changes faster than most people expect in travel and real estate, so a simple preset and a repeatable workflow keep a series from looking inconsistent. In situations like this, Luminar Neo works well for quickly matching tone, color, and skies across multiple frames without heavy manual masking.
Basic Flying Techniques for Beginners

If you are new to flying, pick an open spot and keep it simple. Get the takeoff and landing of the drone smooth, then slow down your hands. Avoid making big moves with the sticks. Watch the drone’s nose. After the drone makes a turn, the controls can feel flipped. Run the drone in a few squares.
Figure eights, then add gentle climbs and descents of the drone. Skip the yaw of the drone; it is the quickest way to get shaky footage and drift. Use a tripod or the Cine Mode if you have it. Fly the drone at a pace and turn the drone wide so the gimbal stays calm. Save the battery of the drone for landing. Set the return to a height high enough to clear trees and roofs of the houses.
Capturing Unique Perspectives with Your Drone

What is drone photography? It gives an accurate 3D view of anything you’re filming. A regular camera on the ground can’t capture what even a basic FPV camera can. For aerial shots, focus on moving along a path, not just going up high. Start with a shot to show where things are. Then move down low. Shoot from a 20-40° angle to show the shape of things. Finish with a pass along a line like a road, a roof edge, or a shoreline.
Your AI-Powered Photo Editor for MacOS and Windows
3 Safety Tips When Flying

Safety precautions should have been the first section of this article. Although there are many more rules, let’s start by looking at three basic tips for drone photography:
- Before you start filming, check the weather forecast for your city. Flying is prohibited in windy, rainy, or foggy conditions because you can very easily lose your drone. Do you really want that?
- Always check that everything is connected properly. Once the drone takes off, you won’t have much time to get all your shots. Check the battery, all cables, and all wires to make sure nothing goes wrong during flight.
- Don’t fly right next to yourself. This can be dangerous, since you won’t always be able to control it correctly right away, and you could injure yourself.
After the flight, save two copies of the footage, quickly review the shots for artifacts, overexposure, and blurring, and check for any sudden jerks in the video that would be difficult to fix later. Even at this stage, it’s clear which shots need additional tone correction for the sky or shadows on rooftops, so it’s handy to have a drone photo editor on hand to polish the series to a polished look without edits or wasted time.
When you review the raw files, two issues show up most often: flat skies and crushed shadows on roofs. Luminar Neo helps you clean those areas quickly, so the whole set stays consistent without spending time on dozens of small fixes on every image.
The Differences Between Analog and Digital
When you’re looking for the best camera for drone photography, you shouldn’t go for analog models. They’re designed to transmit video signals in real time via an analog radio signal (usually 5.8 GHz), ensuring minimal latency, and they’re quite affordable.
When it comes to weddings, real estate, or travel, people usually want high-quality drone footage. This means using a camera setup on the drone. You will not find analog film cameras on drones because film does not work well with vibration. You would need a system to advance the film, and you cannot check the pictures while the drone is flying.
So when people talk about getting an “analog drone look,” they usually mean using footage and adding effects to make it look like film. These effects can include things like grain, vignetting, and slight color changes. If a camera is not attached to the drone, it is often an action camera like the GoPro HERO or the DJI Osmo Action.

There are two types of drone cameras. The first type is built-in, like the ones on the DJI Mini, Air, and Mavic models. The camera and the gimbal are part of the drone. You cannot swap them out. The settings on these cameras are optimized for use with the drone. The second type is modular, meaning you can remove the camera and replace it with another. This is often used on professional drones that can carry a large gimbal with a removable camera, like the DJI Inspire with a Zenmuse camera, or on industrial rigs where you buy the camera and the drone body separately.

Elevate Your Photography with Our Advanced Software
Planning Your Shots to Fly with Purpose
Identify 5-7 necessary shots: a wide shot for context, a 3/4-angle view of the facade, the entrance or driveway, the yard/property, a separate “panoramic view” shot, plus a short walk-through for the video. Next, assess the lighting—where the shadows fall, whether the sky is overexposed, and where reflections will occur on windows and roofs.
This is especially true for UAV photography, as flight time is limited, and every extra maneuver drains the battery and increases the risk of error. Finish the plan with “safety corridors”: where you can retreat in case of people, cars, or gusts of wind, and where the landing will be the cleanest.
Avoiding Excessive Altitude for Better Images
When you take a picture from high up, it does not make the picture better. The building looks flat; you can not see the details. It is hard to see what is going on in the courtyard because it looks like a map.
- First, you take a picture to show where everything is, then you go lower to take a picture of the front of the building.
- Then you go even lower to take a picture of the details of the entrance or the site.
- You have to be careful not to get too close to people or things that might be in the way.
This makes it easier to control perspective and reflections on windows, as well as avoid minor blurring caused by the wind. In post-processing, it’s helpful to edit RAW photos, as RAW provides headroom for restoring the sky and shadows, but it won’t restore sharpness if the shot was originally taken from too far away and with a hazy “milky” veil in the air.
Using Your Drone Responsibly and Ethically

Before you start taking pictures, you need to do some things to ensure you are being responsible. You have to think about the rules of the place you’re in, how high you can fly, and what the weather is like. You have to respect people’s privacy: do not fly your drone over people’s backyards, do not fly it over people’s heads, and do not take pictures of windows close if it might show who lives there.
It is also a good idea to talk to the property owners when you are taking pictures for real estate. Let the property owners know whether you have permission to take pictures in an area with many buildings, and have a plan for what to do if you lose signal or it is very windy. Drone photography is what you are doing, and drone photography is what you have to be careful with. By doing things this way, you protect yourself, the people who are paying you to take the pictures, and your drone photography equipment.