In Luminar 4, you can really feel that technology does all the heavy lifting for you. Whether you don’t know anything about photo editing, or you know all the angles of post-processing, Luminar 4 can become your go-to piece of software for creating marvellous images.
Technology has changed the way we do things – it has made our lives easier. It’s time it changed the way we edit images, too. In Luminar 4, you can really feel that technology does all the heavy lifting for you. Whether you don’t know anything about photo editing, or you know all the angles of post-processing, Luminar 4 can become your go-to piece of software for creating marvellous images. It’s so well-packed with state-of-the-art tools powered by artificial intelligence that you face an embarrassment of riches when you open it for the first time.
I’ve been testing Luminar 4 since it was released and I finally got to gather my thoughts about it in this review. Here I’m going to give you a brief overview of pretty much all the tools that you can find within Luminar 4 and show you in great detail what Luminar’s most powerful AI tools are capable of.
Getting Started
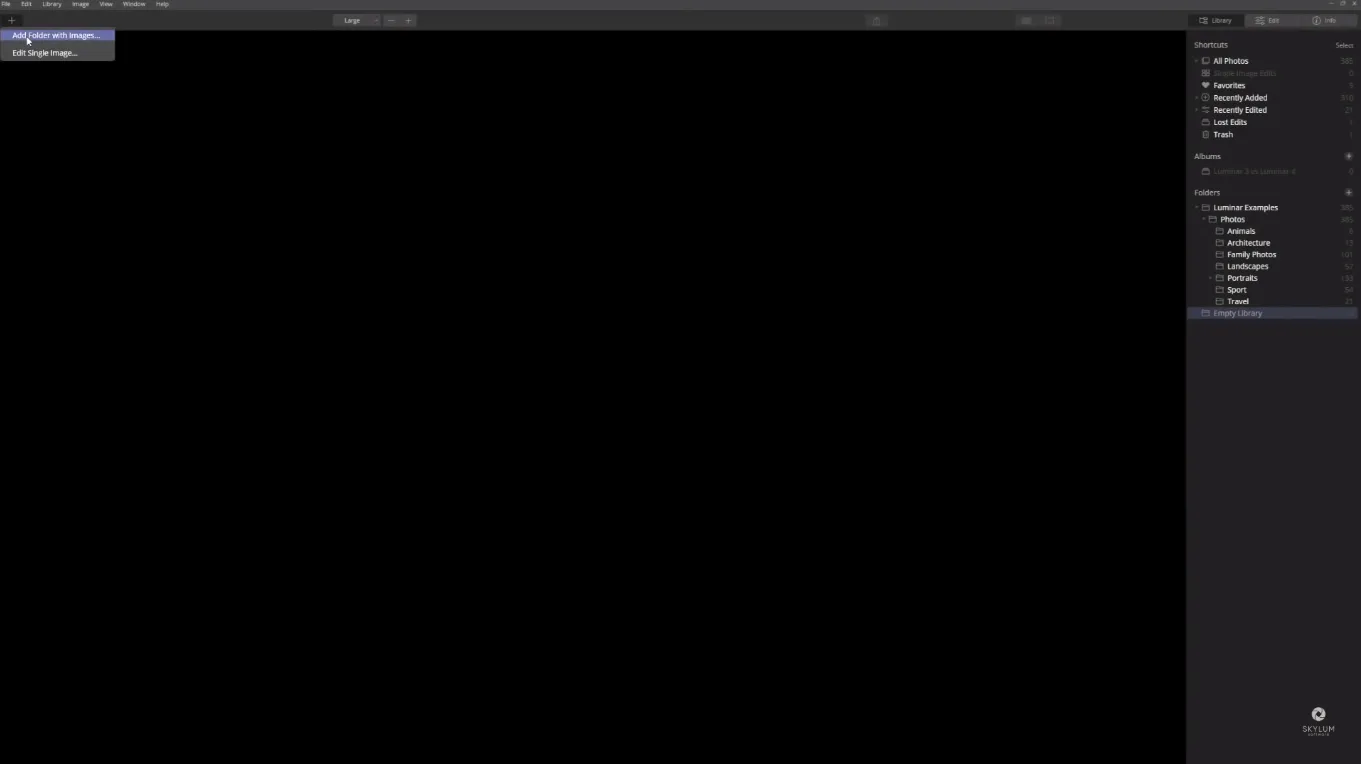
Once you open Luminar 4, you find yourself in the Library module, which is all about browsing and navigating your photos. To start editing, you first need to tell Luminar which photos or folders you’d like to add to the library. Here you have two options.
Option 1. Add Individual Photos
To add individual photos, click the plus icon in the top left corner and choose Edit Single Image in the drop-down menu and navigate to the photo you’d like to edit.
Option 2. Add Folder With Photos
To do that, click the plus icon in the top left corner and choose Add Folder With Images or go to the side panel and press the plus icon next to the folder menu. From here, navigate to the folder that contains your photos.
In the Library module, you can organize your photos by giving them ratings, colour labels, and selecting your favourites. It’s a great way to filter your photos, especially when you have to deal with huge bulks of them. Besides, you can add your photos into virtual collections called Albums from any location or folder and remove them without any effect on the actual file.
Editing Photos
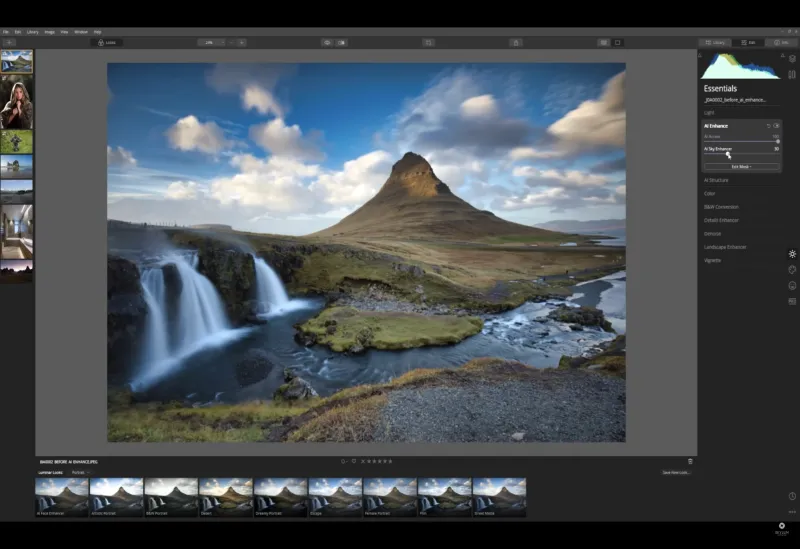
The Edit module is where you boost your photos. Whether you want to quickly spruce up your image using Luminar’s vast selection of Looks or give it a total makeover using Luminar’s famous AI tools, you go to the Edit module. Looks are situated at the bottom of the window while Luminar’s core and advanced tools can be found on the right-hand side of the Side panel. They are broken into 6 tabs: Layers, Canvas, Essentials, Creative, Portrait and Pro.
Luminar’s Looks
A great place to start is the preset Looks that come bundled with Luminar 4. To open the Luminar Looks Panel, simply click the Looks button in the Top Toolbar. Select the appropriate collection of Looks in the Looks Panel at the bottom edge of the screen and click the Look that you want. You can try applying a different Look for each layer or adjustment layer to achieve more creative results! To adjust the intensity of the effect, use the Amount slider to blend the adjustment. From here, you can go further and fine-tune your photo using the Edit menu located on the right-hand side.

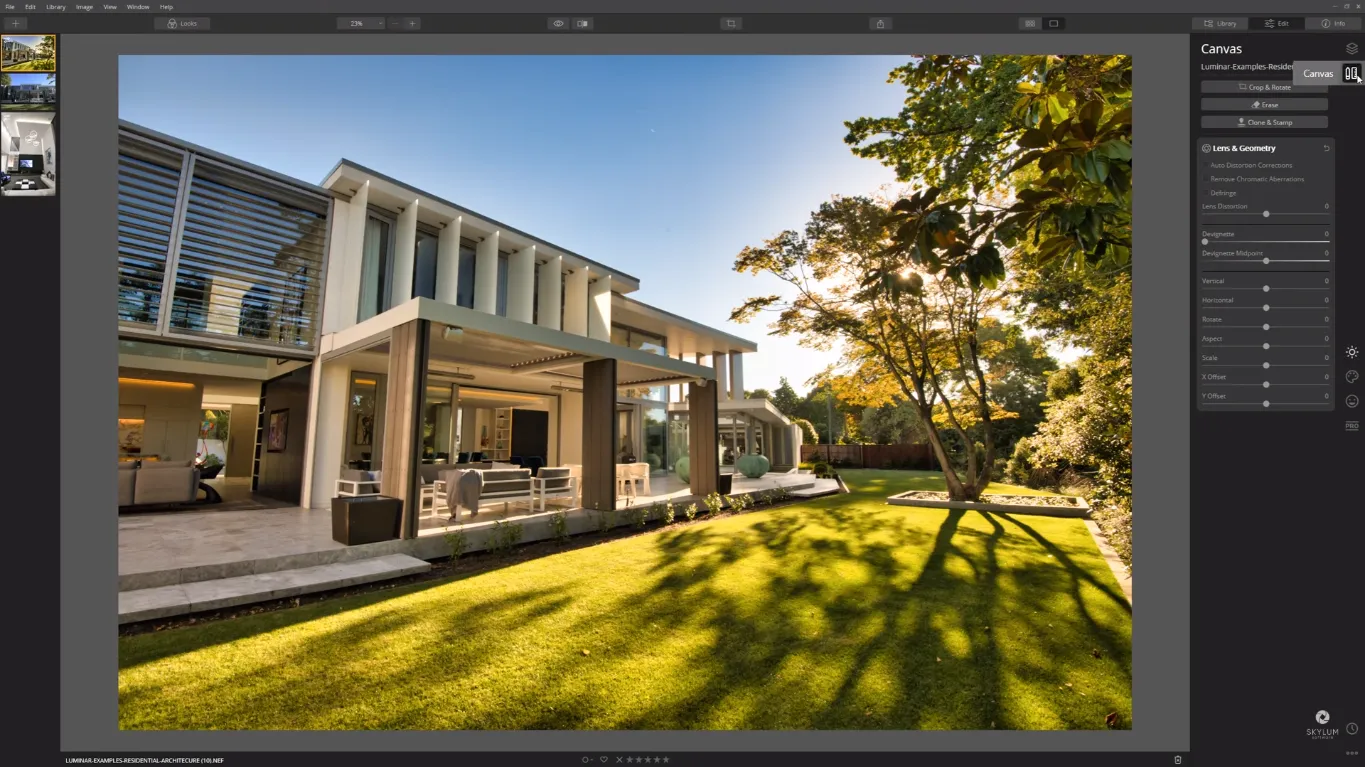
Canvas
If you need to crop your photo, remove unwanted objects or correct distortions, go to Canvas. You can find the Canvas icon in the top right corner of the Sidebar in the Edit panel right below the Layers icon. Let’s see what tools can be found within that tab and how they can help you improve your photo.
Crop & Rotate. If you need to change the size of your photo, Luminar 4 offers you a large selection of various ratio presets to suit your needs and allows you to create your own, of course. Here you can also flip and rotate your photos as you please.
Erase. This tool lets you remove unwanted objects from your image by simply painting over them. You don’t have to set a source point for the pixels – the Erase tool automatically samples from around the erasing area to seamlessly blend the pixels into the rest of an image.
Clone & Stamp. This tool also allows you to remove undesired details from an image just like the Erase tool, however, to use this one, you need to target the pixels you want to paint over the damaged areas with.
Lens & Geometry. With this tool, you can fix the lens imperfections by simply dragging the necessary sliders. I recommend you play around with each of the sliders in this group to see what each of them is capable of in terms of lens corrections.
Layers
Layers allow for maximum flexibility in image editing and you simply can’t do without them even if you’re a beginner. Using layers is a great way to get creative with your images while keeping things organized. To open Layers in Luminar 4, click the Layers icon in the top right corner of the Sidebar in the Edit panel. There are three types of layers in Luminar 4:
- Adjustment layers are the most flexible way to work with your photos. Any Luminar’s tool or a combination of them can be used with an adjustment layer, so you can easily control the order of their application, opacity, or blending modes. You can switch layers on or off and drag them up or down in the layer stack to change the look of your photo and create new effects.
- Image layer is used when you want to add one image on top of another. There’s an unlimited number of reasons to add an image layer, like to introduce textures, watermarks, or logos to your photos. Within an image layer, you can also use masks and blending modes.
- Stamp layer is basically a copy of all the current layers merged together that appears at the top of the layer stack. You might want to use it to apply additional effects, masks, or blending modes to the layers together.
Essentials
Within the essentials tab, you have access to some extremely powerful and beneficial AI tools which can enhance your photos with the minimum of fuss.
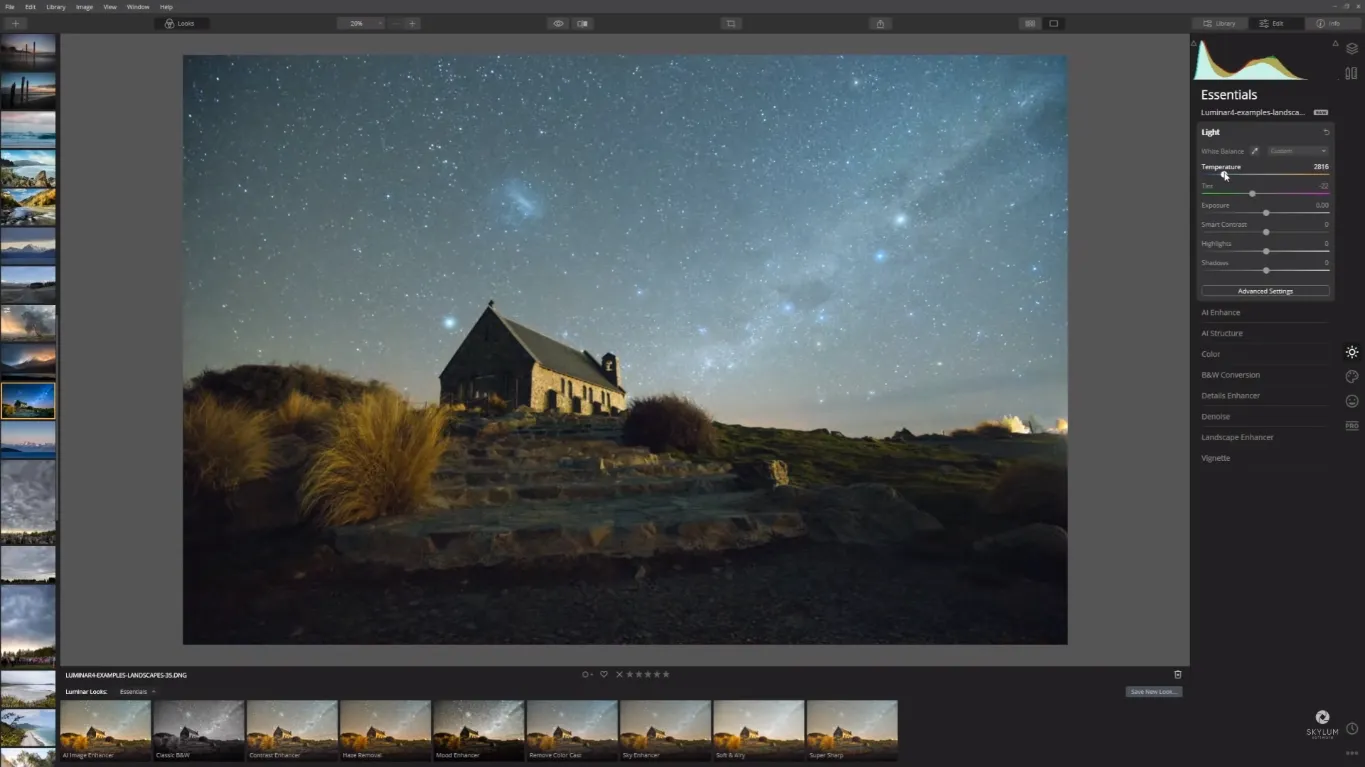
Light. The Light panel gives you access to some simple yet very powerful tools to quickly change the look of your photo. Temperature and Tint control the colour balance while Exposure, Smart Contrast, Highlights, and Shadows help you dial in the correct brightness to your photo.
AI Enhance has the AI Accent tool and AI Sky Enhancer, both of which provide a super quick way to improve your images with a simple slider.
AI Structure. If you want to add some contrast, Luminar’s AI Structure does a fantastic job. I’m going to take a closer look at the AI Enhance and AI Structure tools further below.
B&W Conversion. Here you can control the brightness of individual colours or bring individual colours back.
Details Enhancer. The Details Enhancer tool will help you bring crystal-clear sharpness to your images.
Denoise. Use this tool to eliminate any unwanted noise or grain.
Landscape Enhancer comes with a few very-powerful tools for enhancing your landscapes. The Dehaze slider will help you get rid of any fog or haze. The Golden Hour tool is great for bringing some warmth to your photos and make them look like they were shot during the golden hour. Use the Foliage Enhancer slider to bring more colour to the greenery in your landscape photos and modify its effect with the Hue slider.
Vignette. You can finish off your image by bringing some attention to the centre of it using the Vignette tool.
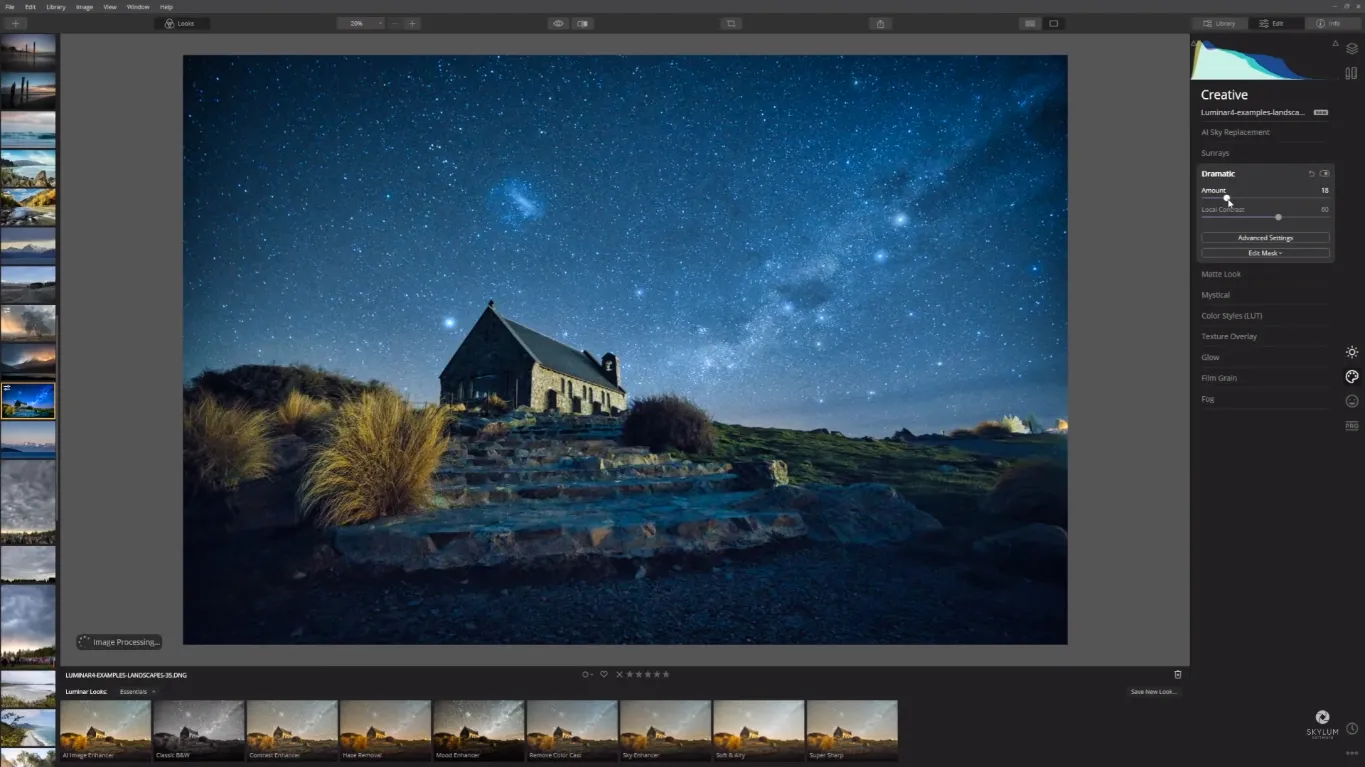
Creative
To add some creativity to your images, go to the Creative tab. It’s packed with extremely powerful tools that can bring your photos to the whole new level, so I recommend you to take your time playing around with the tools in this tab.
AI Sky Replacement. This tool allows you to change the sky in your photos without masking or selecting anything. I’m going to explain how this tool works in more detail further below.
Sunrays. It adds a new source of light to your image. It has dozens of sliders to adjust this effect, including the number of the sunrays, their length, warmth, intensity, and how much they pass through an area, plus you can control the radius, warmth and glow of the sun you’ve introduced. It’s a really cool tool, I recommend you play around with it to see what it’s capable of.
Dramatic. This tool will bring down the saturation and increase the contrast in your image creating a very dramatic, cinematic look.
Matte Look. Give your photos an aged effect with the Matte Look tool that brings up the contrast and flattens the colours of your image.
Mystical. If you’re looking for a dreamy effect, use the Mystical tool.
Colour Styles (LUT). To quickly choose the appearance of your photo, use the professional lookup tables with the LUT tool. It comes with a long list of styles in the drop-down menu so you can opt for the one you like or load your own ones in the .cube format. To adjust the style, use the Amount, Contrast, and Saturation sliders.
Texture Overlay. It allows you to load your own textures or images to blend in the photo. It’s a great way to add some creativity to your image, especially when you want to introduce a vintage look, for one. This tool also has various sliders to have control over the saturation, contrasts, and other characteristics of the introduced texture.
Glow Tool. Use this tool to add a subtle glow to your photos.
Film Grain. This one is great for giving your photos that analogue film stock look.
Fog. Use it to add a blurring effect to your photo to simulate the actual fog. You can choose between Light Fog and Dark Fog and adjust the intensity of the effects using the Amount slider.
Portrait
The Portrait tab has some incredible AI tools to help you retouch your portraits quicker than ever.
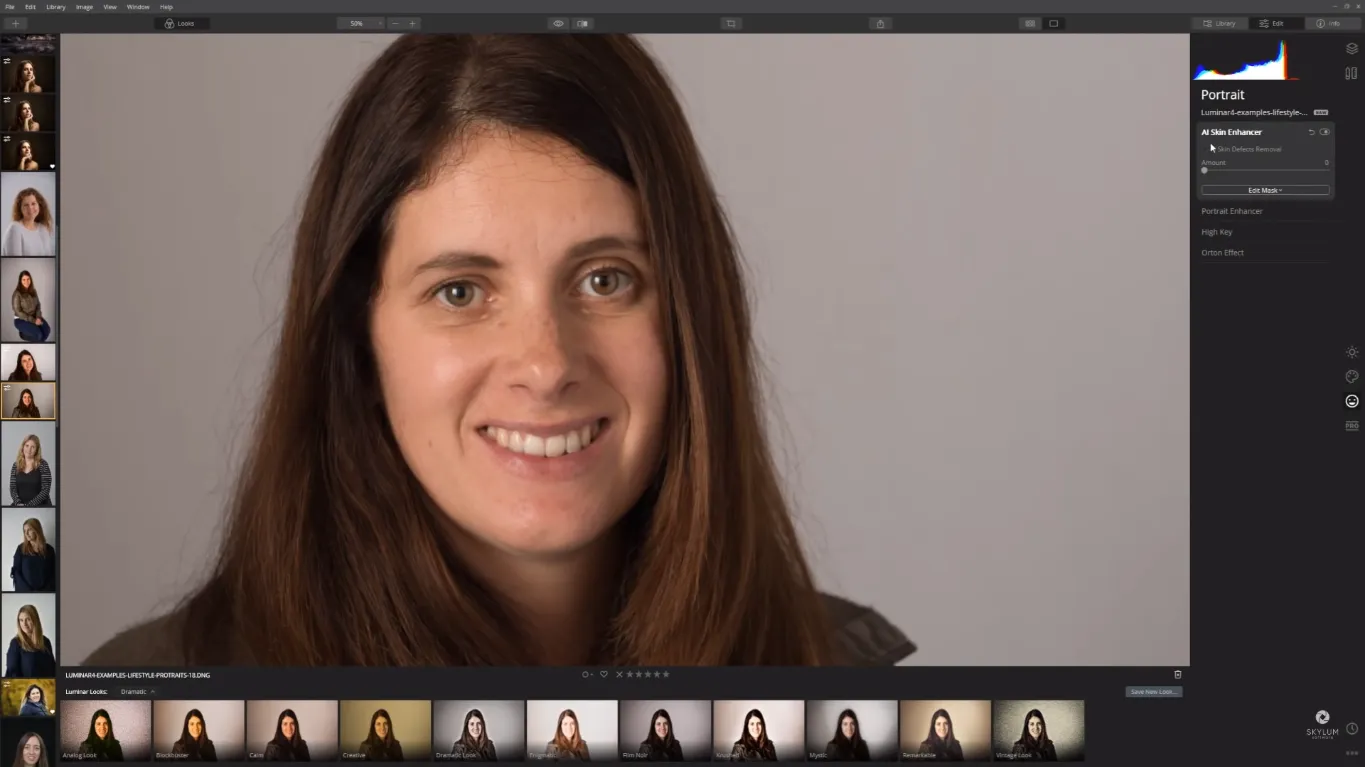
AI Skin Enhancer. If your model has some skin imperfections, the AI Skin Defects Removal in the AI Skin Enhancer section does a fantastic job of cleaning up the skin while leaving the skin texture intact.
Portrait Enhancer. The Portrait Enhancer tool offers a great number of sliders to enhance your portraits in a very natural yet delightful way. I’m going to take a closer look at these tools a bit later in the text.
High Key. You can finish the photo with a little bit of a high key effect by using the High Key tool that will bring all the attention to the model’s face.
Orton Effect. Use this tool if you want to add a unique look to your portrait by making it sharp and blurry at the same time.
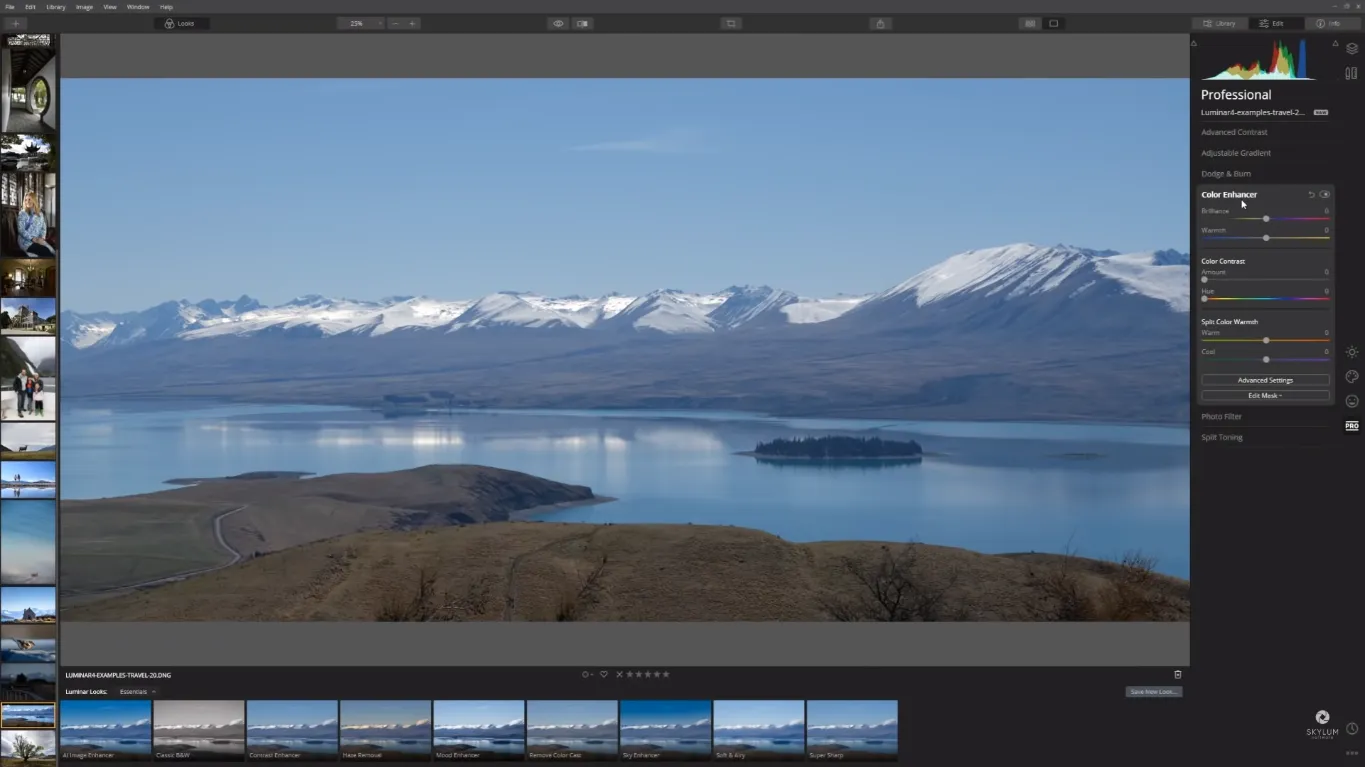
Pro
The Pro section offers some great tools for advanced editing that I encourage you to play around with. The simple slider-based approach lets you quickly see the effect the tool has.
Advanced Contrast. Take full control over the tonal contrast with the Advanced Contrast tool. Adjust the highlights, mid-tones, and shadows to bring the details in your photo to the next level.
Adjustable Gradient. This tool allows you to adjust exposure, contrast, warmth, and vibrance for the top or bottom areas of your image.
Dodge & Burn. This tool simulates the traditional photography techniques for lightening and darkening a photo. It’s a masking tool that doesn’t have many sliders, so it’s more about experimenting. Just play around with it to see how it can help you improve your image.
Colour Enhancer. The advanced colour controls are housed here. This tool offers you to take finer control over brilliance, warmth, colour contrast and balance, and cold and warm tones.
Photo Filter. This tool simulates different colour filters that photographers attach to a camera lens to add special toning effects to a photo. You can adjust the effect with the Amount, Hue, Saturation, and Preserve Luminosity sliders.
Split Toning. The Split Toning tool is a very powerful tool that can help you introduce colour to your black and white images. It offers several controls that will help you achieve the desired look in a quick and simple way.
New & Improved AI Tools Explained
Luminar 4 is most famous for its cutting-edge AI-based tools. I’m going to go over only some of the most popular ones and show you how I use them to edit my photos. Anyway, all of the tools in Luminar are worthy of your attention, so go and play around with every one of them!
AI Enhance & AI Structure
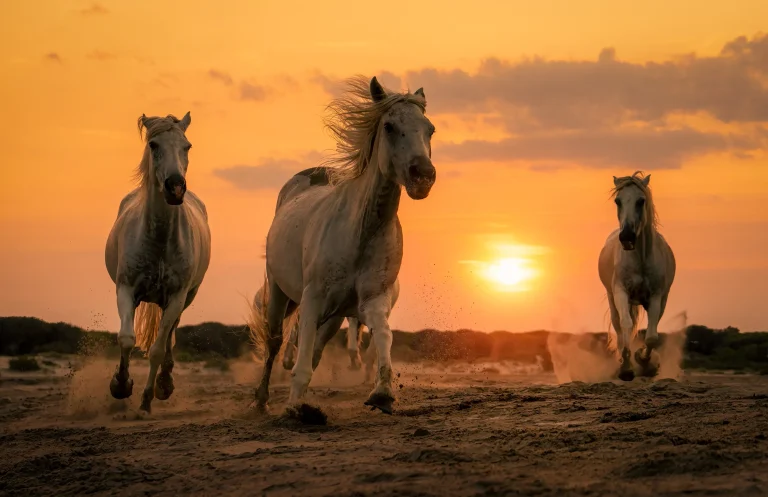
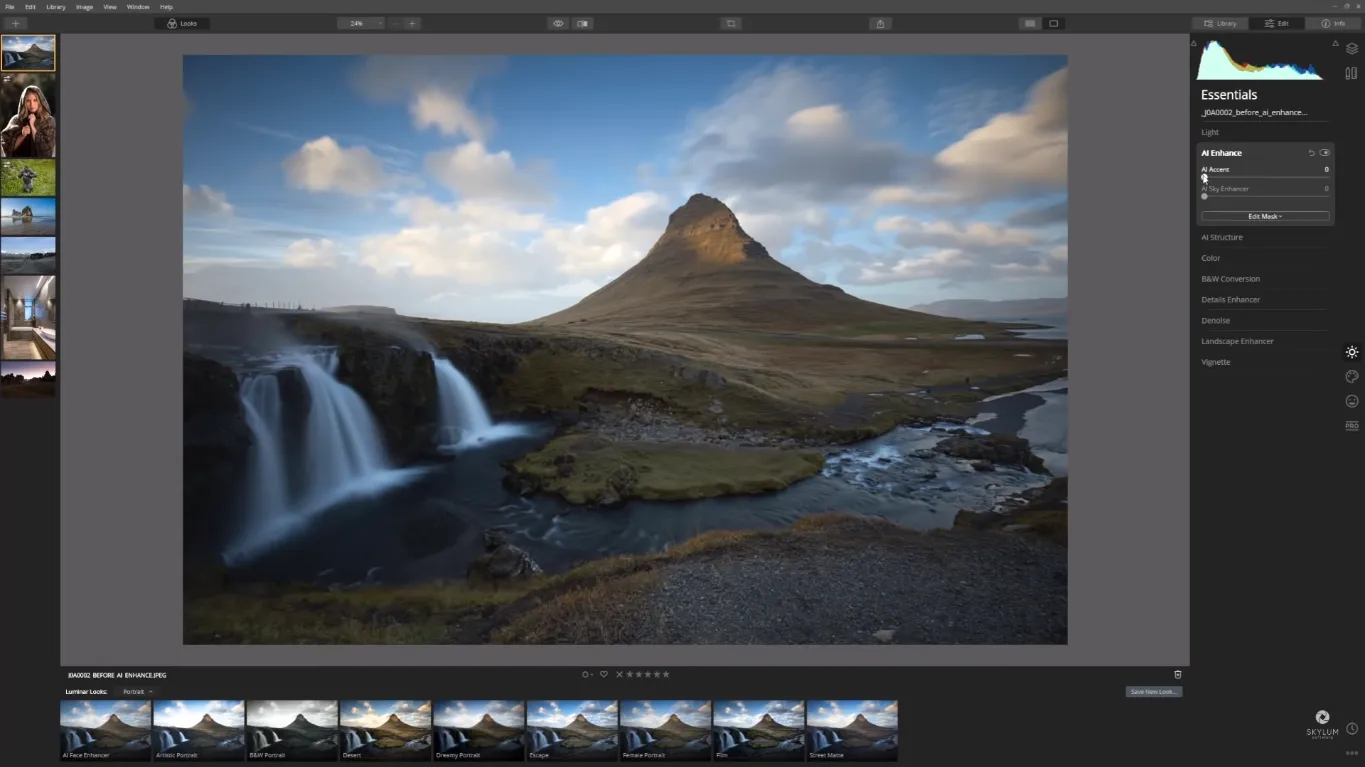
The AI Enhance section comes with AI Accent and AI Sky Enhances tool and is one of my favourites. AI Accent analyzes your photo and then makes smart decisions about enhancing the contrast, exposure, saturation, all with one slider. And if your sky needs a helping hand, the Sky Enhancer tool has you covered. To show you how it works, I’m going to enhance this image:
Push the AI Accent slider all the way to a hundred to see what this tool is capable of. As you can see in the photo below, I managed to achieve a really dramatic effect in this photo just with one slider. If I was working in another piece of software, I would have to spend hours tweaking dozens of sliders to achieve such a stunning result. It’s amazing!
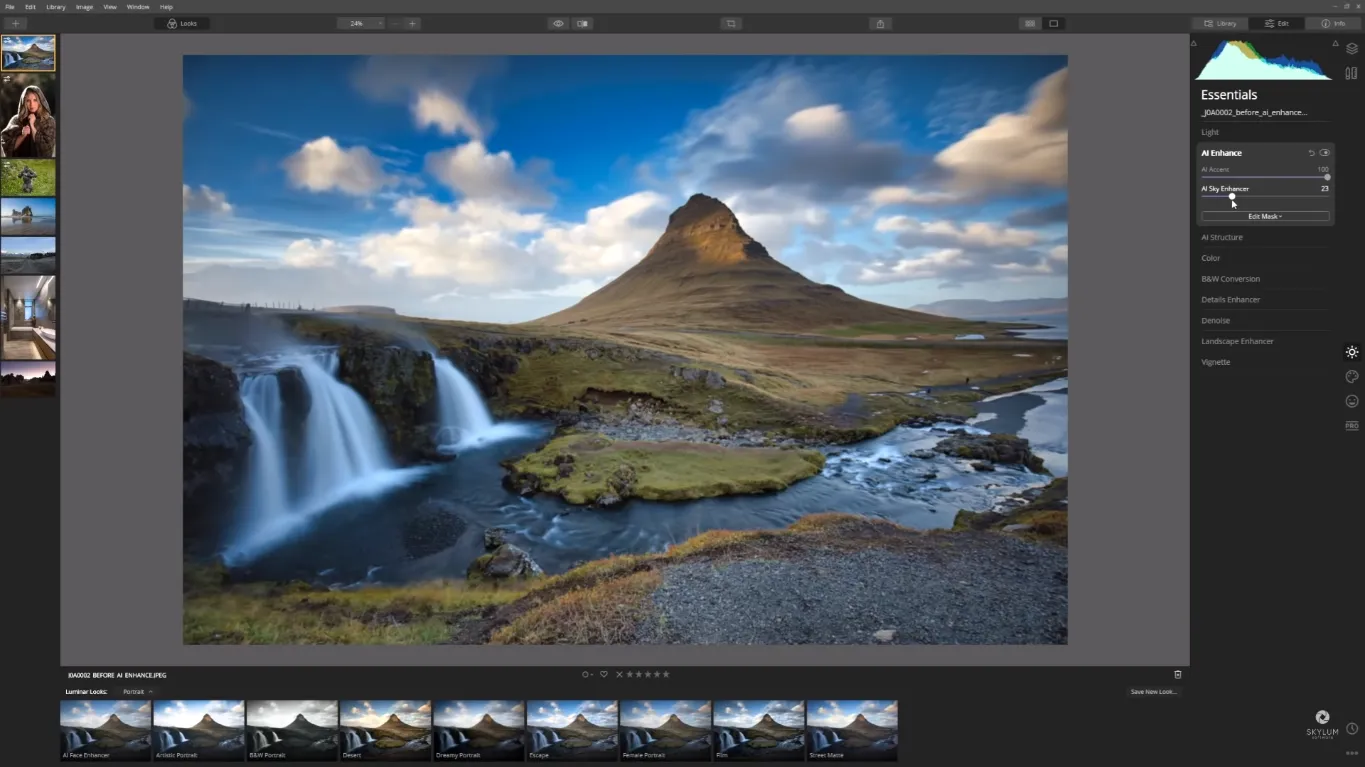
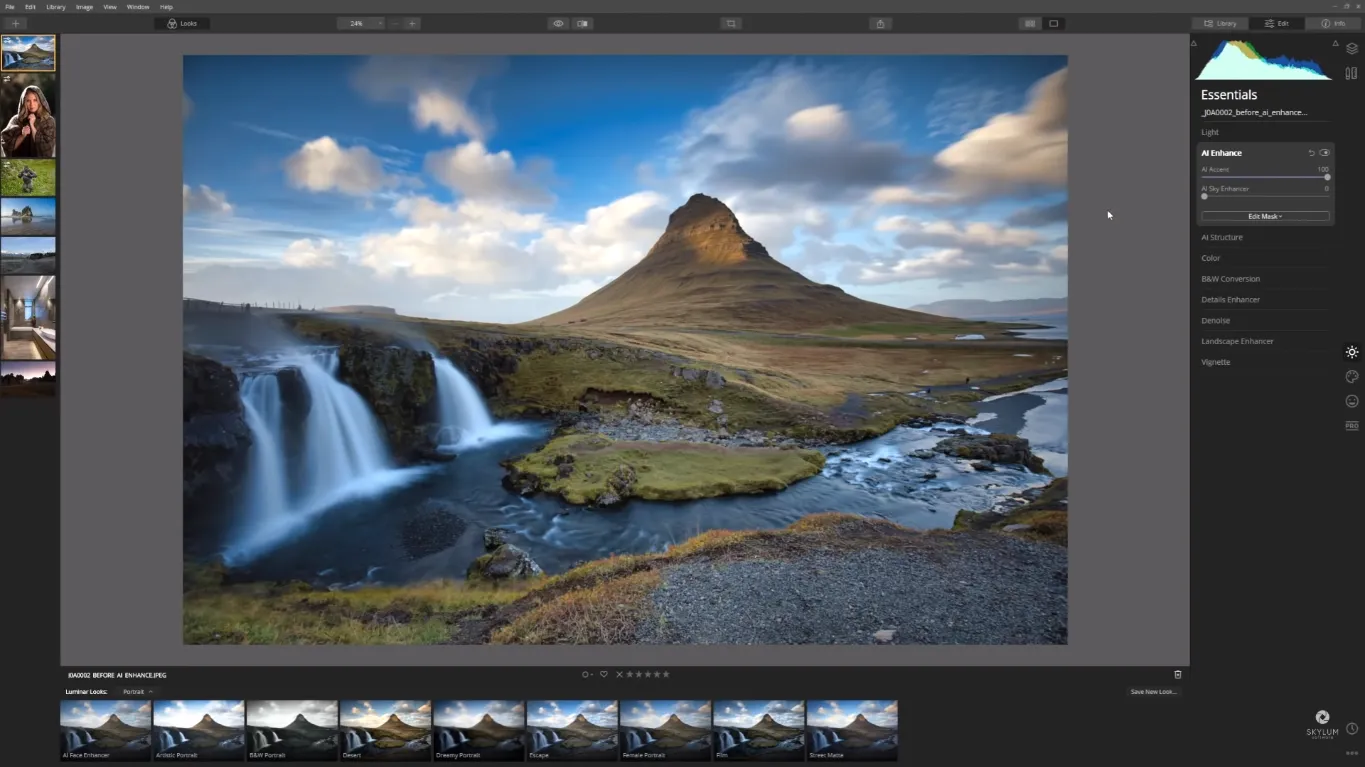
Another thing you can do within the AI Enhance section is to enhance the sky in your image by using the AI Sky Enhancer slider. This tool is also driven by AI, so it’s smart enough to know where your sky is. Though the sky already looks fantastic in this photo, I’d like to see how the AI Sky Enhancer tool can enhance it even more. I slightly brought the slider up and the blues in the sky are starting to become richer and deeper. Check the final result out:
Now let’s jump to Luminar’s most recent addition, the AI Structure tool. It’s a content-aware tool that’s great for bringing up details, adding clarity and structure to your image whilst leaving areas that you don’t want that apply to untouched. Use it to boost the details in the background by applying a positive value on the slider or make them less apparent by applying a negative value. Here’s an example of how AI Structure can deal with a portrait with a very detailed background.
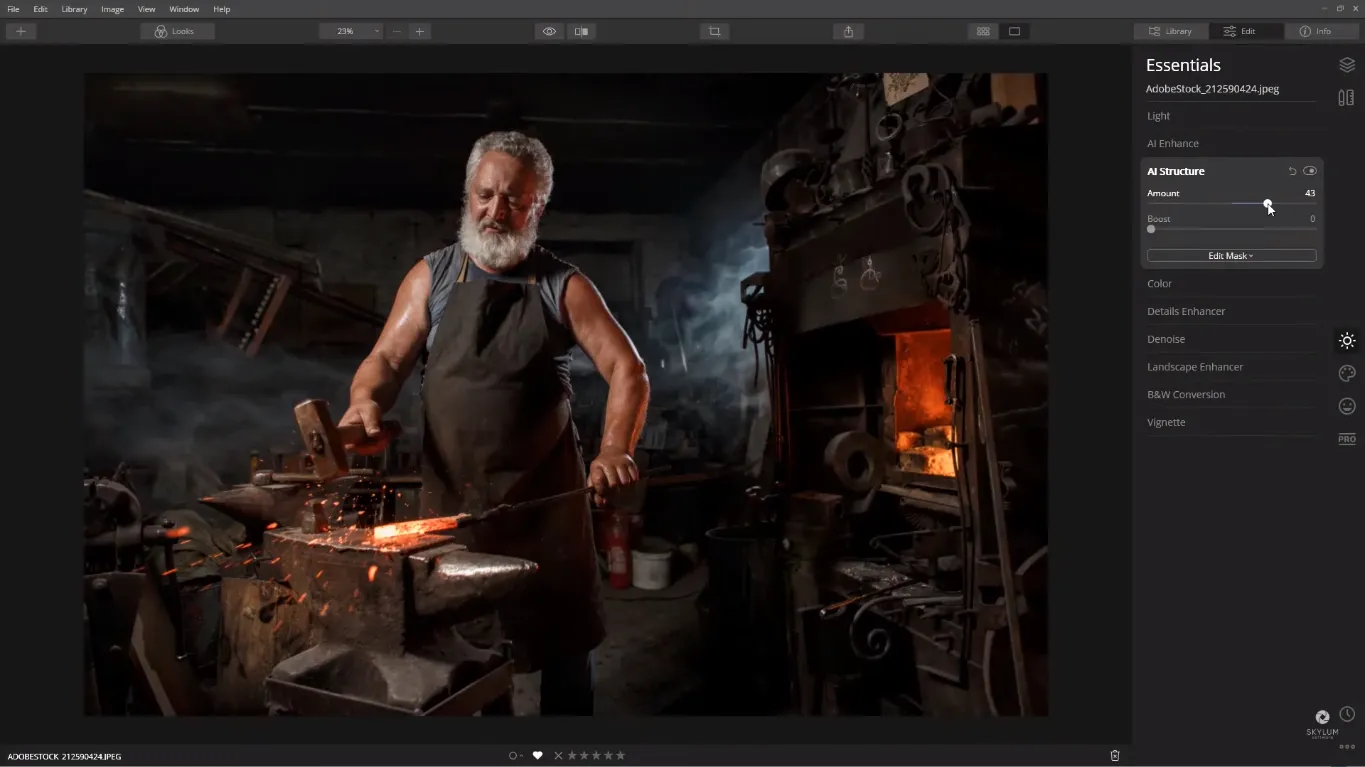
To see what these sliders are capable of, I cranked them all the way up, and look how much drama and impact it added to this already fantastic photo:
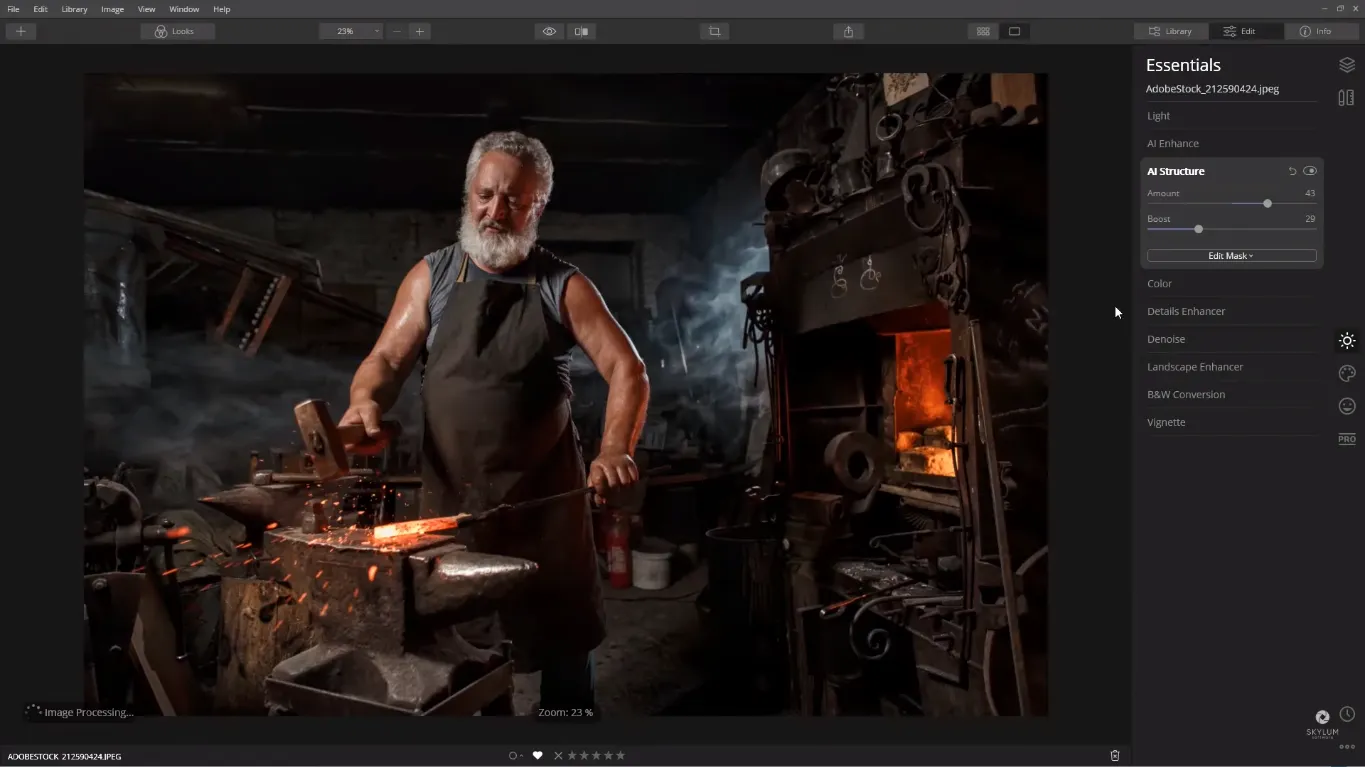
It’s impressive how quick and easy AI Structure added clarity to the background without affecting the foreground subject. And I didn’t even have to spend one minute masking anything! The tool is intelligent enough to calculate which parts of the image need boosting and enhance them without adding any unwanted noise, halos, or artefacts.
Both of these AI-powered tools, AI Enhance and AI Structure are extremely powerful and can replace dozens of sliders. I recommend using them in combination with one another to introduce that dramatic look to your photos to make them stand out.
Golden Hour
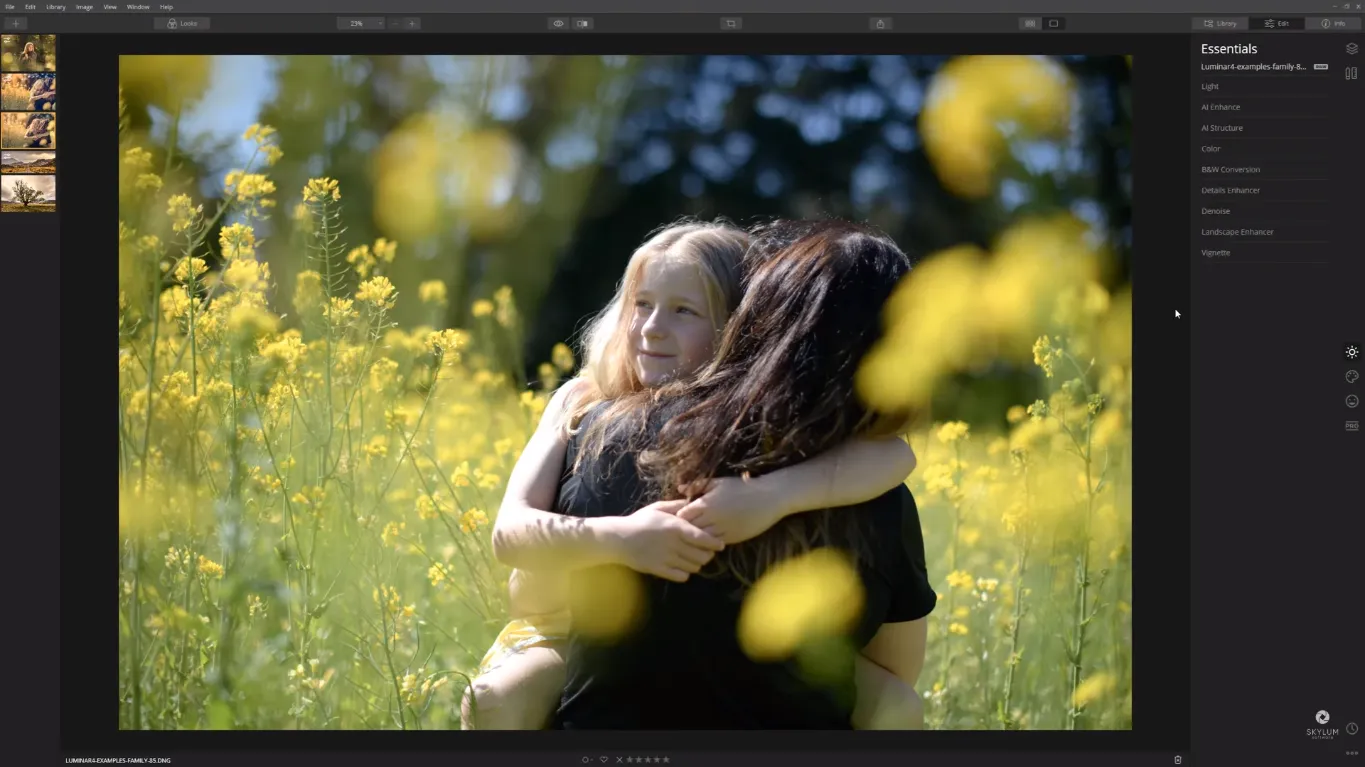
The golden hour refers to that fantastic time for photographers right after sunrise or that hour before sunset. Luminar’s new Golden Hour tool can really help you emulate this gorgeous look. There are two main things that help make the golden hour such a magical time to take photographs. One is the quality of light that’s created and the other is the low angle of the sun. We can certainly try to emulate that quality of the light in Luminar 4 but a photo that was taken at midday with the sun right above is never going to realistically look like a golden hour shot. The Golden Hour tool does a pretty good job at introducing that distinctive warmth to skin and hair, however, the result heavily depends on the time of day the photo was taken and the colours in your photo. That’s why sometimes you won’t be able to achieve the expected look by using the Golden Hour tool only – some photos might require a little more tweaking. Let’s see how we can introduce that fantastic “golden hour” look in Luminar 4 by using a combination of different tools.
I’m going to work on this photo of my daughter being carried through a field by my wife and it’s the middle of the day. Midday sun certainly doesn’t have any of the qualities of the golden hour, but let’s see what we can do.
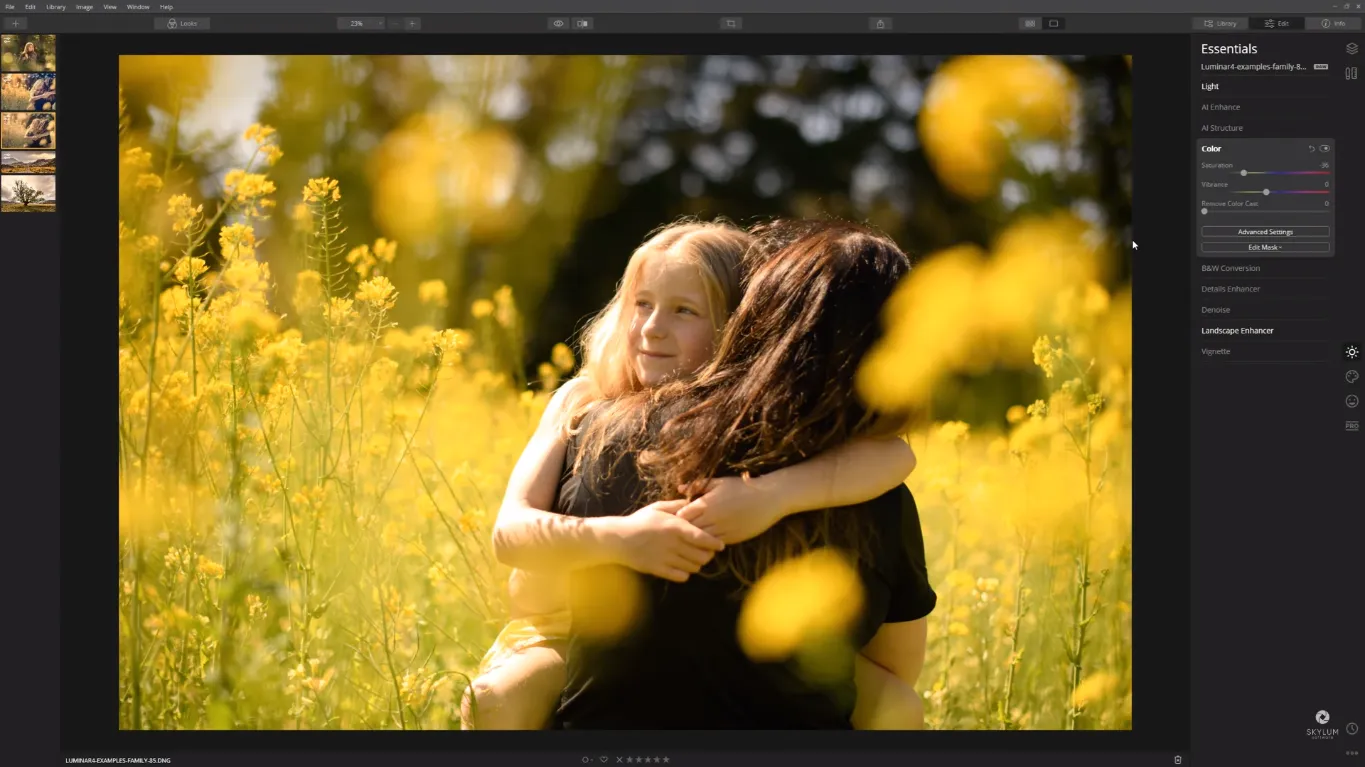
Go to the Landscape Enhancer tab where you’ll find the Golden Hour slider and push that all the way up. The tool immediately saturated all the colours and brought warmth to the photo that wasn’t otherwise there. If your existing image is as cold as mine, the next thing you want to do is to warm up the colours a little. To do that, go to the Light section and use the Temperature slider to add some colour toning. This, however, can sometimes make the image look a little oversaturated, like in my case. To solve that, I go to the Color section where I ease the Saturation slider off to the left. The image now looks a lot more like it was shot in the golden hour:
I’m now going to add some finishing touches to make the image look even more realistic. I’d really like to bring those highlights on my daughter’s arm a little bit down. To do that, I go back to the Light section and bring the Highlights slider down, and then to the Advanced section, where I grab the Whites and bring those down as well. I’m really happy with the result for now:
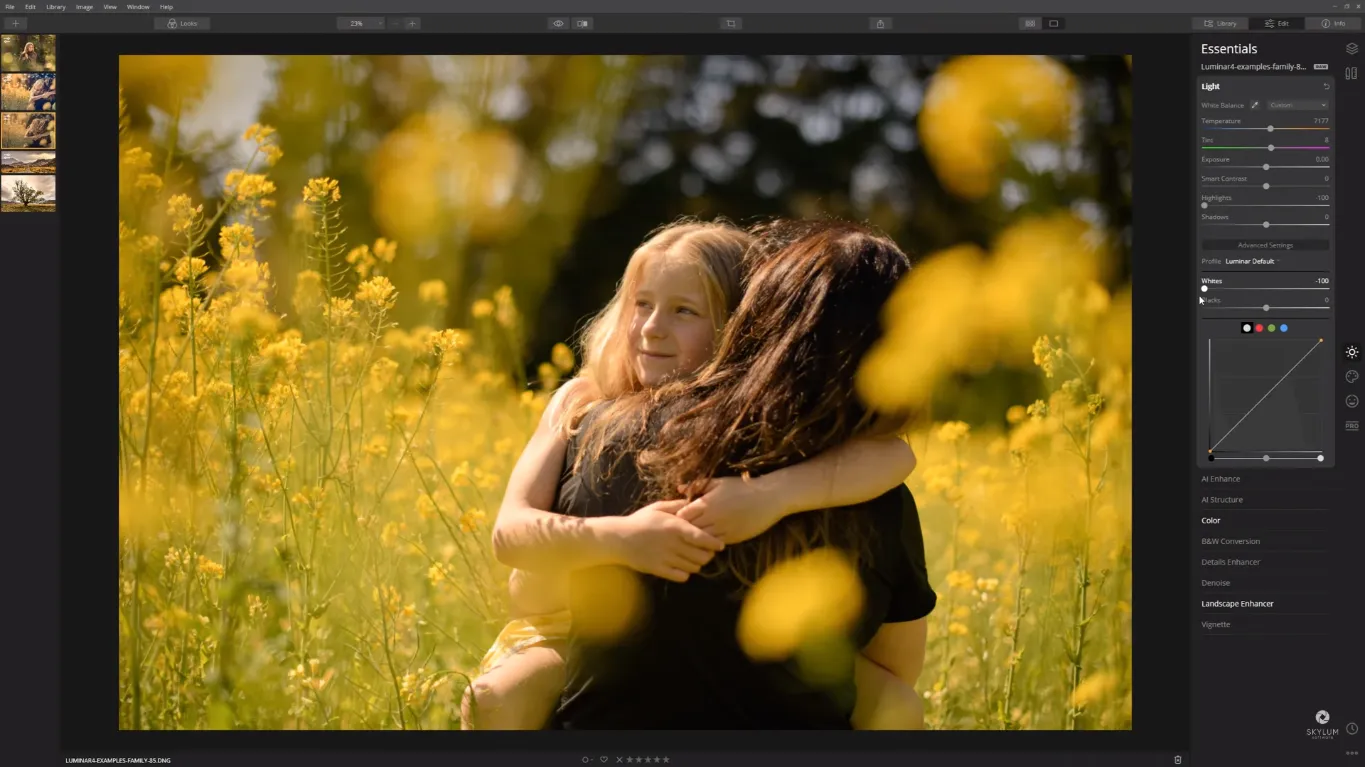
As you can see, Golden Hour is a pretty powerful tool that allows you to create that magical golden-hour effect, however, it often requires other tools to use in combination with it to enhance that look, especially with cold and desaturated photos.
AI Sky Replacement
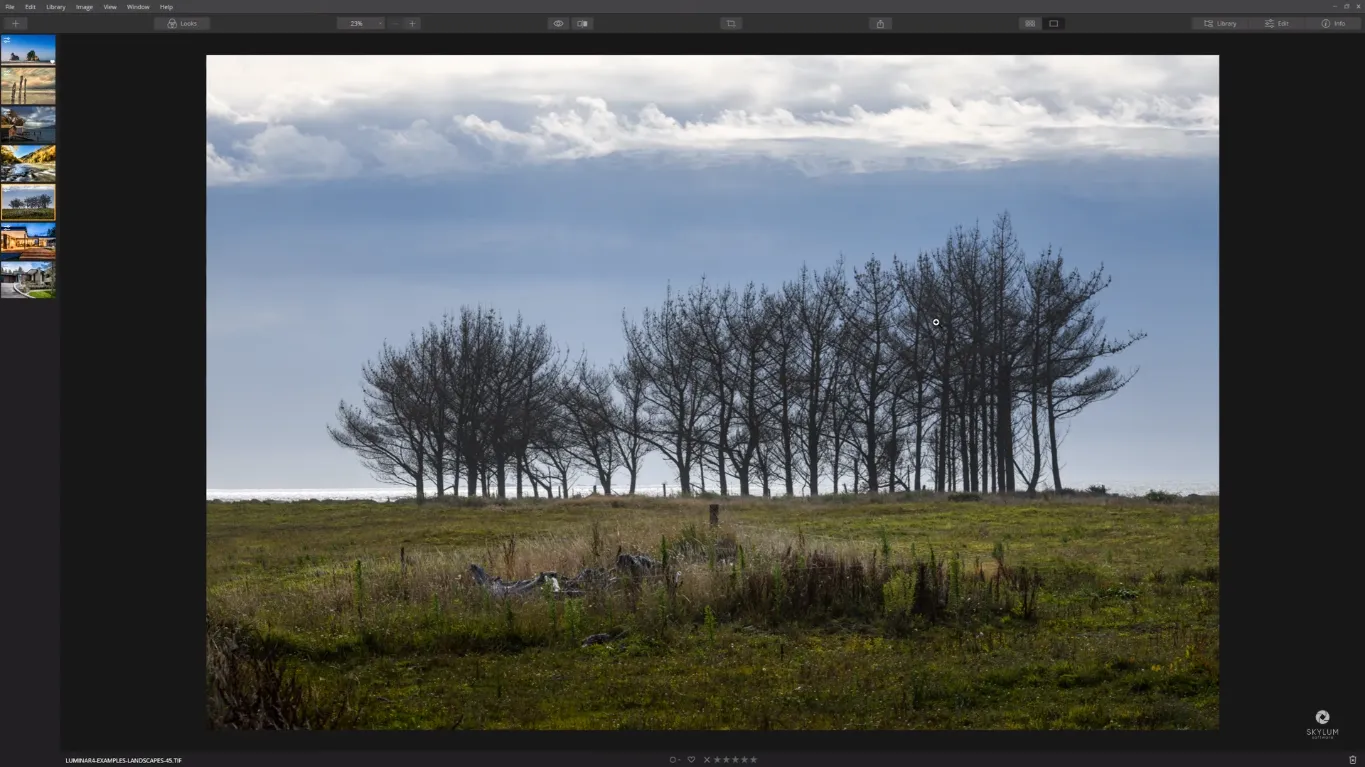
The AI Sky Replacement tool in Luminar 4 is an absolute game changer and is actually my favourite new addition to the software. If you’ve got a great photo but the sky is lacking in some way, the AI Sky Replacement tool can really take your photo to the next level. Usually, changing the sky in a photo would take a lot of effort masking out if you’re using another piece of software, but in Luminar 4, even such complex tasks can be achieved with just one click. Let’s see how we can replace the sky in this particular image:
Go to Side Panel and click on the AI Sky Replacement tool to open it up. To select a sky from the library of sample skies, click on the Select Sky button and choose a sky in the drop-down menu. If none of the skis that come with Luminar took your fancy, you can load your own sky by clicking the Load Custom Sky Image option at the bottom of the drop-down menu. I’ve looked through the skies and decided to go with Dramatic Sunset 2 for this particular image.
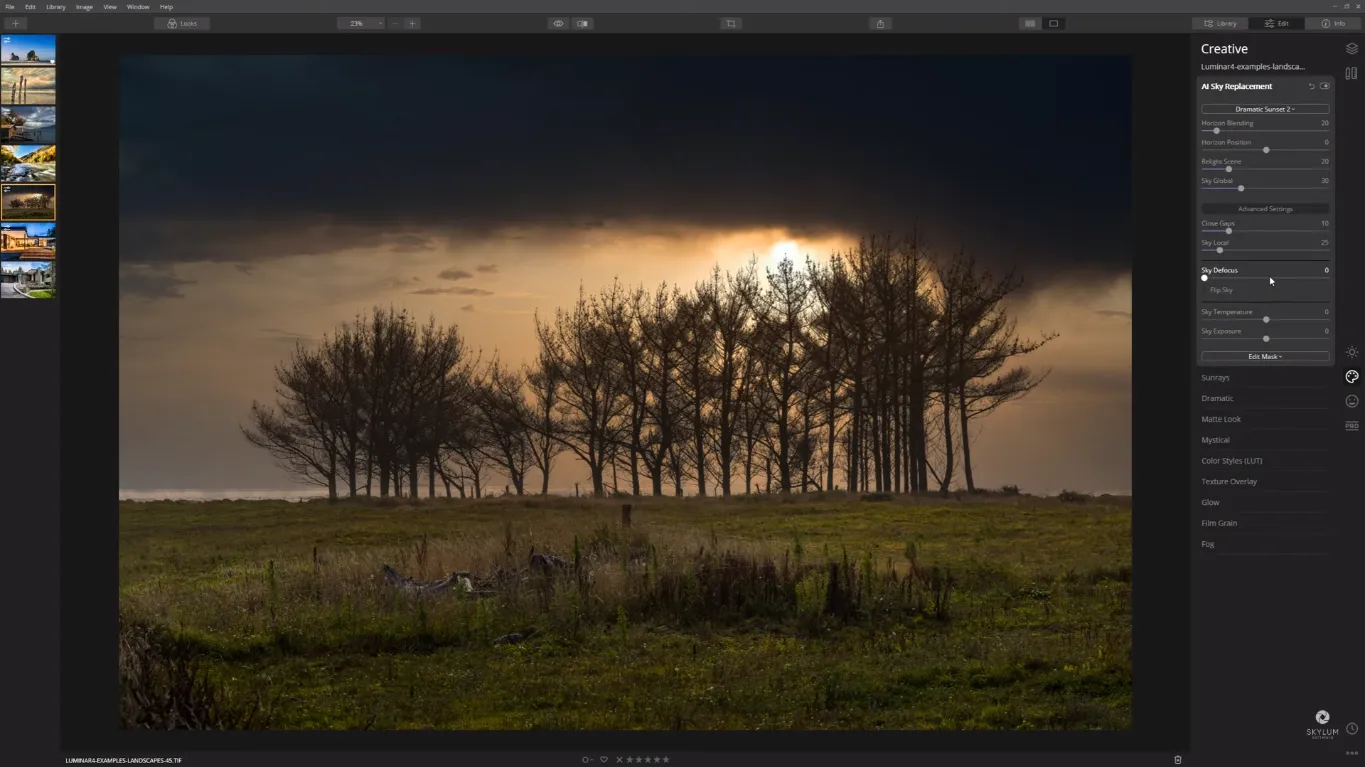
From here, let’s take a look at the different controls we’ve got and see how we can improve the effect:
Horizontal Blending deals with the transition between the horizon line and the sky. For this photo, I pushed the slider all the way up to blend out the area between the sky and horizon line to create a much more photorealistic blend.
Horizon Position. When you first bring your sky into Luminar, the AI will figure out where the horizon is, and it genuinely does a pretty good job of this. But if you want to override it, you can do that with the Horizon Position slider. You can take it up and down depending on how high or low you want to position your sky.
Relight Scene is one of my favourite sliders. It will match the colour of the foreground elements to what you’ve introduced in the sky.
Sky Global controls how much of the new sky you’ve introduced will blend with the existing sky.
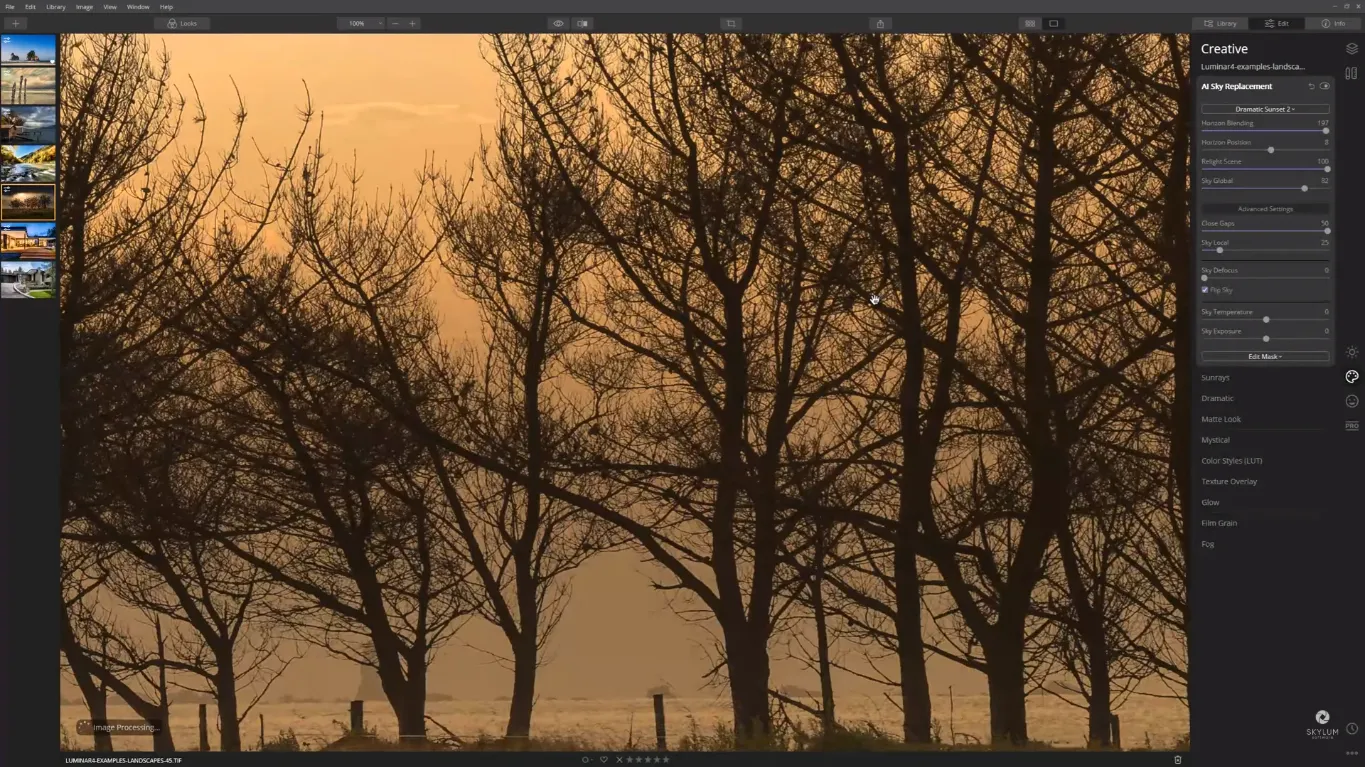
Close Gap fixes really small details where there might be holes that aren’t filled. The Sky Replacement tool usually does a very good job but sometimes it needs a little helping hand and this slider can really help. I pushed it all the way up and it introduced more of the sky and did a better job at masking the trees out. I zoomed in for you to see that that the mask is pretty much perfect now:
Sky Local brings out more of the existing clouds with the new sky you’ve introduced.
Sky Defocus actually defocuses the new sky. Use it when you feel like the new sky is too sharp compared to the foreground image.
Sky Temperature allows you to either warm things up by taking the slider to the right or cool them down by taking it to the left. What I think is the coolest about this slider is that as you move the Sky Temperature either way, the relighting of the scene is also adapting so the foreground gets cooler or warmer to match the temperature of the sky.
Sky Exposure allows you to change the exposure of the sky if it appears too bright or too dark.
This is my final result. Just look how dramatic and realistic the photo looks now:
Having this ability to swap out skies is really powerful and the fact that you can do it with such speed in Luminar 4 I think is just amazing. As I said, Luminar does come bundled with a selection of skies that you can use yourself straight from the drop-down list and that’s great for giving you some new options for your photos but if you want to take things one step further I would suggest you start collecting your own sky library. When you see some really cool skies out there – capture them so you can start importing your own work into Luminar.
As you can see, the speed at which you can swap out skies with Luminar’s AI Sky Replacement tool is phenomenal. I encourage you to play around with this tool and see where your creativity takes you.
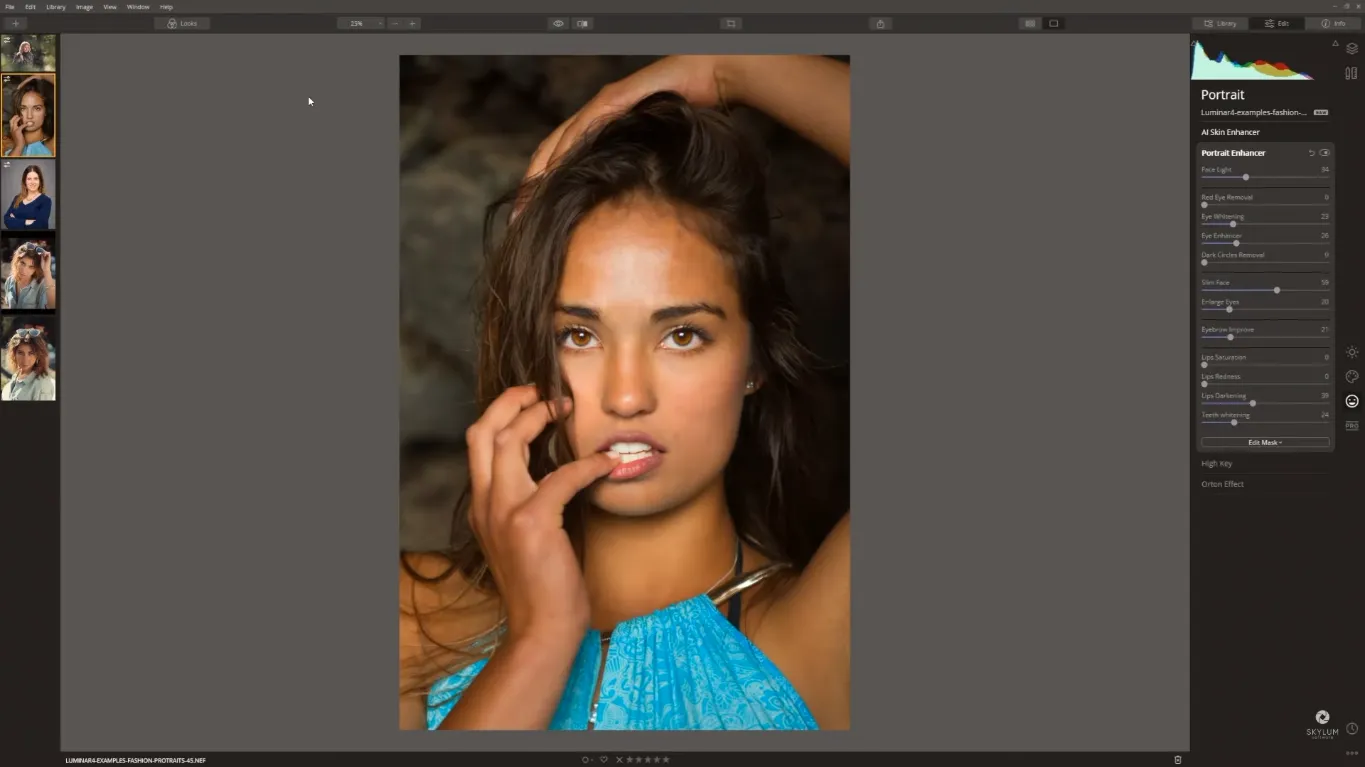
AI Skin Enhancer & Portrait Enhancer
Improving portraits in post-production is often a really time-consuming affair. You’ve got selection, masking, and you’ve got to have a boatload of retouching knowledge if you want to do it well. Thankfully, none of that’s necessary with the new AI portrait retouching tools in Luminar 4. These tools enhance your portrait images whilst keeping things natural letting your subjects look the way they feel. Let’s see how these tools work and what results you can expect using them on a portrait like this:
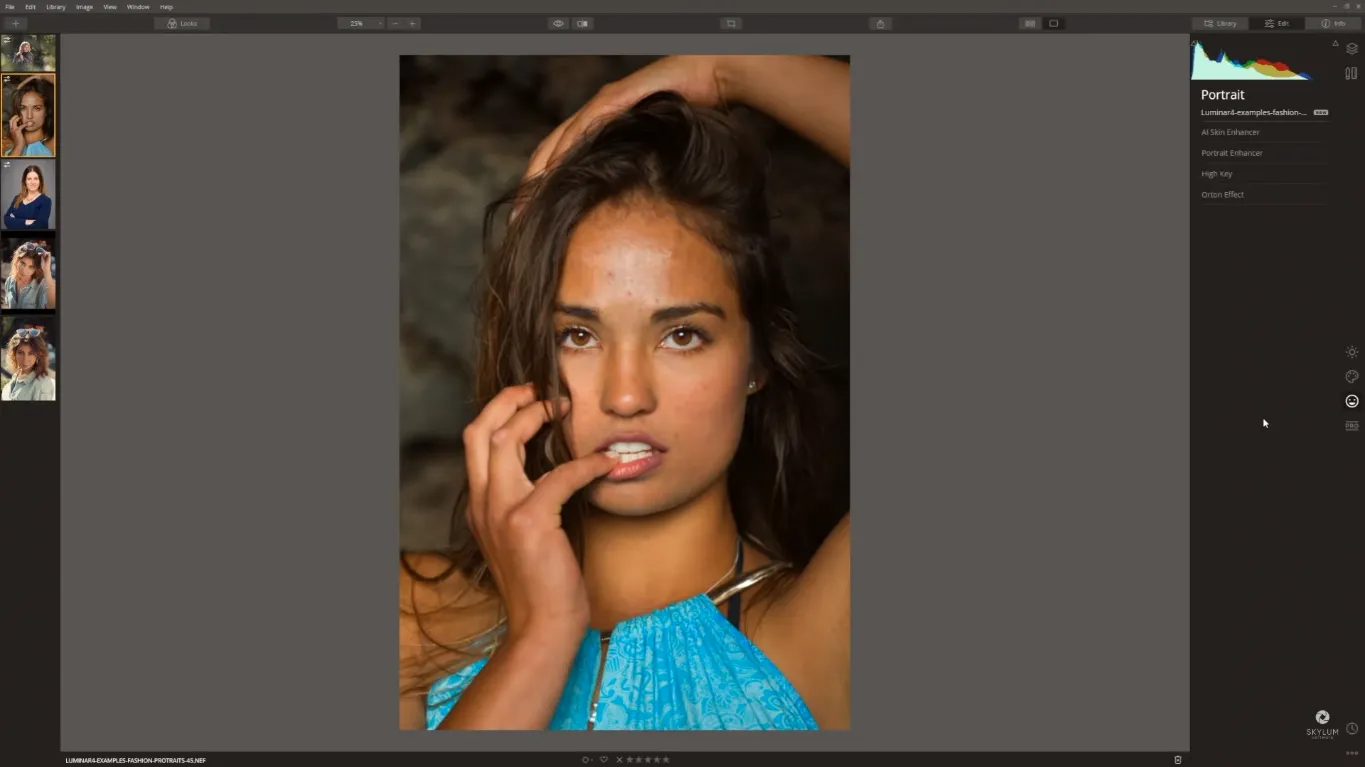
Let’s first see how AI Skin Enhancer can enhance our portrait. One thing that you can do is to tick the box that says AI Skin Defects Removal and then Luminar’s AI is going to analyze the face and immediately remove some of the skin defects. Increase the Amount slider which is going to soften the skin whilst leaving the pores intact. You don’t need to go to 100% if you want to achieve a very natural look. See how carefully AI Skin Enhancer removed the imperfections:

Let’s jump into Portrait Enhancer. This tool has a lot more sliders than the previous one. They allow you to enhance different parts of the face, like eyes, teeth, or lips. Make sure you use them with care as some of them can alter the structure of somebody’s face. Let’s have a closer look at each of these sliders.
Face Light is a really great tool to increase the light on your model’s face. It will make the face the brightest part of the image.
Red Eye Removal will get rid of any redeye which is a common problem when you’re shooting with flash.
Eye Whitening is for when you want to brighten the whites of the eyes.
Eye Enhancer is one of my favourite sliders here. Bring the slider all the way up to see how it enhances the iris and make the eyes pop. But don’t go too far with the slider if you want to keep the effect natural.
Dark Circles Removal allows you to get rid of any dark circles under the eyes.
Slim Face can change the shape of your model’s face to look slimmer.
Enlarge Eyes will actually make the eyes bigger.
Eyebrow Improve is a great way to darken and thicken up eyebrows.
Lips Saturation will increase the saturation of lips.
Lips Redness allows adding more redness to lips.
Lips Darkening will darken the lips.
Teeth Whitening will whiten your model’s teeth.
With this portrait, I really wanted things to be as natural as possible. As you can see, I only removed the skin defects, enhanced the eyes and brought more colour to the lips. Check out the final result:
As you can see, creating beautiful portraits faster than ever is easy in Luminar 4. You’ve got some really powerful sliders and really powerful tools at your disposal. Go out there and create some stunning portraits for your friends, family, and clients.
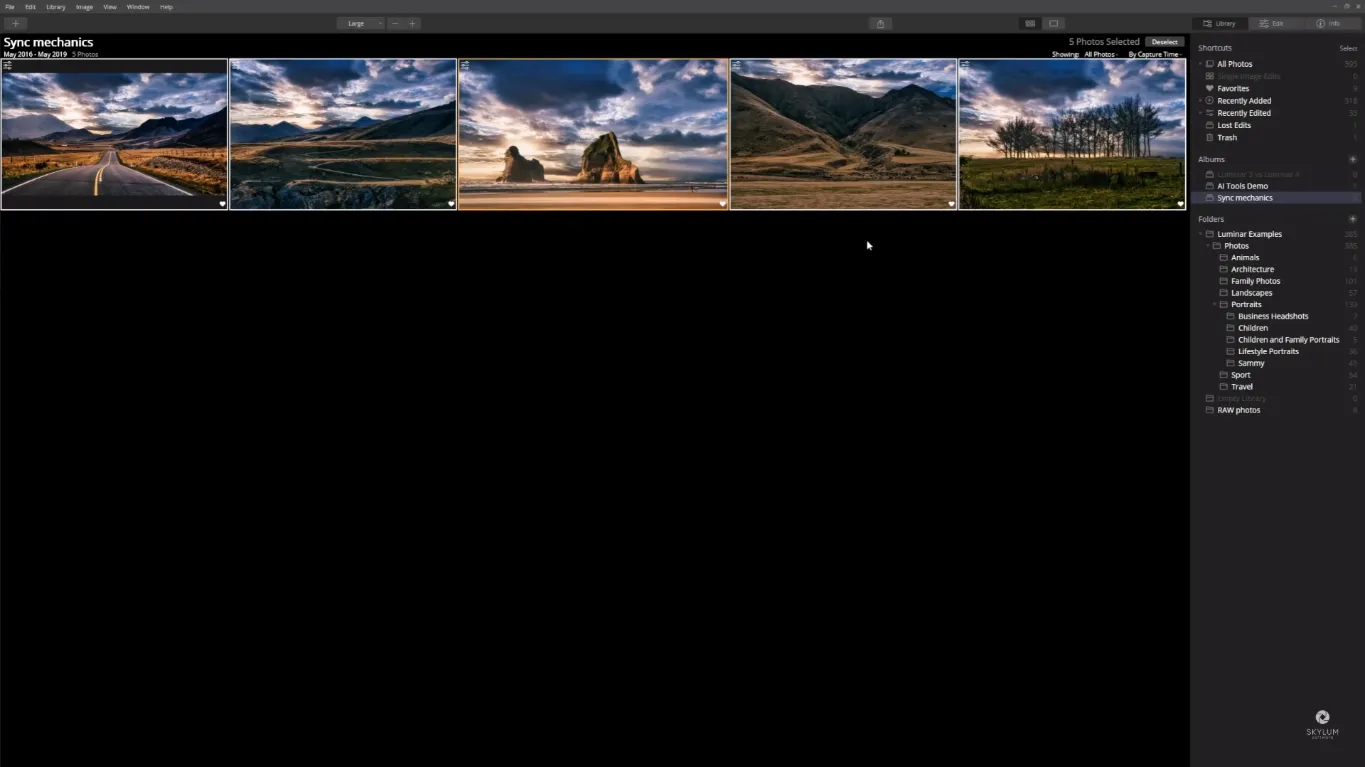
Batch Editing
When you’ve created a look that you’re happy with you can actually apply that look single or multiple images. To do that, you should first switch to the Library module. Then right-click (or control-click on Mac) on the photo you want to copy the look from, come to Adjustments, then Copy Adjustments and then select the images you want to apply it to and again right-click (or control-click on Mac) and come to Paste adjustments.
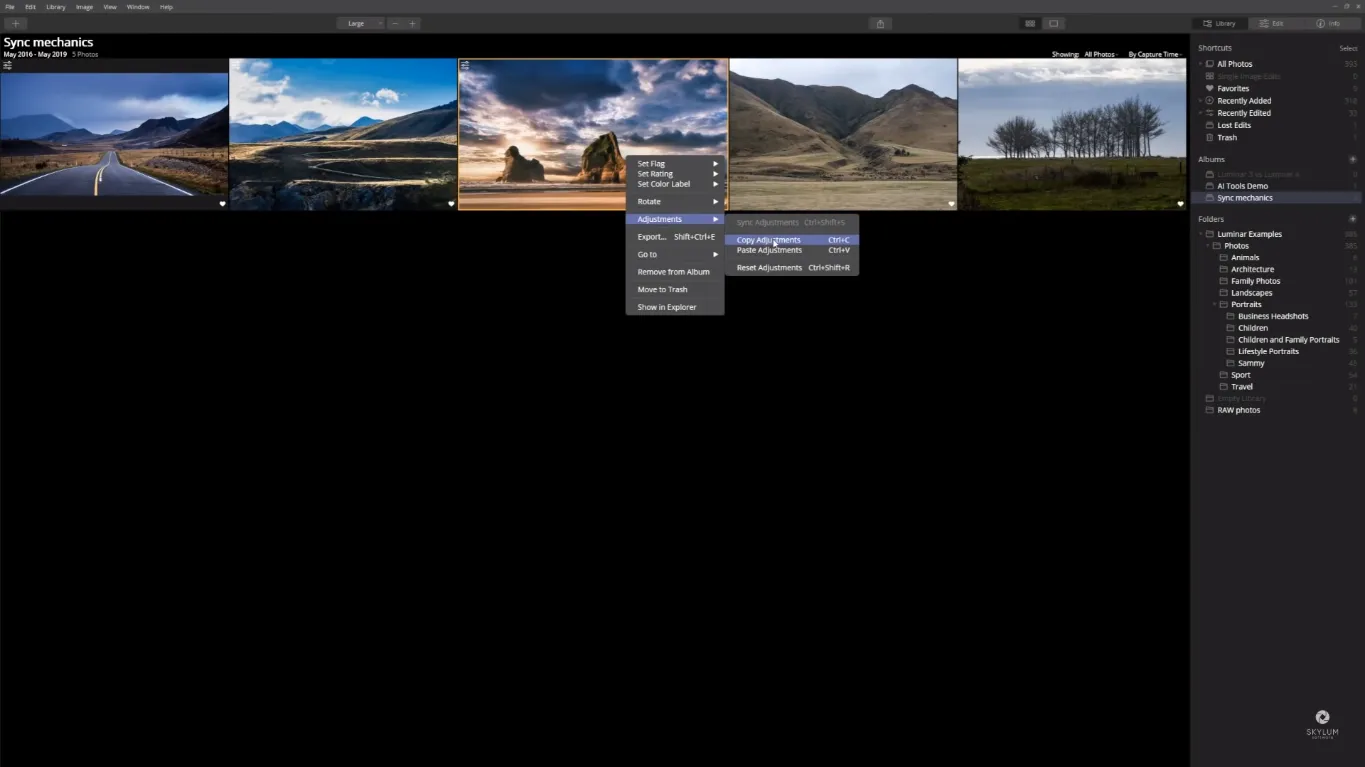
Just like that Luminar applies the effects along with any AI adjustments you’ve made. In this case, you can see that I’ve replaced the sky instantaneously in these other four images.
Final Words
Luminar 4 has everything you need for photo editing, and even more. With so many AI-based tools, Luminar makes it possible to create some really stunning results with a minimum of fuss and do it really quickly. Personally, I was just blown away by how powerful the AI Sky Replacement tool is and it’s just unbelievable how quickly you can enhance a portrait by simply dragging a couple of sliders.
Speed is what modern photographers are looking for in a photo editing tool. More speed in editing your photos means more time for you. That could mean more time out taking photos, more time spending your time with family and friends, or maybe taking up a new hobby. A lot of the tools within Luminar 4 do most of the heavy lifting for you so it’s even easier than ever before to achieve a really great result really quickly and easily.