Backlighting is a creative way to achieve silhouettes and is extremely popular in cinematic images. However, it doesn’t always work out and can become a real problem when it’s unintentionally included in your photos.
This usually happens when a photographer exposes for the subject in the foreground, which appears darker due to being backlit. By increasing the ISO or widening the aperture, the subject does become brighter, but so does the background. This can quickly lead to blown highlights, especially in areas like the sky, which can ruin the overall quality of the photograph. There’s also the issue of the viewer’s eye naturally being drawn to the brightest part of the image, pulling attention away from the intended subject and into the background.
It can feel like a disaster for your photo, and in some cases it may seem unusable. But this is something we can often avoid with the right approach. We’ll first look at how to prevent this from happening in the first place. Then, for situations where it can’t be avoided, we’ll use Luminar Neo to correct the issue and bring balance back into the image. Let’s get started.
Your AI-Powered Photo Editor for MacOS and Windows
How to Prevent Background Lighting Issues

The first step is to try and avoid the issue altogether. Ideally, you want to position your subject so that the light is hitting them from the front or side, rather than from behind. In simple terms, that usually means having the light source behind you. However, this isn’t always possible. We can’t move the sun like a studio light, and we don’t always have full control over the environment or the subject.
In situations where backlighting can’t be avoided, there are a few important things to keep in mind. First, you should shoot in RAW. These files offer a much wider dynamic range, meaning you can recover more detail in both the shadows and highlights during editing. Lifting shadows in RAW will retain more quality, whereas JPEG files tend to introduce noise and lose detail much more quickly.
Here’s the crucial part. You can recover far more detail from the shadows than you can from blown highlights. Once highlights are clipped, that detail is gone. With that in mind, it’s often better to slightly underexpose your image. As you set your exposure, aim to keep the brightest parts of the background just under clipping. Even if your subject looks a little dark, that’s fine, as it can be corrected later in post. In short, expose for the highlights.
You can also introduce more light onto your subject where possible. Using a reflective surface such as white card or a bounce board will help redirect light back onto them. Since you’re already facing the light source, this becomes an easy and effective way to balance the exposure in your scene.
How to Fix Background Light Issues with Luminar Neo
Luminar Neo comes with tools that can help with backlighting. Just be mindful that if highlights are fully blown, the lost detail is usually not recoverable. If the subject ends up a little underexposed, that’s fine, as RAW files give you much more room to lift shadows in post.
Develop: Head into the Develop tool and open the Masking menu. Use Mask AI to target the brightest part of the image.

With the background mask active, bring down Highlights and Whites first, then adjust Exposure slightly if the entire background is still too bright.

You can fine-tune further with the Tone Curve if needed. The goal here is simple: pull the background back into a usable range.
Next, go back to Mask AI and select your subject or foreground.

On a flower shot, that might be detected as Flora or a similar category, but if it isn’t, use Object Select or a brush to isolate it.
Elevate Your Photography with Our Advanced Software
With the subject mask active, lift Exposure and Shadows as needed to bring your subject back to life. From there, fine-tune Contrast and Blacks.

Once the balance is there, deselect the mask and work globally. At this stage the image will often look a bit flat, but that’s normal, as that is what we are going to be working on next.

Supercontrast: I’m a huge fan of Supercontrast. The level of control it gives really allows you to enhance the depth of your image, so I prefer to use this over the standard contrast tool. You’ll likely want to bring the Balance sliders for the highlights, midtones and shadows up slightly, and then adjust the Contrast for each depending on your photo. The midtones and shadows can usually be pushed a bit more to bring depth back into the image and stop it from feeling flat. This is a powerful tool, so use it carefully and build it up gradually.

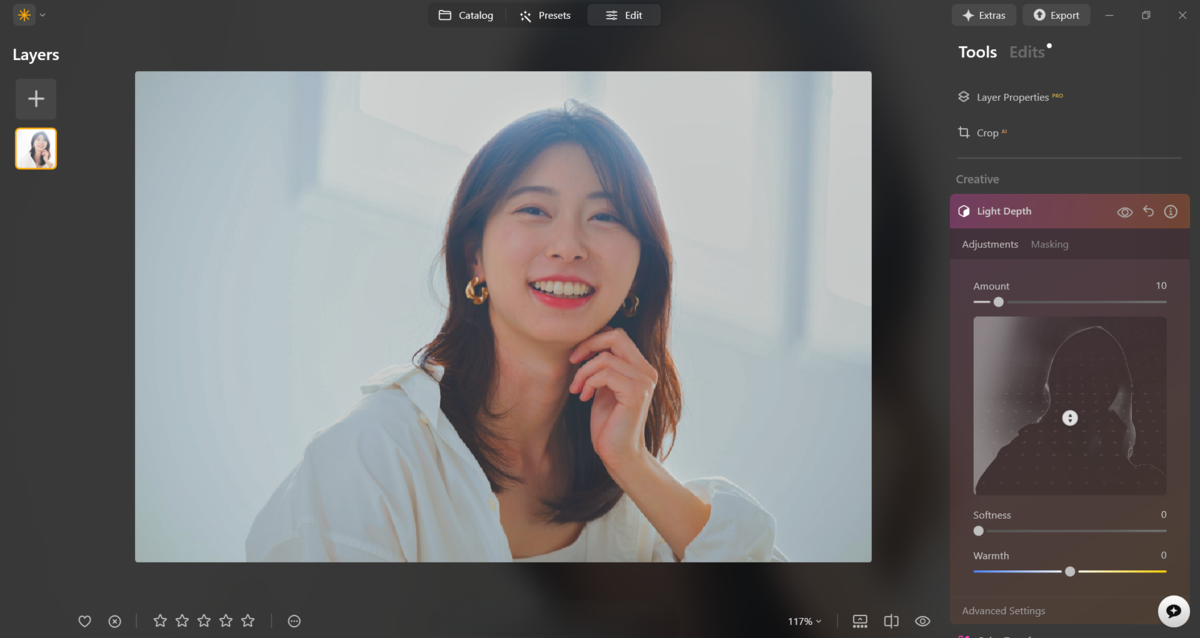
Light Depth: We can now fine-tune the image using the Light Depth tool. This maps your image in 3D space, allowing you to relight it in a much more natural way. Unlike traditional tools that brighten areas more globally, this one conforms to the depth and shape of objects, so the result feels far more realistic. You also have control over the softness and temperature of the light.
This is where you bring the focus back to your subject. Move the slider through the depth of the image until you reach your subject’s position. From there, increase the Brightness Near slightly and reduce the Brightness Far. You should see your subject stand out more clearly against the background.
Structure: The final step is to use the Structure tool. This should be used sparingly, but it can add a nice amount of clarity and detail, helping reinforce depth in the image.

Your photo should now feel far more balanced, with the subject clearly separated and the overall depth restored. From here, you can move on to colour grading and finish with small adjustments such as vignetting.

Exclusive Tools of Endless Possibilities in One Editor
The Bottom Line
Finding the perfect frame with an interesting subject can quickly fall apart if the light source is facing directly towards you, making it difficult to expose correctly. The usual beginner mistake is to push the exposure until the subject becomes visible, which then risks blowing out the highlights in the background. But as we’ve covered in this article, if you shoot in RAW, you can afford to leave the subject slightly underexposed to preserve detail in those highlights.
From there, you can move into Luminar Neo and use masking to balance the exposure across the image. Then head into Supercontrast to bring back depth by adjusting the shadows, midtones and highlights. Finally, use the Light Depth tool to help your subject stand out with natural-looking, dimensional lighting.
So the next time you run into this issue, keep these steps in mind and you’ll give yourself a much better chance of saving the shot.