Understand what Topaz DeNoise AI can do, how to preserve photo detail, and whether to keep it or choose a supported noise reduction tool.
A noisy photograph does not always need replacing. When the subject is sharp and the exposure contains enough usable detail, noise reduction can make distracting grain and colored speckles less noticeable. The challenge is keeping the textures that belong in the picture.
Topaz DeNoise AI was built for that balance. However, there is an important qualification for anyone reading a review today: DeNoise AI is a discontinued product, rather than Topaz’s current noise reduction application. Existing owners and new buyers therefore face different decisions.
This review assesses its documented capabilities and practical limitations, rather than presenting a new hands-on comparison or measured performance test. It explains where the legacy software can remain useful, what to check in its output, and how current alternatives fit different editing workflows.
Don’t feel like reading the whole breakdown? We’ve pulled together a quick summary below.
Key Takeaways
- DeNoise AI can remain useful for existing owners whose installation works and produces acceptable results on their files.
- It is no longer developed or supported. Topaz discontinued DeNoise AI in late 2023, so compatibility matters as much as image quality.
- Cleaner does not automatically mean better. Excessive reduction can smooth skin, feathers, foliage, and other fine textures.
- Topaz Photo is the current product to assess for a new Topaz purchase. DeNoise AI, Photo AI, and Topaz Photo are different applications.
- Luminar and Lightroom Classic offer other approaches. Choose according to file support, editing needs, hardware, and the software already in your workflow.
What Is Topaz DeNoise AI?
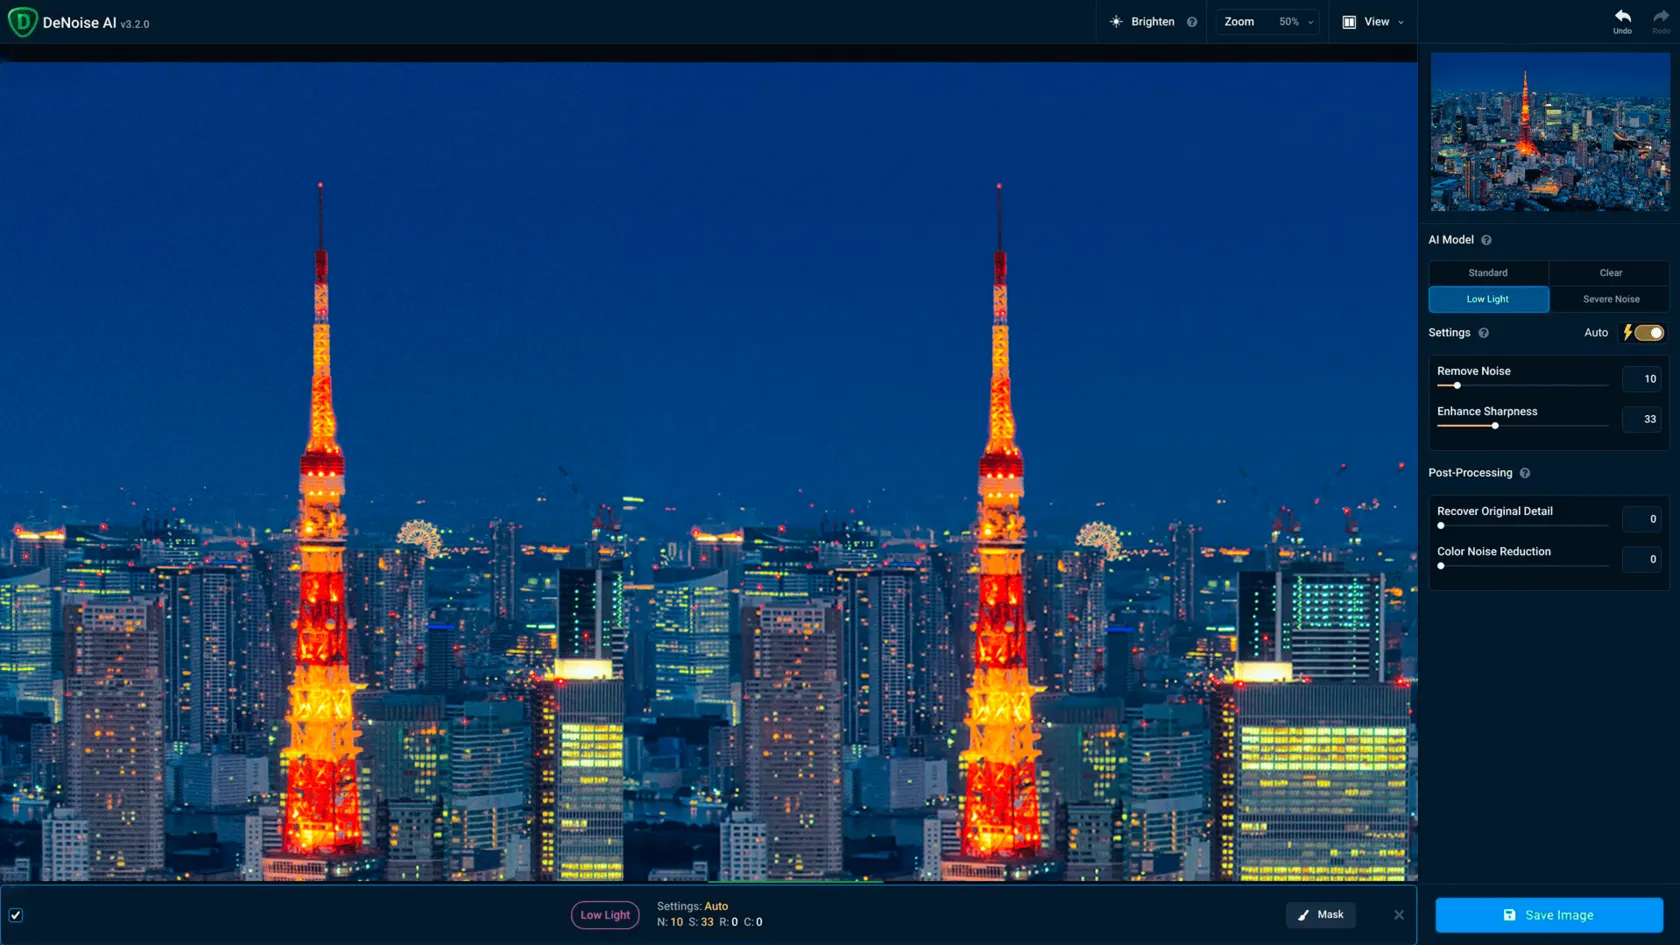
Topaz DeNoise AI is a dedicated desktop application for reducing digital image noise. Its appeal is focused processing: open an image, compare the correction, adjust the available controls, and export a cleaner version for further editing or delivery.
That makes it different from a complete photo editor. Noise reduction does not replace composition, exposure adjustments, color work, retouching, or preparing a collection for export. A photographer may use a specialist tool for selected difficult images while completing the rest of the job elsewhere.
Is Topaz DeNoise AI Still Available?
Topaz classifies DeNoise AI as legacy software. Existing customers may find their owned installers through the company’s legacy downloads, but that does not make it a supported current purchase.
Before relying on an existing installation, check that it opens a representative file, finishes processing, and saves the result correctly. A successful launch alone does not establish that the whole workflow works.
Exclusive Tools of Endless Possibilities in One AI Editor
How Does Topaz DeNoise AI Work?
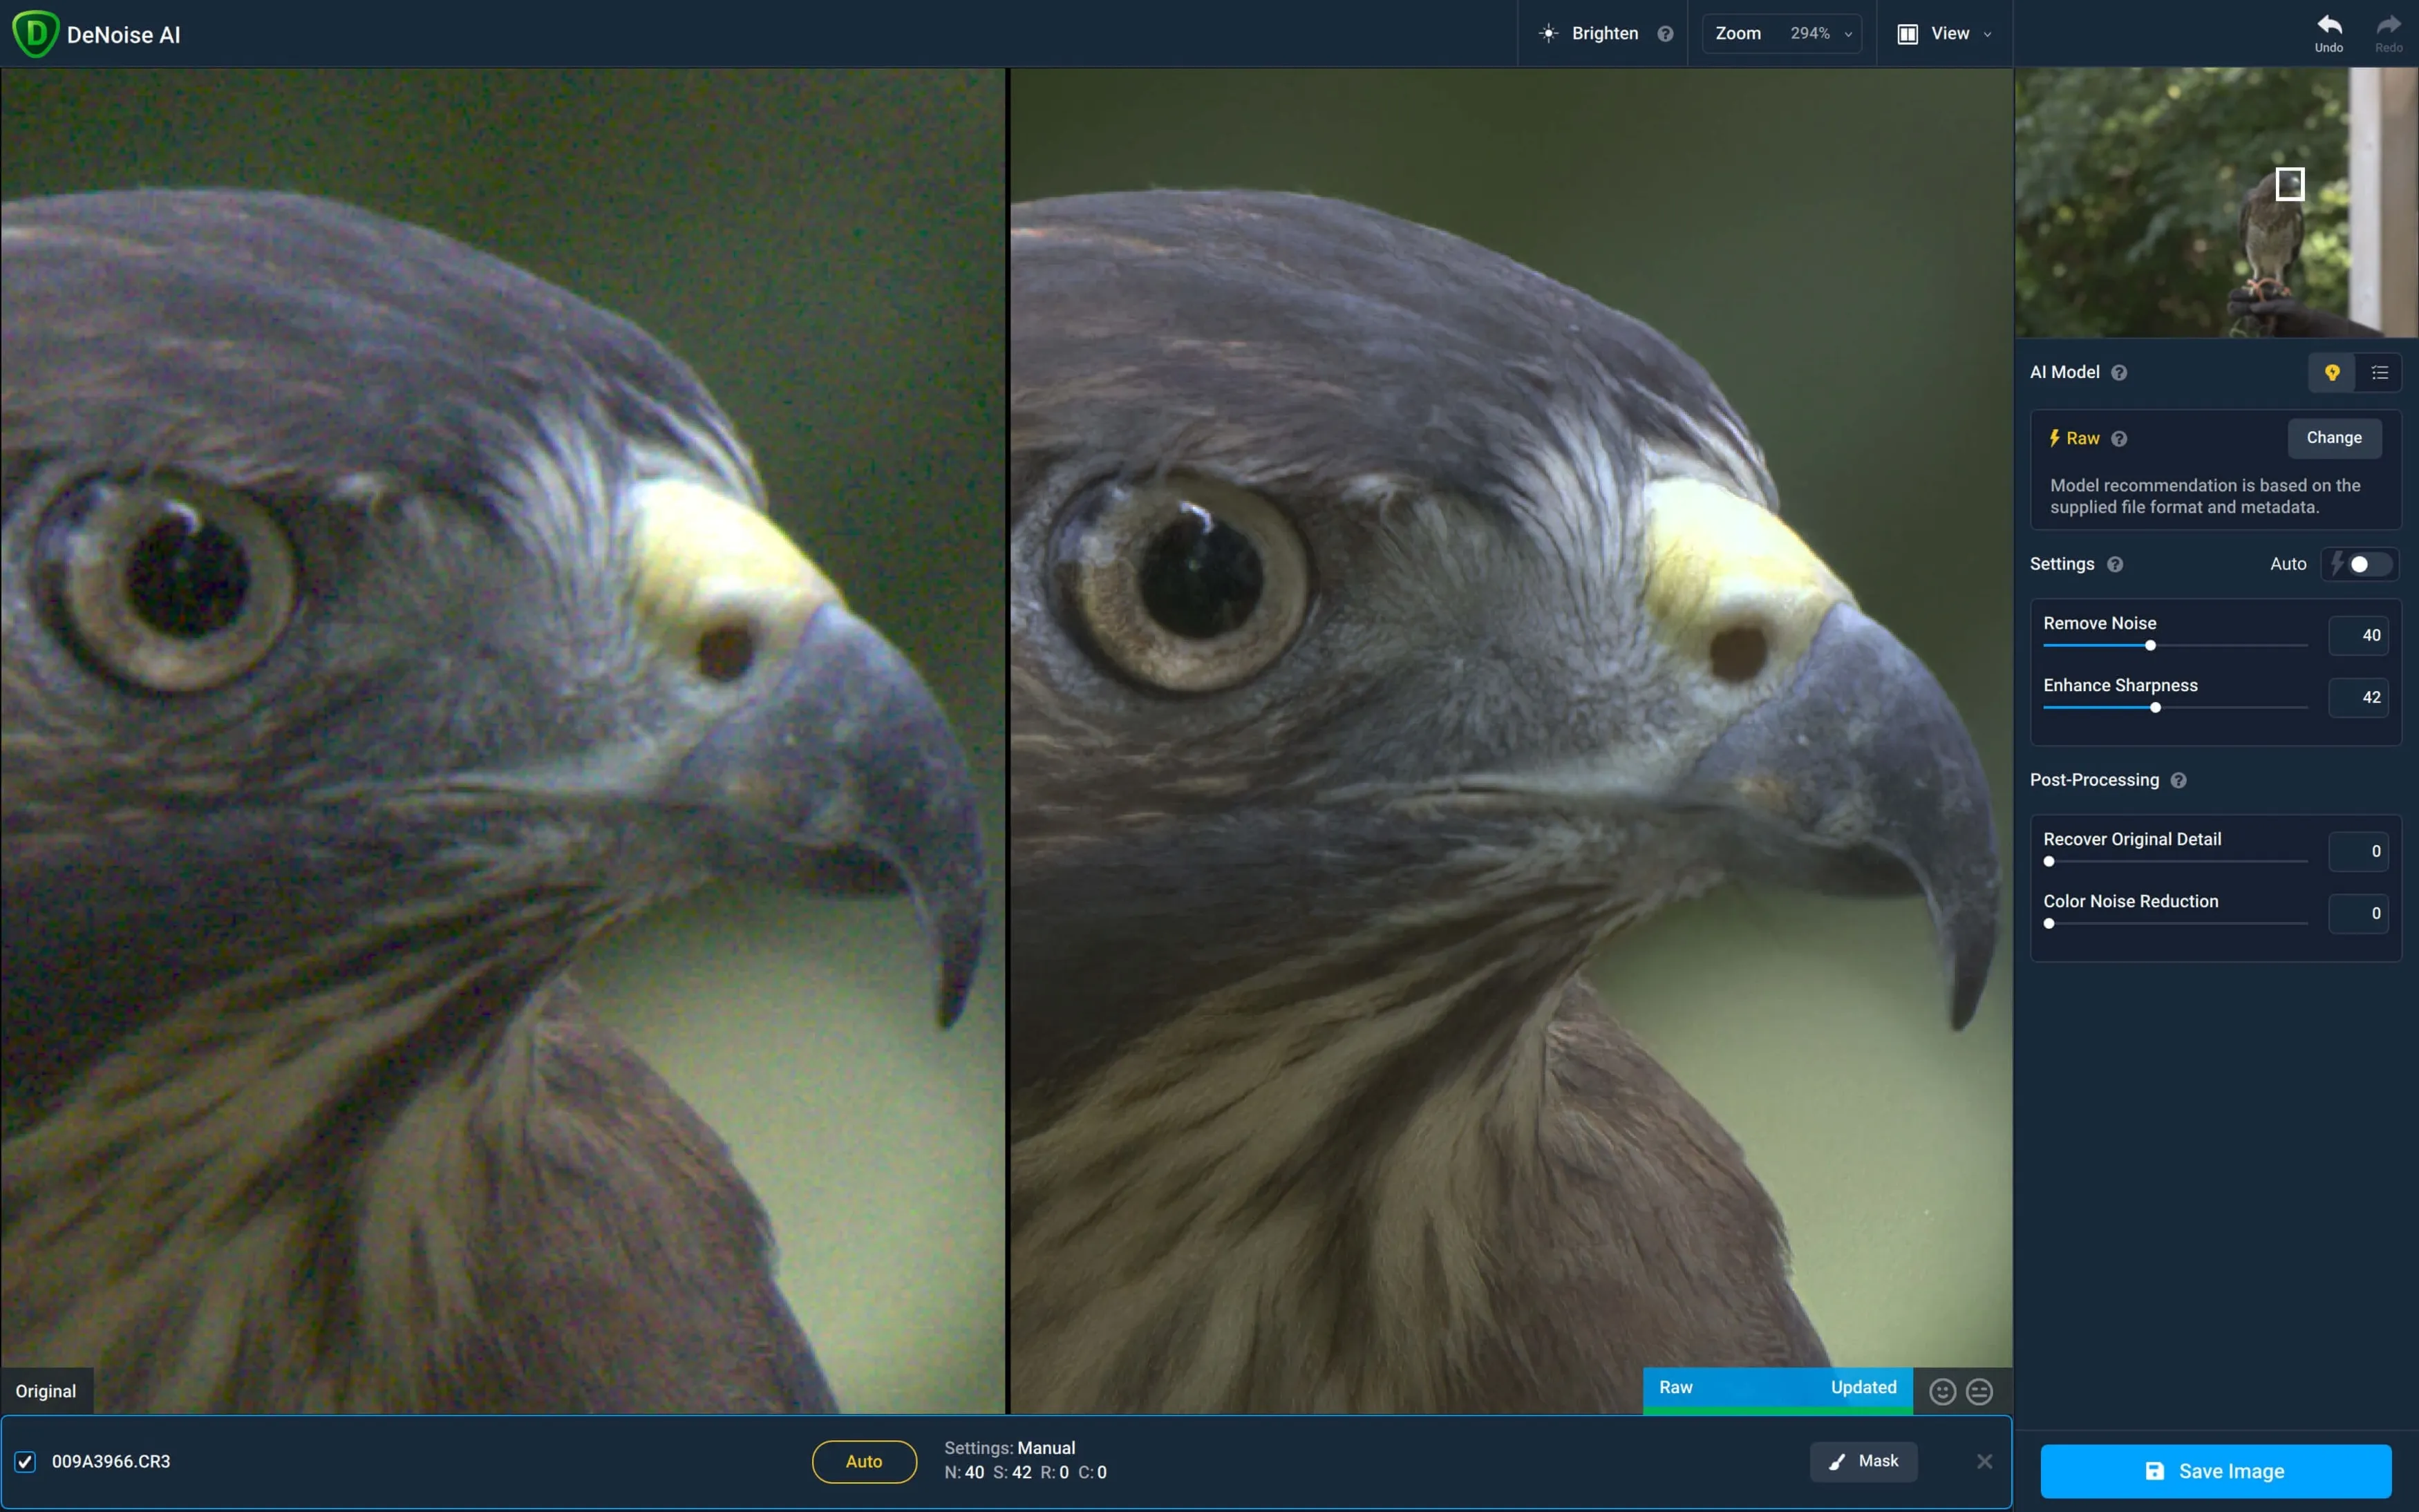
AI noise reduction estimates which image variations are unwanted noise and which belong to the subject. It then suppresses the former while attempting to retain useful edges and texture. That distinction is difficult: distant leaves, fine hair, fabric, and grain can occupy similarly small patterns in an image.
Two common problems are worth separating:
| Noise type | What it looks like | What to inspect after correction |
| Luminance noise | Bright and dark grain, often visible in shadows or smooth surfaces | Whether skin, fabric, and fine surfaces have become unnaturally smooth |
| Color noise | Random colored speckles or blotches | Whether genuine small color variations still look believable |
Noise often becomes obvious when a scene provides little light or when dark areas are brightened heavily during editing. High ISO frequently accompanies those conditions, but the amount of captured light also matters. Understanding the exposure triangle helps explain why a fast shutter speed in dim light can leave a difficult file to process.
DeNoise AI cannot guarantee that every retained texture is accurate or that every removed speck was unwanted. It also cannot reliably turn missed focus or substantial motion blur into a correctly captured photograph. Those problems require separate evaluation.
Topaz DeNoise AI: Pros and Cons

For an existing owner, the strongest reason to continue using DeNoise AI is a familiar process that still handles their images well. The strongest reason to move on is an unreliable or incompatible workflow.
| Pros | Cons |
| Dedicated noise reduction without navigating an entire editing suite | Discontinued, with no ongoing development or support |
| Automatic starting points and manual adjustment in supported versions | Strong settings can remove fine texture or create an artificial appearance |
| Useful for selectively processing difficult images | Separate processing adds steps and potentially extra files |
| Can remain practical within an established, working setup | Future compatibility is uncertain |
| Before-and-after inspection helps judge the tradeoff between cleanliness and detail | Results and processing time vary with the file, settings, and computer |
1. Focused Noise Reduction
A dedicated application gives a difficult photograph its own processing stage. Instead of applying the same correction across an entire collection, the photographer can spend time on the few images that need careful treatment.
For example, a wildlife session might contain mostly clean daylight frames and a handful taken after the light faded. Processing only those selected files can be more practical than sending everything through an additional application.
The benefit is control over individual photographs. It does not establish that DeNoise AI outperforms every built-in denoiser or that a separate application is necessary for every shoot.
2. A Balance Between Noise and Texture
The intended advantage of AI processing is a cleaner image with useful detail retained. Whether that balance succeeds depends on the source photograph and the settings.
A bird against an even sky offers a straightforward comparison: the sky should look less distracting, while the feather structure remains coherent. If the bird becomes painted or small feathers merge into broad patches, the correction has gone too far.
The best setting may leave a little visible grain. A believable photograph with some noise is often more useful than an extremely smooth image with altered texture.
3. Automatic and Manual Adjustment
Automatic processing can provide a starting point, especially when working through unfamiliar files. Manual adjustment becomes important when the subject contains detail that the initial correction handles poorly.
The available controls and processing options depend on the installed version. Use them to compare different treatments rather than assuming that the strongest setting is the most effective one.
4. A Familiar Workflow for Existing Owners
A photographer who already understands the application may have little reason to replace it for occasional work if the output remains suitable. Familiarity can reduce the time spent learning a new interface and adjusting an established process.
That is a reason to evaluate the installation already owned. It is not a reason for a new buyer to seek out an obsolete product.
Where DeNoise AI Falls Short

Compatibility Is the Main Concern
Legacy software can stop fitting an otherwise updated workflow. An operating-system change, a new host editor, or a different camera file may expose a limitation that did not affect earlier jobs.
Keep original files and completed exports independently of the application. Before changing an essential workflow, check a small set of representative images rather than discovering a problem during a deadline.
Detail Can Be Smoothed or Misinterpreted
Portraits, wildlife, and macro images contain textures that are easy to damage through overprocessing. Look for waxy skin, broken feather patterns, softened eyelashes, and surfaces that seem sharper at first glance but no longer match the original.
Additional sharpening can make these problems more obvious. Avoid automatically applying strong sharpening in DeNoise AI and then repeating it in another editor.
Processing Time Needs a Real Test
There is no useful universal processing time for every computer and image. Resolution, the selected processing method, available hardware, and file handling all influence how long a job takes.
Measure the complete workflow: opening the file, waiting for previews, making adjustments, exporting, and returning to the main editor. A tool that processes one image acceptably may still be inconvenient for a large collection.
Likewise, batch processing should be assessed with a mixed sample. Uniform settings may clean a smooth background effectively while oversmoothing the subject in another frame. Without a controlled comparison, calling DeNoise AI’s batch processing categorically slow or limited is not a meaningful verdict.
It Adds Another Editing Stage
A separate application can mean additional exports, disk space, and file naming decisions. Check whether the benefit is visible at the size in which the photograph will actually be used.
If the improvement is only apparent at extreme magnification, processing every file may add work without improving the delivered collection.
Exclusive Tools of Endless Possibilities in One Editor
How to Use an Existing DeNoise AI Installation Effectively

The exact interface varies by version, but the following approach keeps the decision focused on image quality.
1. Start With the Best Source File
Use the original capture or a high-quality working file rather than an image downloaded from social media. Repeated compression can add artifacts that complicate noise reduction.
When working with RAW, confirm that the application supports the exact camera and format. A RAW photo editor provides flexibility for exposure and white balance, but importing a file successfully does not guarantee access to every RAW-specific processing feature.
2. Establish a Conservative Starting Point
Begin with the automatic suggestion or a moderate correction. Compare the result with the original before increasing strength.
Choose an area that contains both noise and genuine texture. An empty sky shows smoothing easily, but it does not reveal what has happened to a face, a coat, or nearby foliage.
3. Inspect More Than One Area
At 100% magnification, check the main subject, deep shadows, fine patterns, and high-contrast edges. Then zoom out to assess the photograph as a whole.
| Area | A useful result | A reason to reduce processing |
| Skin | Less distracting grain with natural texture | Waxy surfaces or disappearing facial detail |
| Hair and feathers | Individual structures remain plausible | Clumped, broken, or invented-looking patterns |
| Smooth sky | More even appearance | Banding or unnatural patches |
| Fine text and edges | Readable shapes without distracting grain | Halos, distorted lettering, or brittle outlines |
| Dark foliage | Less distracting noise with visible structure | Broad smears replacing leaves or branches |
4. Adjust Sharpening Separately
Judge noise reduction first, then decide whether the image needs sharpening. Reducing grain can change how sharp an image appears without requiring a large additional boost.
If another editor applies sharpening automatically, account for that setting before exporting. Two moderate corrections can combine into an excessive result.
5. Save a Copy and Check the Export
Keep the original unchanged. Open the saved result, check its dimensions and appearance, and inspect it at the intended viewing size.
Make the final crop part of this assessment: a tight crop enlarges remaining noise and processing artifacts. An image that works as a small full-frame photograph may need a different treatment when cropped heavily.
Which Photographers Can Benefit?

Wildlife and Action Photographers
Fast shutter speeds can be essential for moving subjects, even when light is limited. Noise reduction may help make backgrounds less distracting while keeping the chosen moment usable.
Check the subject carefully. A sharp eye and believable feather detail matter more than a perfectly smooth background. Denoising cannot compensate for a frame in which the essential feature was never in focus.
Night and Low-Light Photographers
Dim interiors, evening streets, and night landscapes often contain noisy shadows and small bright details. Moderate reduction may improve the image, but aggressively lifting an almost empty shadow can reveal limits that processing cannot solve.
Astrophotography requires particular care. Compare small stars and faint structures with the original so that processing does not erase or alter them. A clean-looking sky alone is not sufficient evidence of an accurate result.
Portrait and Macro Photographers
Noise reduction can help when a portrait is made indoors or a macro subject requires a fast exposure. Both subjects also make texture loss conspicuous.
Inspect eyes, eyelashes, hair, skin, and tiny repeating structures. Keep the correction proportional to the finished image rather than trying to remove every visible speck at maximum magnification.
Your AI-Powered Photo Editor for MacOS and Windows
Alternatives to Topaz DeNoise AI: Luminar
Luminar suits photographers who want to reduce noise and continue adjusting light, color, and composition in the same editor. Its Noiseless AI tool works with RAW and non-RAW images, offers Low, Middle, and High starting points, and includes controls for luminance noise, color noise, detail, and sharpness.
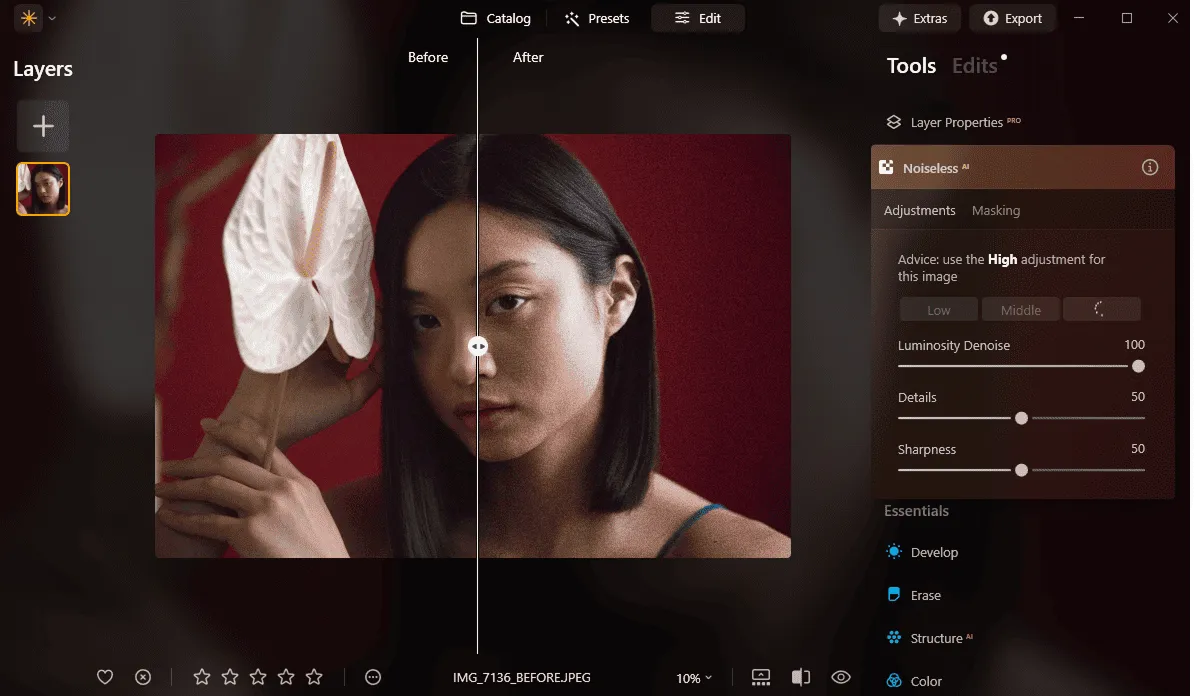
This makes it useful for a selected travel, wildlife, or portrait collection that needs more than noise removal. After a restrained correction, continue with photo color adjustments and review the complete image. Increasing contrast or lifting shadows can change how visible residual noise becomes.
The relevant advantage is an integrated workflow. Whether its denoising suits a particular photograph still requires an actual comparison; it should not be described as automatically matching or beating Topaz.
FAQ
Yes. It is a legacy application that Topaz no longer actively develops or supports. An existing installation may remain usable, but it should not be treated as a current supported product.
No. DeNoise AI is the older dedicated denoiser. Topaz Photo is a different, current subscription-based application with a wider set of enhancement tools. Photo AI is another distinct product and is now legacy software.
Noise reduction and blur correction address different problems. A photograph may appear clearer after distracting grain is reduced, but missed focus and significant subject movement cannot be assumed to disappear.
Usually, evaluate noise reduction before adding substantial sharpening so that sharpening does not exaggerate grain. Follow the chosen application’s RAW workflow and check whether another editor is applying additional sharpening automatically.
Topaz Photo is the current Topaz application to assess. Luminar combines Noiseless AI with broader editing tools, while Lightroom Classic offers integrated Denoise for supported files. Compare output, compatibility, processing time, and the total workflow before choosing.