It can come as a surprise to photographers just starting out that you can achieve high-quality indoor portrait shoots using nothing more than a window as your light source. They may be even more surprised to learn that professional photographers, including some of the best in the world, still enjoy using window light even when they have access to expensive lighting equipment.
Natural light is special. It can be incredibly flattering for your subject, with light spreading evenly across the face. Pair that with a cloudy day and you get soft lighting that evens out skin tones and helps conceal blemishes, providing a result similar to a giant studio softbox. So if you have a beautiful interior that is well lit by windows, don’t rush to close the curtains and bring out your studio lights, make the most of what’s already there.
We’re going to give you five tips in this article to help you achieve professional results. And if your space feels a little dark, don’t worry, we’ll also cover some low-cost tools that can help you out. Let’s get started!
Exclusive Tools of Endless Possibilities in One Editor
Tip 1: Choose the Right Window and Light Conditions

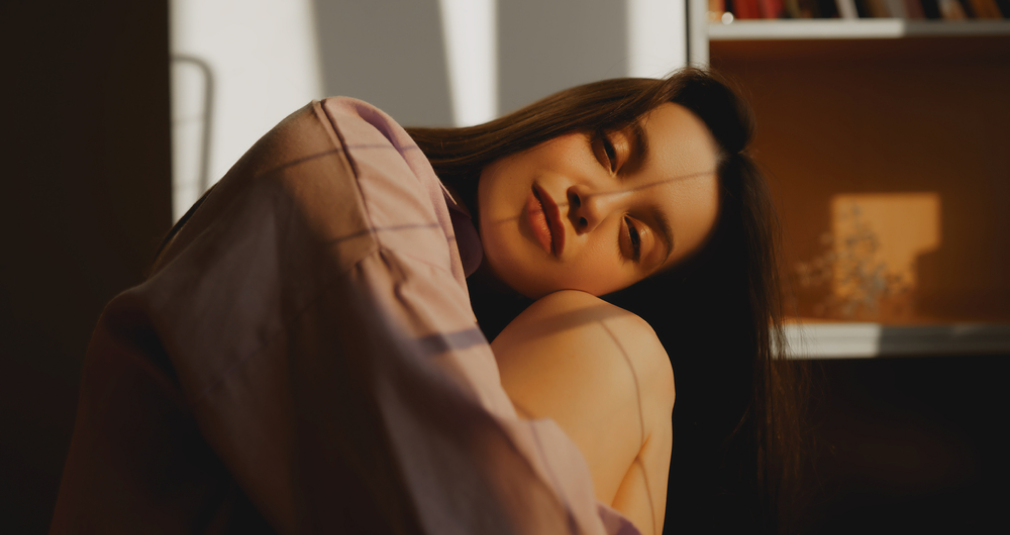
The type of weather you get on the day of shooting will heavily impact the style of shoot you achieve. As mentioned in the introduction, cloudy weather acts like a giant softbox, giving you soft, flattering and even light. Sunny days can be a little trickier to shoot in. You are going to get harsher light that can bring out blemishes and create uneven lighting, with stronger shadows forming on the face. If you’ve got a number of windows to choose from, experiment with those that don’t have direct sunlight coming through yet still provide ample lighting. You can definitely still shoot on sunny days, but you may need to do more work in post, which we’ll touch on later in the article.
However, you can also get creative and use techniques to soften the light. If you have voile curtains on hand, they will do a great job of diffusing the light while still letting plenty through for crisp images. You can also look at other materials such as sheer fabric, baking paper, or even a cheap shower curtain. These all act as diffusion and help reduce harshness.
Get creative and find ways to soften strong light if you’re struggling with unflattering results.
Tip 2: Control the Distance from the Window

The size of the window can impact the shoot as well, relative to how large it appears compared to your subject. Larger windows will provide softer and more even light, whereas smaller windows will produce more directional light with stronger shadows, as the light doesn’t wrap around the subject as easily.
There is also a quicker fall-off with smaller windows, so if your subject stands further away you may find you need to raise the ISO, which can introduce grain. I’ve been surprised at just how much difference even a small change in distance from the window can make, and it’s something to be very mindful of. This becomes particularly important when you need consistency across your shots. If your subject is moving around a lot, you may find yourself constantly adjusting exposure settings or needing to brighten images in post. These changes tend to be more noticeable with smaller windows. A larger window gives you more room to work with and allows your subject to move more freely while maintaining consistent light.
Above all, keep your subject close enough to the light source so you’re not forced to push your ISO too high and introduce unnecessary noise into your images.
Tip 3: Use Angles to Shape the Face

Just because we aren’t using studio lights doesn’t mean we can’t use studio lighting techniques, we just need to make a slight adjustment. When it comes to lighting styles in the studio, the photographer moves the lights around to achieve different looks, which isn’t possible when our light source is the sun. Instead, we adjust the angle of our subject in relation to the window.
Turn them to a 45-degree angle to the window and you’ll get that classic portrait look with a natural light falloff across one side of the face. You can get more dramatic by having them stand side-on to the light, so that half of the face falls into deeper shadow. Front lighting will provide clean, lifestyle-style lighting with minimal shadows. Or my favourite, backlighting, which can give a more cinematic look.
Experiment and direct your subject to achieve a variety of different looks, and find what best suits your vision for the shoot.
Your AI-Powered Photo Editor for MacOS and Windows
Tip 4: Control Shadows with Simple Tools

Additional tools may need to be brought in to help you shape the light in your scene or on your model. But don’t worry, all of these are inexpensive and you may even have them lying around your house already.
As mentioned above, fabrics can be a great way to soften the light in your shot. Voile curtains and sheer fabrics are both fantastic choices, as are materials like baking paper and even shower curtains.
You can also control the light within the room itself. If you notice that your subject’s face is too shadowed, you can easily bounce light back onto them. Reflectors can be picked up online for very little, but at their core they are simply white surfaces. You can achieve the same effect by sticking white paper onto some cardboard. Any white surface will give you some degree of bounce to illuminate the shadowed side of your subject.
You can also go the complete opposite way and deepen the shadows on your subject’s face if you are aiming for more dramatic and cinematic portraits. All you need to do is hold up a black material instead, which will absorb any light being reflected back onto the face and create denser shadows.
If you’ve never tried using black materials to deepen shadows, I highly recommend it, you’ll get some really unique results.
Tip 5: Simplify the Background

Knowing that light can fall off quite quickly when shooting with a window as your light source, it doesn’t make much sense to spend a great deal of time perfecting your background. You may notice as you look through your viewfinder that not much is visible, and if you try to compensate by increasing the exposure, you risk overexposing your subject.
Therefore, keep your background simple, or even exclude it altogether by using a wide aperture and enjoying some beautiful bokeh instead.
However, there will be times when you want the background to provide context and enhance the theme of your image. I’ve done this myself with long alleys trailing behind, with neon lights dotted in the background. But I’ve never done it at the expense of overexposed skin tones or a distracting scene. So play to the strengths of your environment. If you want to include more of the background, you may need additional lighting. Otherwise, keep it simple and let your subject take all the attention.
Editing Tips for Window Light Portraits with Luminar Neo
Luminar Neo has some extremely useful tools for situations like this, where lighting can feel somewhat restrictive. Not to say that window lighting is bad, but as we can’t move our light source, we may run into some challenges. It also has great portrait-dedicated tools as well, so let’s take a look.
Light Depth

This is a newer tool and one that I absolutely love. It creates a 3D map of your image, allowing you to relight your shot in a 3D space. You can move the light through your image, lighting up areas of the foreground, subject, or background.
The best part is how well it conforms to the shapes within your scene, so the light behaves in a much more realistic way. You simply move the slider through the depth of the image, and from there you can adjust the intensity, temperature, and tone of the light.
I seriously can’t recommend this tool enough. It’s a lot of fun to use, so give it a try.
Studio Light

If you want to add an additional light source to your image with a bit of style, give Studio Light a try. You can place it anywhere in your image and adjust the intensity, tone, and temperature. There’s also an additional set of controls that really make Studio Light stand out allowing you to add realistic textured and patterned shadows to your subject to introduce a more stylised look. My favourite is the Shutters setting, which creates striped highlights across your subject and adds that extra bit of interest to help make your shot stand out.
Face Light

If your subject is struggling to stand out in your image, it may be that their face isn’t bright enough compared to the surroundings. Instead of increasing the overall exposure, which often doesn’t work, or spending time manually dodging, you can use the Face Light tool. It automatically detects the face in your image, so all you need to do is adjust the intensity. This tool has saved me a great deal of time and I consider it essential for portrait editing.
Elevate Your Photography with Our Advanced Software
The Bottom Line
A simple window can have a massive impact on your indoor shoot. Whether you are a beginner or a seasoned professional, a window can often be preferred over studio lighting, as natural light can look just as good, if not better, depending on what you’re trying to achieve.
The best part is that it’s a free light source, easily accessible, and all you need to do is place your subject in front of it. Working with natural light, especially on overcast days, provides beautiful, even lighting that is extremely flattering for your subject. On sunny days, fabrics and other methods can help soften the light if it feels too harsh. Either way, working with window light is a treat and works perfectly for indoor shoots, so be sure to give it a try.