Learn which settings to tweak, what tools to tap, and how to get clean, natural photo edits on your iPhone in less time.
iPhone cameras already take great photos, but manually adjusting colors, retouching skin, and cleaning up the background still take a lot of time. AI-powered editing tools are changing that—with one tap, you can correct colors, skin tone, or replace a dull sky. This guide explains how to edit photos on iPhone with AI using artificial intelligence. From setting up your phone and choosing the right app to avoiding the most common mistakes users make.
Don’t feel like reading the whole breakdown? We’ve pulled together a quick summary below.
Key Takeaways
- Prep Your iPhone First: Update your iOS, clear out extra storage, and turn on iCloud backups before editing so your apps run without lagging and your originals stay protected.
- Edit One Step at a Time: Apply AI adjustments individually rather than all at once. Checking the result after each change makes it easier to undo mistakes without restarting from scratch.
- Keep Edits Subtle: Tools for skin retouching and sky replacement work best with moderation. Always zoom in on edges, hair, and fine details to catch any unwanted blurring or artifacts.
- Start With Good Lighting: AI features rely on clear visual information from your base photo. Well-lit shots produce much cleaner results than dark, overexposed, or flat images.
- Quick Fixes for Glitches: If an app freezes or produces an odd result, close background programs, try a different source photo, and verify that you have enough storage space to save high-resolution copies.
Preparing Your iPhone for AI Photo Editing

Before opening any editing app, a quick setup will make the whole process much more convenient. AI-powered editing tools rely on processing power, available memory, and a stable version of iOS to function properly. Therefore, a few minutes of preparation at the start will save you time later and prevent the app from suddenly crashing in the middle of your work.
Especially when you plan to work with large files, use multiple AI tools in succession, or export high-resolution copies for printing. Additionally, by addressing all the basic technical issues in advance, you’ll be able to focus on the creative side of the process, rather than having to troubleshoot problems while you’re editing a photo.
| Step | What to do | Why it matters |
| Check iOS version | Update to the latest iOS in Settings – General – Software Update | Newer AI editing apps need current iOS to run properly |
| Free up storage | Delete unused apps or old videos if storage is low | AI models and edited photos take extra space |
| Choose an app | Pick a dedicated AI photo editor rather than relying only on the built-in Photos app | Third-party apps offer far more AI tools and manual control |
| Back up your photos | Turn on iCloud Photos or use a manual backup | Protects your originals before editing |
In terms of editing on iOS specifically, Luminar for iPhone is designed with a touch-friendly interface.
It’s also helpful to consider what you shoot most often. If most of your photos are portraits, an app with high-quality AI retouching tools will be more useful than one geared toward shooting landscapes or still life. If you mainly shoot outdoors, you’ll likely use tools for adjusting the sky and color more often. Choosing an app that matches your primary photography genre will save you time in the future, since you won’t have to scroll through tools you seldom need.
Professional Editing. Now in Your Pocket.
Download Luminar on your Mobile Device
How to Start Editing Photos Using AI Features
Once your smartphone is ready, using an AI photo editor works pretty much the same way in most apps.
- Download and open the app from the App Store.

- Import a photo from your gallery.
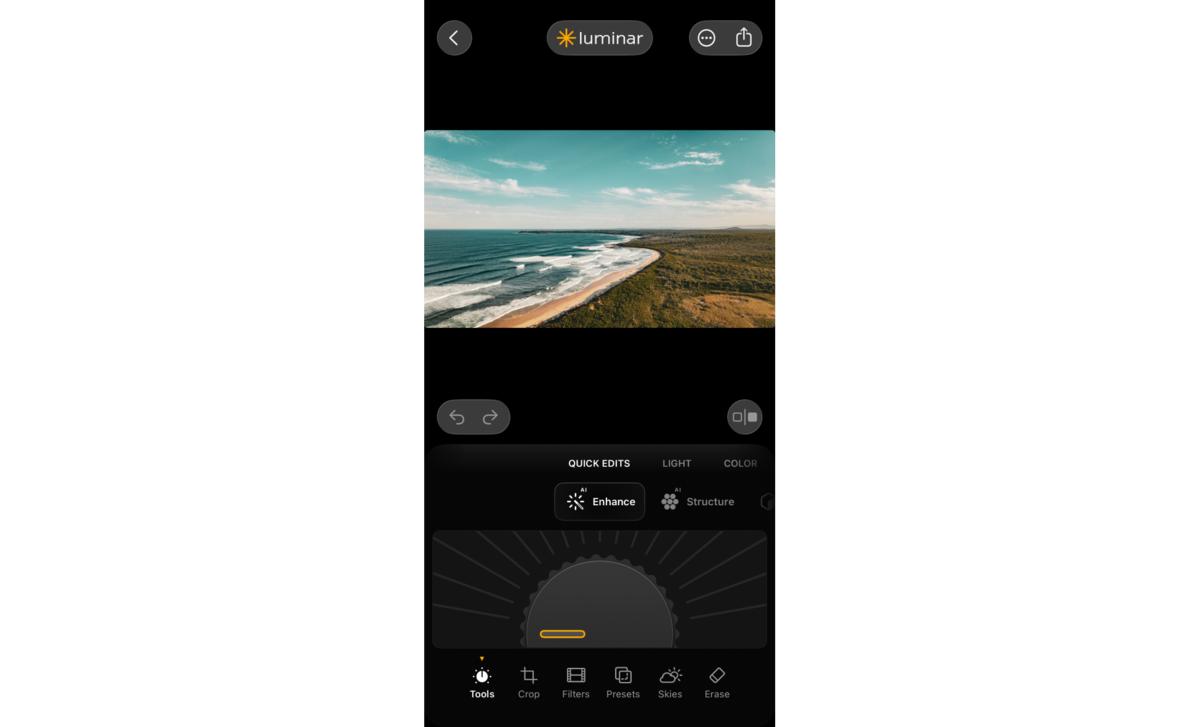
- Select an AI tool—sky replacement, portrait retouching, or background removal.
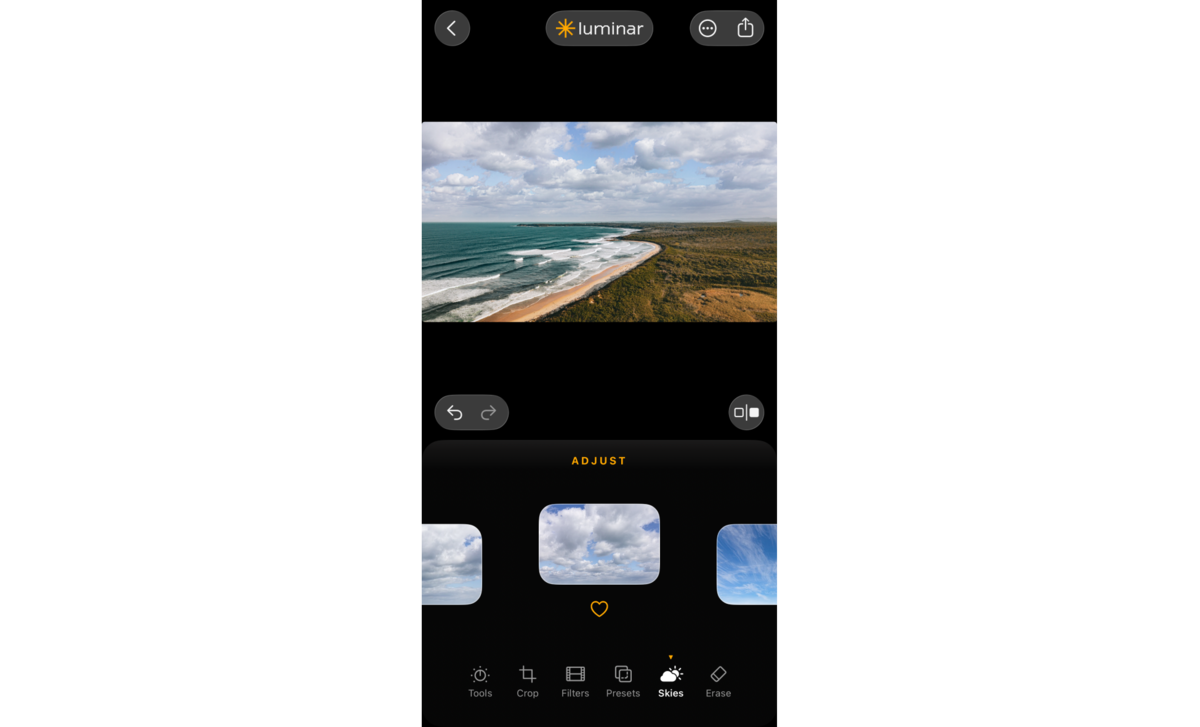
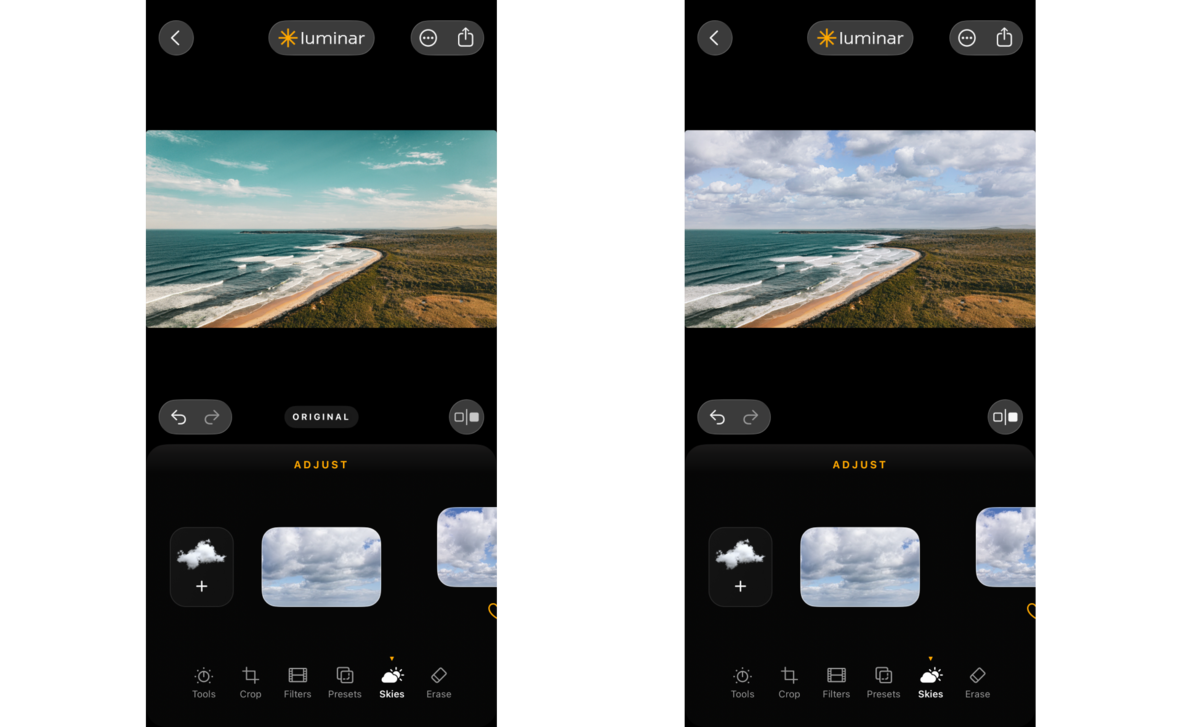
- Preview the result before saving, as most apps show changes in real time.
- Save the edited photo as a copy so the original remains unchanged.
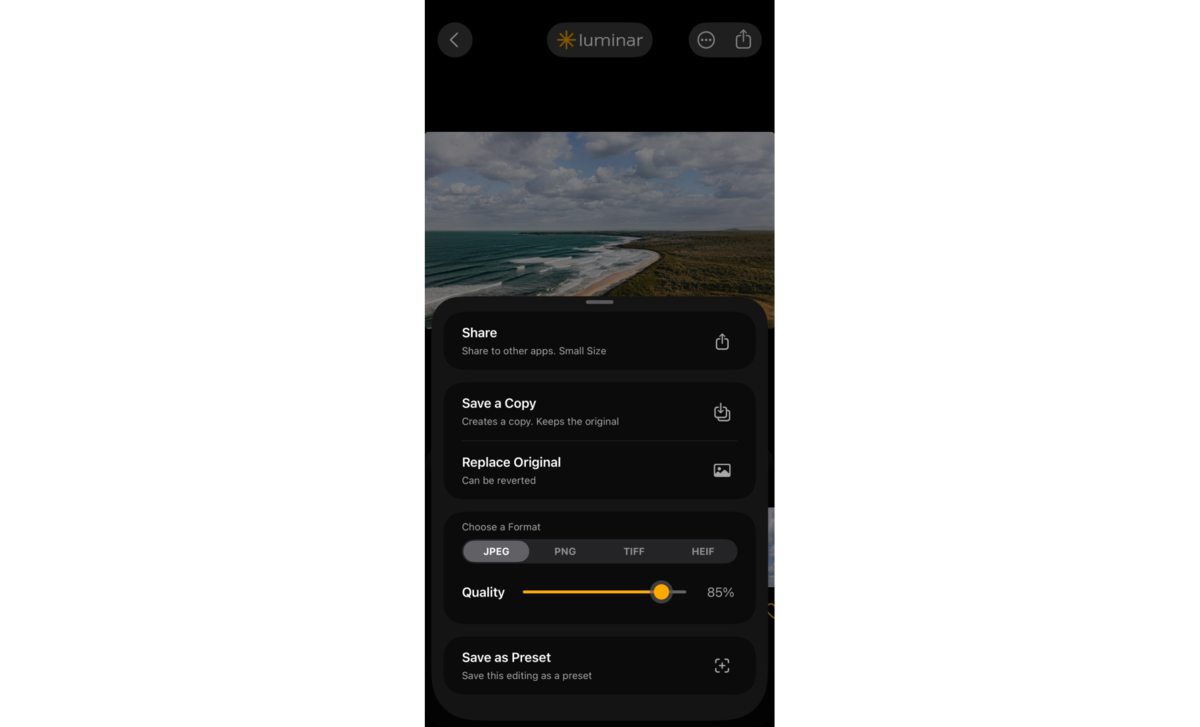


AI tools are grouped by task in Luminar for mobile, for instance, so you don’t have to guess where a particular feature is located. Mastering this simple sequence will make it much easier to transition to more complex tools in the future.
Step-by-Step Guide to Creating Images with AI

It usually starts with a base photo or a blank canvas (depending on the app), after which AI-powered generation or fill tools are used to add or modify elements in the scene. Next, color, lighting, and overall style can be adjusted using AI presets that respond to the specific content of the frame. If the automatic result needs minor adjustments, manual sliders let you fine-tune the image before exporting the final file.
Each step builds on the previous one, so check the result after each step rather than applying multiple AI tools at once. You can easily undo a single change if something doesn’t look right, eliminating the need to redo the entire editing process from scratch.
Understanding AI Editing Limitations on iPhone

AI tools work quickly, but they aren’t flawless, so be aware of a few limitations before relying on them when editing every photo. Fine details can sometimes get blurred—hair, fur, and thin branches are occasionally blurred during automatic masking, since the AI is simply trying to determine as best it can where one element ends and another begins.
Processing also takes time and drains the battery, and more extensive AI edits, such as completely replacing the sky, can run noticeably slower on older iPhone models compared to newer devices.
Results also depend on lighting, as photos taken in flat or mixed lighting provide AI tools with less information to work with. In addition, available storage space runs out quickly, since saving multiple AI-edited versions of the same photo takes up more space than regular manual editing.
Enhancing Photos with Advanced AI Tools
Once you’ve gotten used to the basic settings, most AI editing apps offer more advanced tools for photos that require additional work. The Enhance AI can automatically adjust exposure, color balance, and detail across the entire photo, making it especially useful for shots taken in challenging lighting conditions or with a cluttered background.
These advanced tools are typically divided into several categories. Sky Replacement replaces a flat or overcast sky with a more expressive one, adapting to the lighting already present in the rest of the frame.

Object removal eliminates random passersby or unwanted objects from the background, and style presets adjust the overall color palette and mood based on the actual content of the photo.
Tips for Using AI Editing Apps Effectively

A few simple habits can help you use AI editing apps much more effectively. A photo with good initial lighting usually provides the AI with more information to work with, so the result is cleaner than with dark or overexposed shots. When it comes to portraits, Skin AI tools work best when used sparingly.
It’s also a good idea to save a copy of the photo before applying a second AI tool so you can compare the results side by side, rather than committing all changes immediately. After replacing the sky or removing objects, it’s helpful to zoom in on the edges and areas with hair to spot any potential artifacts.
Also, don’t hesitate to spend an extra minute trying out a few different presets on the same photo before choosing the final version, as the result can vary depending on the original content and lighting of the shot.
Finding Additional Resources for AI Photo Editing

If a particular tool is not working the way you expect, most apps offer built-in tutorials or a help section in the settings menu. Consulting the official Luminar Mobile User Guide is the next step if you need step-by-step instructions for specific features or want to see examples of typical editing workflows from start to finish.
These materials are usually grouped by feature, so finding information about a specific tool you’re having trouble with will take much less time than going through everything from the very beginning.
Troubleshooting and Getting Further Assistance

Check the built-in instructions if a new tool seems confusing the first time you use it. Many AI editors display short on-screen tutorials when you open a particular feature for the first time, and reviewing this guide a second time is often faster than figuring out the problem from scratch.
- The app is running slowly or crashing. Close other apps running in the background and make sure the app itself is updated to the latest version.
- The AI tool is producing strange results. Try a different source photo, as lighting and image quality directly affect the AI’s accuracy.
- The edited photo isn’t saving. Check your available storage space and make sure the app has permission to access your gallery in the settings.
- The problem persists. Most apps have a support page or contact form in the settings menu where you can get direct assistance.
Editing photos on an iPhone using AI involves choosing the right tool for the shot and reviewing the result before saving. With a little practice, most everyday edits take very little time compared to manual editing, and the result looks natural.