Crop a Mac screenshot in seconds with Preview or capture only the area you need. Follow these simple methods to remove unwanted edges and save a clear, focused image.
To crop a screenshot on Mac, open it in Preview, select the area you want to keep, and choose Tools → Crop or press Command + K. If you have not taken the screenshot yet, Shift + Command + 4 lets you capture a selected area directly.
You can also crop immediately through the screenshot thumbnail, use Photos for images already in your library, or work in Luminar when cropping is part of a broader image-editing task.
Don’t feel like reading the whole breakdown? We’ve pulled together a quick summary below.
Which Screenshot Cropping Method Should You Use?
Use Preview for an existing screenshot saved in Finder. Choose the floating thumbnail for an immediate edit, or capture a selected area when you already know what you need.
| Method | Best use | Main consideration |
| Selected-area screenshot | Capture only the required content | Set the boundaries before capturing |
| Floating thumbnail | Crop immediately after capture | Open the thumbnail before it disappears |
| Preview | Crop a saved screenshot quickly | Duplicate the file first if you want a separate original |
| Photos | Edit a screenshot already in your photo library | Export the edited version afterward |
| Luminar | Combine cropping with other image edits | Export a finished file after editing |
Exclusive Tools of Endless Possibilities in One Editor
How to Take a Cropped Screenshot on Mac
Press Shift + Command + 4, then drag around the area you want to capture. This produces a screenshot of the selected region without a separate cropping step.

Capture a Selected Area
- Press Shift + Command + 4.
- Drag the crosshair around the content you need.
- Release the mouse or trackpad button to capture it.
Press Esc to cancel. Hold Space while dragging to reposition the selection without changing its size.

Other Useful Mac Screenshot Shortcuts
| Action | Shortcut |
| Capture the entire screen | Shift + Command + 3 |
| Capture a selected area | Shift + Command + 4 |
| Capture a window or menu | Shift + Command + 4, then Space |
| Open the Screenshot toolbar | Shift + Command + 5 |
For a window screenshot, click the window after the pointer becomes a camera. Hold Option while clicking to exclude the window shadow.
Screenshots save to the desktop by default, but you can change the destination under Options in the Screenshot toolbar.

How to Crop a Screenshot in Preview
Preview is a straightforward option for cropping a screenshot already saved on your Mac.
Open and Crop the Screenshot
- In Finder, duplicate the screenshot if you want to preserve a separate original.
- Control-click the file and choose Open With → Preview.
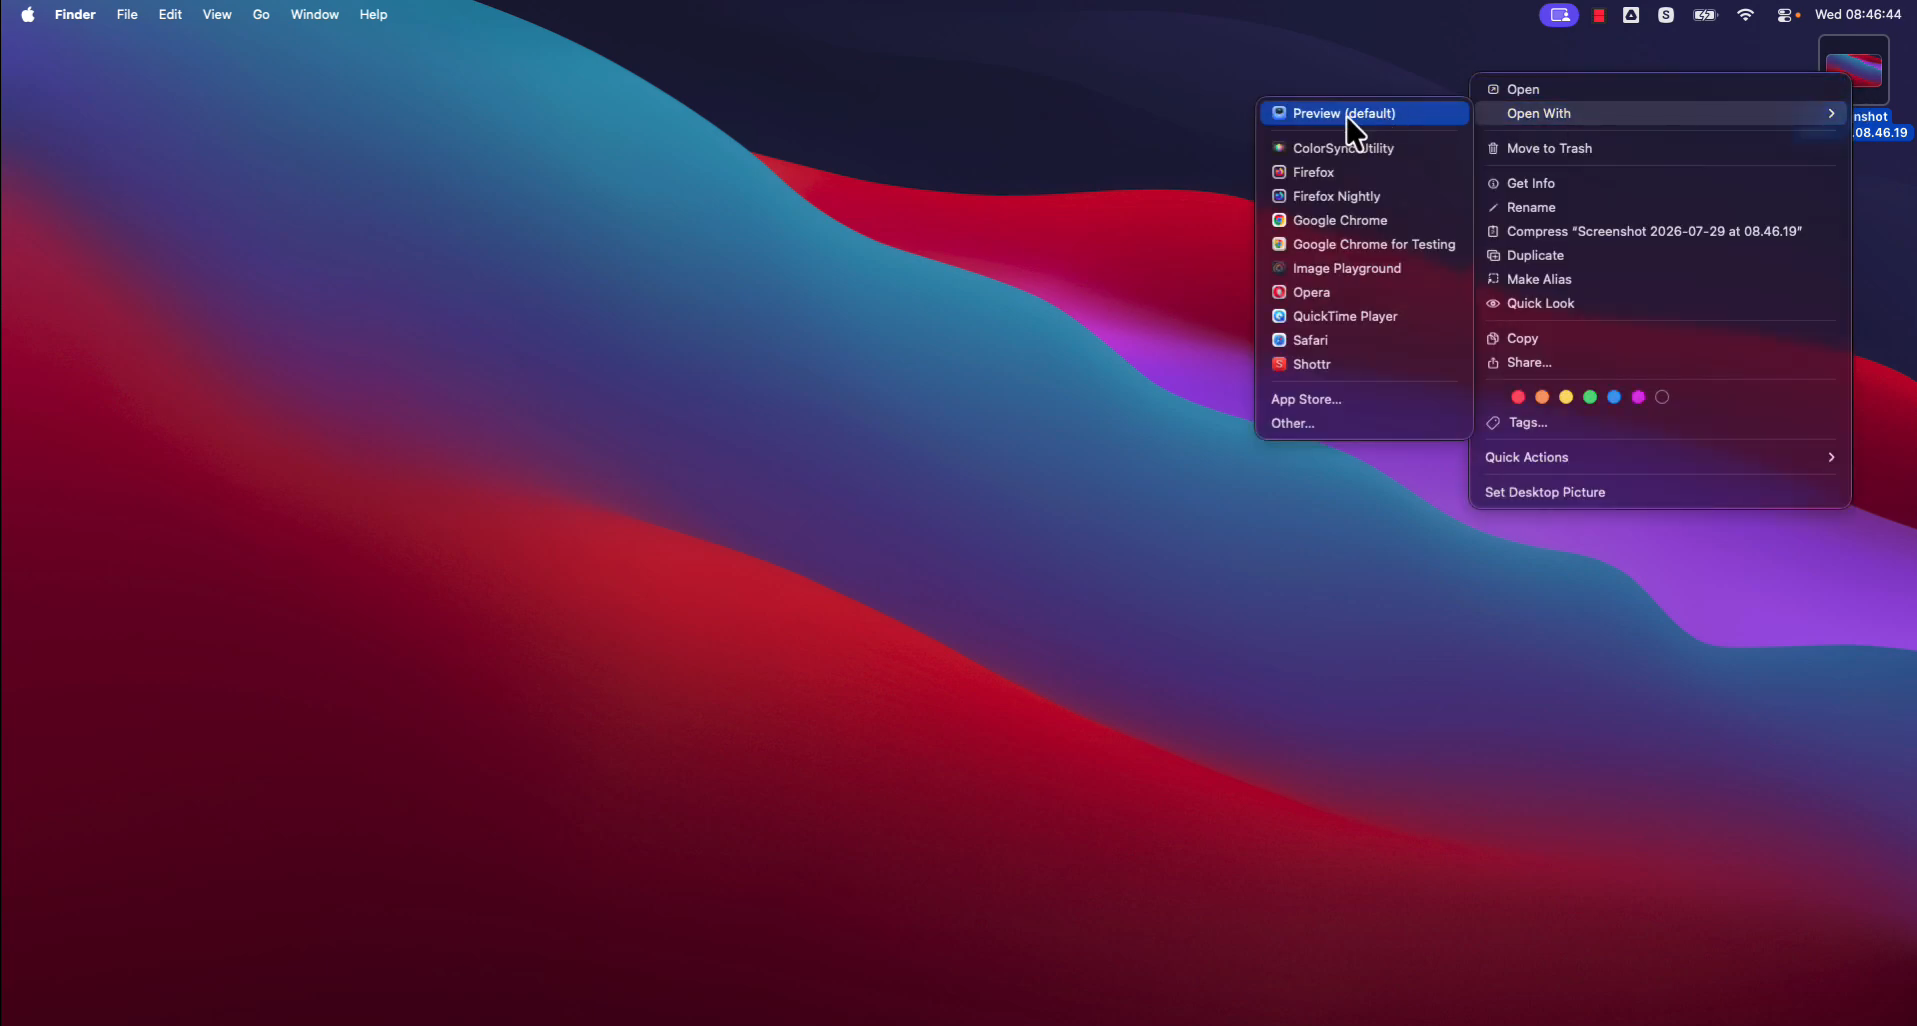
- Click Show Markup Toolbar if the editing controls are hidden.
- Choose Rectangular Selection and drag around the area you want to keep.
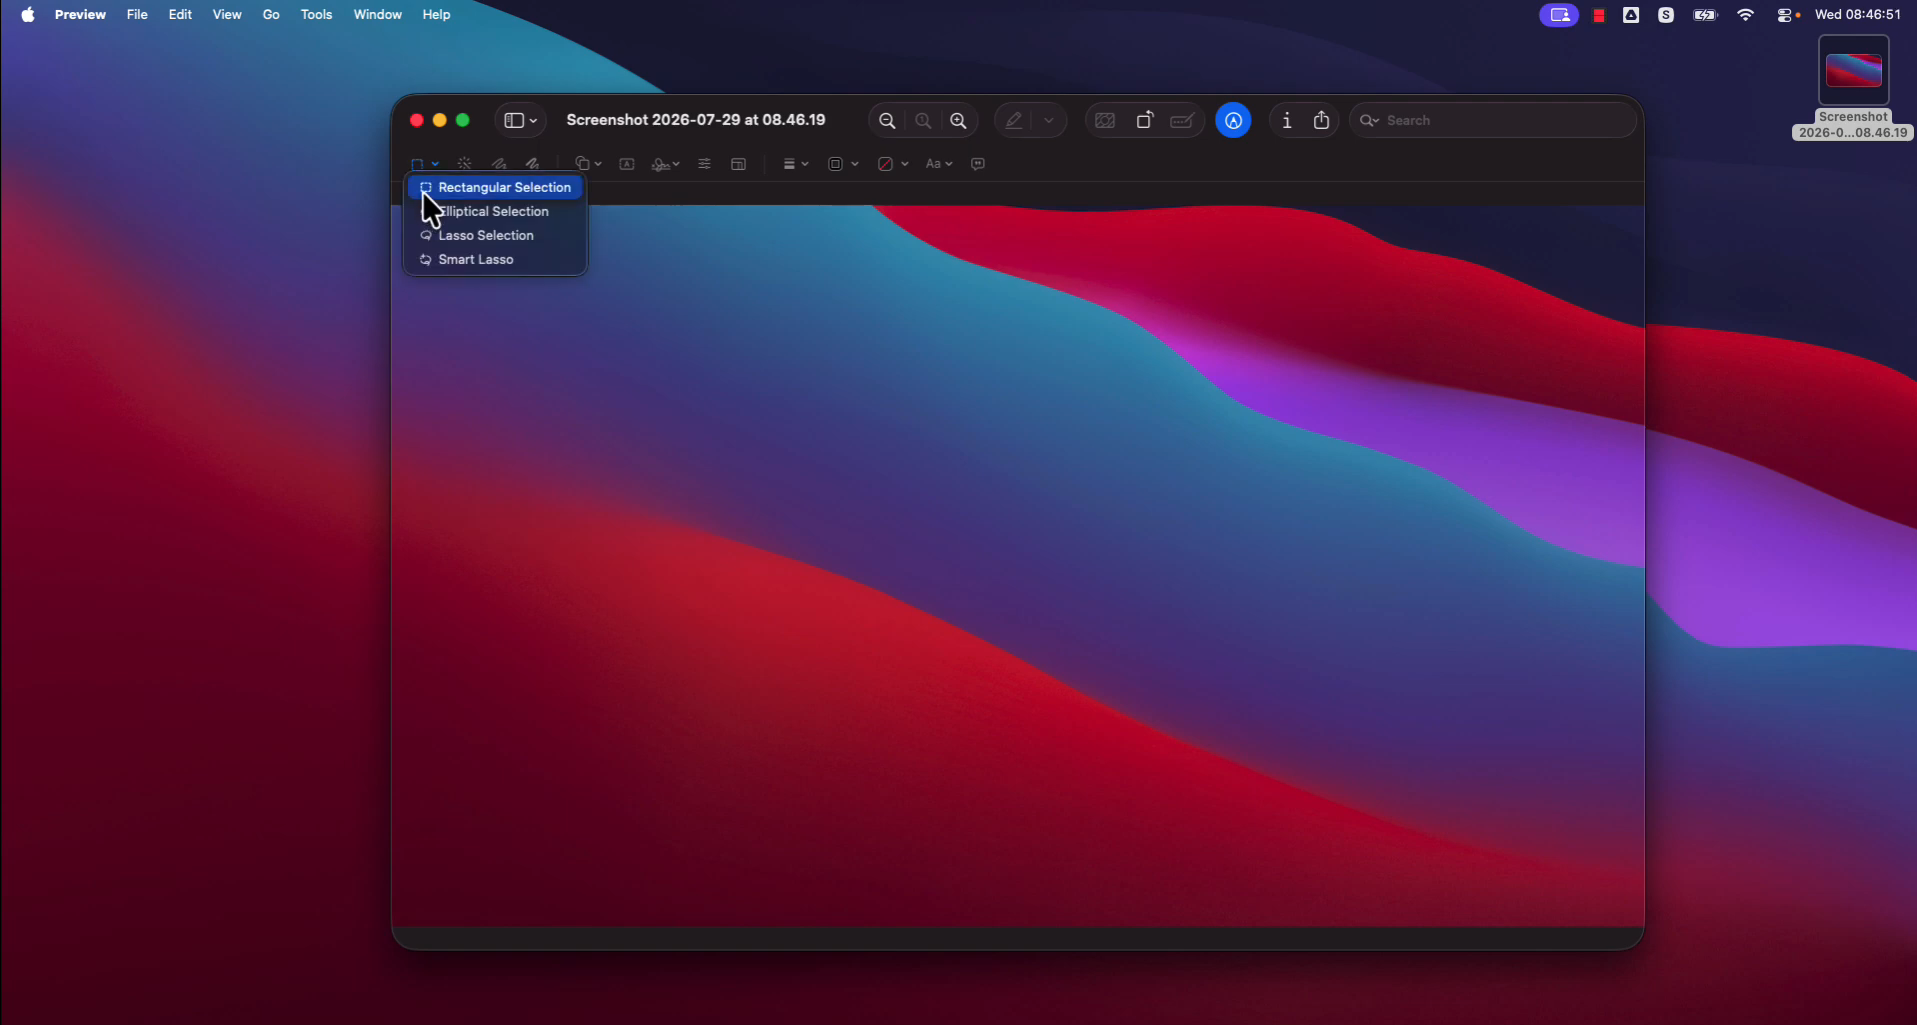
- Select Tools → Crop, or press Command + K.
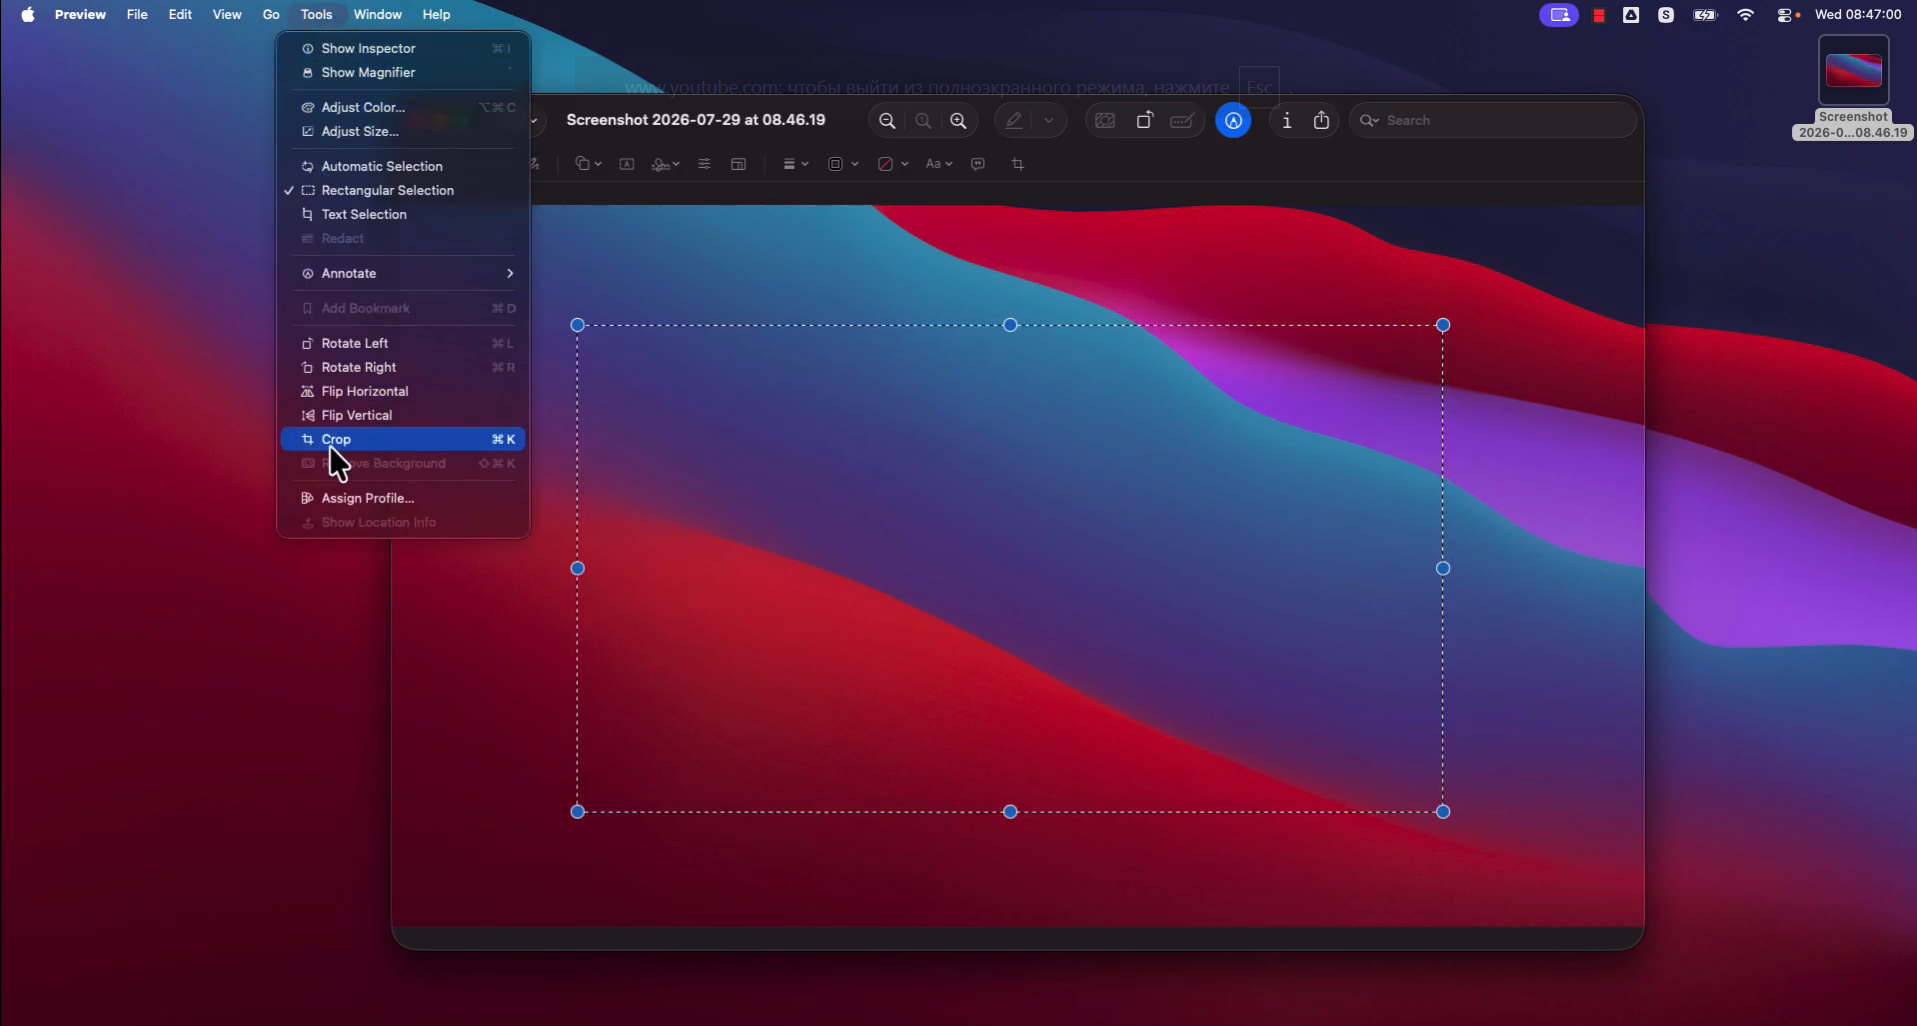
- Choose File → Save, or press Command + S.


The selection must contain the content you want to retain. Everything outside it is removed from the cropped image.
Undo a Crop
Choose Edit → Undo Crop immediately after cropping if the selection was wrong.
Keeping a duplicate before editing is useful when you need both the full screenshot and a cropped version for different purposes.
How to Crop Using the Screenshot Thumbnail

Click the floating thumbnail immediately after taking a screenshot to open its editing window.
- Take a screenshot.
- Click the thumbnail in the corner of the screen.
- Select the Crop control.
- Drag the crop handles around the content you want to retain.
- Click Done to save the result.
If the thumbnail does not appear, press Shift + Command + 5, open Options, and enable Show Floating Thumbnail.
If it disappears before you click it, open the saved screenshot in Preview instead.
Elevate Your Photography with Our Advanced Software
How to Crop a Screenshot in Photos

Photos is convenient when the screenshot is already in your library or you want to organize it alongside other images.
Import and Crop
- Open Photos.
- Drag the screenshot from Finder into the Photos window. Alternatively, choose File → Import and select it.
- Double-click the imported screenshot.
- Click Edit, then Crop.
- Drag the crop rectangle around the required area.
- Choose an aspect ratio if needed, or use a freeform crop.
- Click Done to save the edit in Photos.
For screenshots, crop manually so you can retain the exact labels, controls, and context the reader needs.
Export the Cropped Version
Saving an edit in Photos does not update the separate screenshot file you originally imported.
To create a shareable file:
- Select the edited screenshot.
- Choose File → Export → Export 1 Photo.
- Select the required format and size.
- Click Export and choose a destination.
Use the regular export command for the cropped image. Export Unmodified Original exports the original without your crop.
How to Crop a Screenshot in Luminar
Luminar is useful when you want to crop an image and continue with other adjustments in the same editor. For a simple screenshot of text or software controls, Preview is usually sufficient.
Use the Manual Crop Controls
- Add the screenshot to Luminar and open it in Edit.
- Open Crop AI.
- Choose Free under Ratio for an unconstrained crop, or select the required aspect ratio.
- Drag the crop handles to retain the relevant content.
- Switch to another tool to apply the crop.
- Export the finished image.

Use manual framing for interface screenshots. An automatic composition suggestion may exclude a button, message, or other detail needed to understand the screen.
Luminar’s image cropping tools also provide aspect-ratio controls for images intended for presentations or other layouts.
Set Pixel Dimensions During Export
Crop first, then resize only if the destination requires specific dimensions.
For example, you might crop to a 16:9 ratio and export at 1600 × 900 pixels. Changing the ratio sets the shape; export resizing sets the final pixel dimensions.
Luminar’s image resizer lets you adjust output dimensions during export. Downscaling removes pixels, while enlarging a small screenshot does not restore the original detail.
The Photo Perspective Correction Tool You've Been Waiting For
Cropping vs. Resizing: What Is the Difference?
Cropping changes which content remains visible. Resizing changes the pixel dimensions of that content.
| Adjustment | What changes | Example |
| Crop | The image boundaries and visible content | Remove the desktop around an app window |
| Resize | The pixel width and height | Reduce a screenshot from 2000 to 1000 pixels wide |
| Change aspect ratio | The relationship between width and height | Crop a wide screenshot into a square |
For a screenshot containing small text, crop away unnecessary space before considering a size reduction. This can keep the relevant content readable without shrinking the entire original screen capture.
How to Keep Screenshot Text Readable
Keep the screenshot’s original pixel dimensions unless you need a smaller file or a particular output size.
Before sharing:
- Retain enough surrounding content to explain the selected area.
- Avoid cutting through labels, buttons, or sentences.
- Leave a small margin around the important content.
- Check the exported image at its intended display size.
- Use PNG when available for text-heavy screenshots.
- Avoid repeated JPEG exports, which can introduce compression artifacts.
If a screenshot is already blurry, capture it again with the relevant window larger or the application’s text zoom increased. Sharpening cannot reliably reconstruct unreadable text.
A beginner-friendly photo editor can help with broader image adjustments, but interface screenshots generally need clear framing rather than creative effects.
Conclusion
Use a selected-area capture when you know exactly what you need, or open an existing screenshot in Preview for a quick crop. Keep the necessary context, save a separate original when useful, and check that the exported text is readable before sharing.
Frequently Asked Questions
In Preview, Command + K crops an image after you make a rectangular selection. To capture only part of the screen from the start, use Shift + Command + 4.
Crop requires a selection in the image. Choose Rectangular Selection, drag around the area you want to keep, and try Tools → Crop again.
Yes. Preview and Photos are built into macOS, and the floating screenshot thumbnail provides immediate editing controls.
Photos stores the edit in its library rather than updating the separate file you imported. Export the edited photo and use that new file.
Cropping alone removes the outer pixels without resampling the retained area. It leaves fewer total pixels, so avoid enlarging the cropped result beyond a size at which its text remains clear.