Give faded family photographs a clearer digital copy. Learn how to scan prints, repair scratches, correct tones, and restore old photos in Photoshop or Luminar.
To restore an old photo, start with a clear scan, save an untouched copy, and identify the damage. Then correct fading, repair distracting marks, and apply light sharpening before exporting. AI restoration can speed up the process, while manual tools give more control over individual repairs.
The best approach depends on the photograph. A slightly faded print may need only tonal adjustments. A portrait with tears across the face requires more careful work. The goal is to make the image easier to see while preserving the people, details, and character that make it valuable.
Don’t feel like reading the whole breakdown? We’ve pulled together a quick summary below.
Key Takeaways
- Start with a clear scan. Use 600 ppi as a starting point for small family prints and keep an untouched TIFF master.
- Match the tool to the damage. Adjust tones to fix fading; use healing, Erase, or Clone tools for dust and scratches.
- Review AI results carefully. Check faces, clothing, and fine details after automated restoration.
- Treat colorization as an interpretation. Save colorized versions separately from restorations that preserve the original tones.
- Keep editable files and backups. Export a high-quality TIFF for preservation and a JPEG for sharing.
Why Old Photos Fade and Deteriorate
Photographic prints contain materials that change over time. Storage and handling influence how quickly those changes occur.
Light Exposure
Light can fade photographic dyes and alter the appearance of a print. Prolonged display, especially in sunlight, increases the risk. Use a reproduction for display and keep valuable originals protected from light.
Heat and Environmental Changes
Heat accelerates many deterioration processes. Changes in temperature and humidity can also stress photographic materials. A stable storage environment is more suitable than an attic, basement, or garage with large seasonal variations.
Humidity and Handling
High humidity encourages mold and can make photographic surfaces stick together. Poor handling adds fingerprints, creases, and scratches.
Store prints in photo-safe enclosures and handle them by their edges. A flaking, heavily curled, moldy, or stuck photograph needs careful assessment before digitization. Avoid flattening it by force or applying household cleaners.
Your AI-Powered Photo Editor for MacOS and Windows
How to Digitize Old Photos Before Restoring Them
The quality of the digital copy affects every later step. A clear capture preserves more usable information and reduces the need for aggressive editing.
Scan Flat, Stable Prints
A flatbed scanner is a practical option for prints that can safely lie flat. Avoid automatic document feeders, which can damage fragile photographs.
For many small family prints, 600 ppi is a useful starting point. Increase the scan resolution if the print is very small or contains fine detail that the scanner can resolve. Higher settings alone cannot create detail missing from the original.
For example, a 4 × 6-inch print scanned at 600 ppi produces approximately 2,400 × 3,600 pixels. At 300 ppi, those dimensions support an 8 × 12-inch output before cropping.
Scan in color, even if the photograph looks monochrome. This preserves its tint and gives more flexibility when correcting stains or deciding whether to keep a sepia appearance.
Save an untouched master as TIFF with no compression or lossless compression. Make adjustments on a working copy. If automatic scan corrections are enabled, capture an uncorrected version too.
Photograph Prints When a Scanner Is Unsuitable
A camera or smartphone can digitize a photograph without pressing it beneath a scanner lid. An overhead setup is particularly useful for curled or fragile prints.
Keep the camera parallel to the image, use even diffuse light, and check for glare. Fill most of the frame without cutting off the edges. Avoid digital zoom and inspect the capture for blur before continuing.
Photograph any writing on the reverse as well. Names, dates, and locations may matter as much as the picture.
How to Restore Old Photos in Luminar
Luminar combines automated old photo restoration with tools for refining tone and repairing individual marks. The following workflow applies to the desktop application.
Step 1: Import the Scan and Open Restoration
Add the untouched scan to the Catalog. In the current interface, open Extra > Enhancement > Restoration and select the image.

Run Restoration before applying additional edits to the resulting image. Keep the original scan available for comparison.
Step 2: Choose the Appropriate Restoration Mode
| Mode | What it does | Choose it when |
| Scratches | Removes visible damage while retaining the original tones | Keeping the monochrome or vintage appearance matters |
| Color | Adds color to a black-and-white photograph | A colorized interpretation is wanted |
| Full | Combines scratch removal and color restoration | Both repair and color treatment are wanted |
Click Restore. Processing requires an internet connection, and the result is saved in the Catalog’s Restoration folder.

Restoration is not available in plugin mode and currently does not support batch processing. Feature access also depends on the license.
Step 3: Straighten and Refine the Tones
Open the restored result and use the crop and rotation controls to tidy its framing.

Use Develop to adjust exposure, highlights, shadows, and contrast. Temperature and Tint can help correct an unwanted cast. Apply small changes while checking faces and clothing.

If a neutral monochrome result is preferred, use the Black & White tool. A dedicated black-and-white photo editor provides tonal control beyond simply removing saturation.

Avoid sharpening while obvious scratches remain, because it can make those marks more prominent.
Step 4: Repair Remaining Marks Manually
Use Erase for small unwanted spots where the surrounding area supports a clean repair. Use the photo cloning tool when choosing an exact source is important.

Select a clean area with similar light and texture, adjust the brush size and softness, and paint over the defect in short strokes. Sample from several areas to avoid repeating the same texture.
For example, repair a scratch on a jacket using clean fabric from the jacket, not a nearby wall. Work carefully where a mark crosses an outline so the repair preserves its shape.
Step 5: Apply Light Detail Adjustments and Export
Review the photograph at 100% and apply only enough sharpening or detail enhancement to improve readability. Reduce the effect if halos appear or skin and grain become unnaturally harsh.

Export a TIFF for a high-quality finished copy and a JPEG for sharing. Luminar stores edit information in its Catalog; exported images do not replace the Catalog and source files needed to revisit the edits.

Keep the untouched scan, restored output, and a backup of the editing environment.
The Photo Perspective Correction Tool You've Been Waiting For
How to Restore Old Photos in Photoshop
Photoshop offers precise control through layers, adjustment tools, and local retouching. It suits photographs that need selective corrections or repairs across complex details.
Step 1: Protect the Original and Prepare the Image
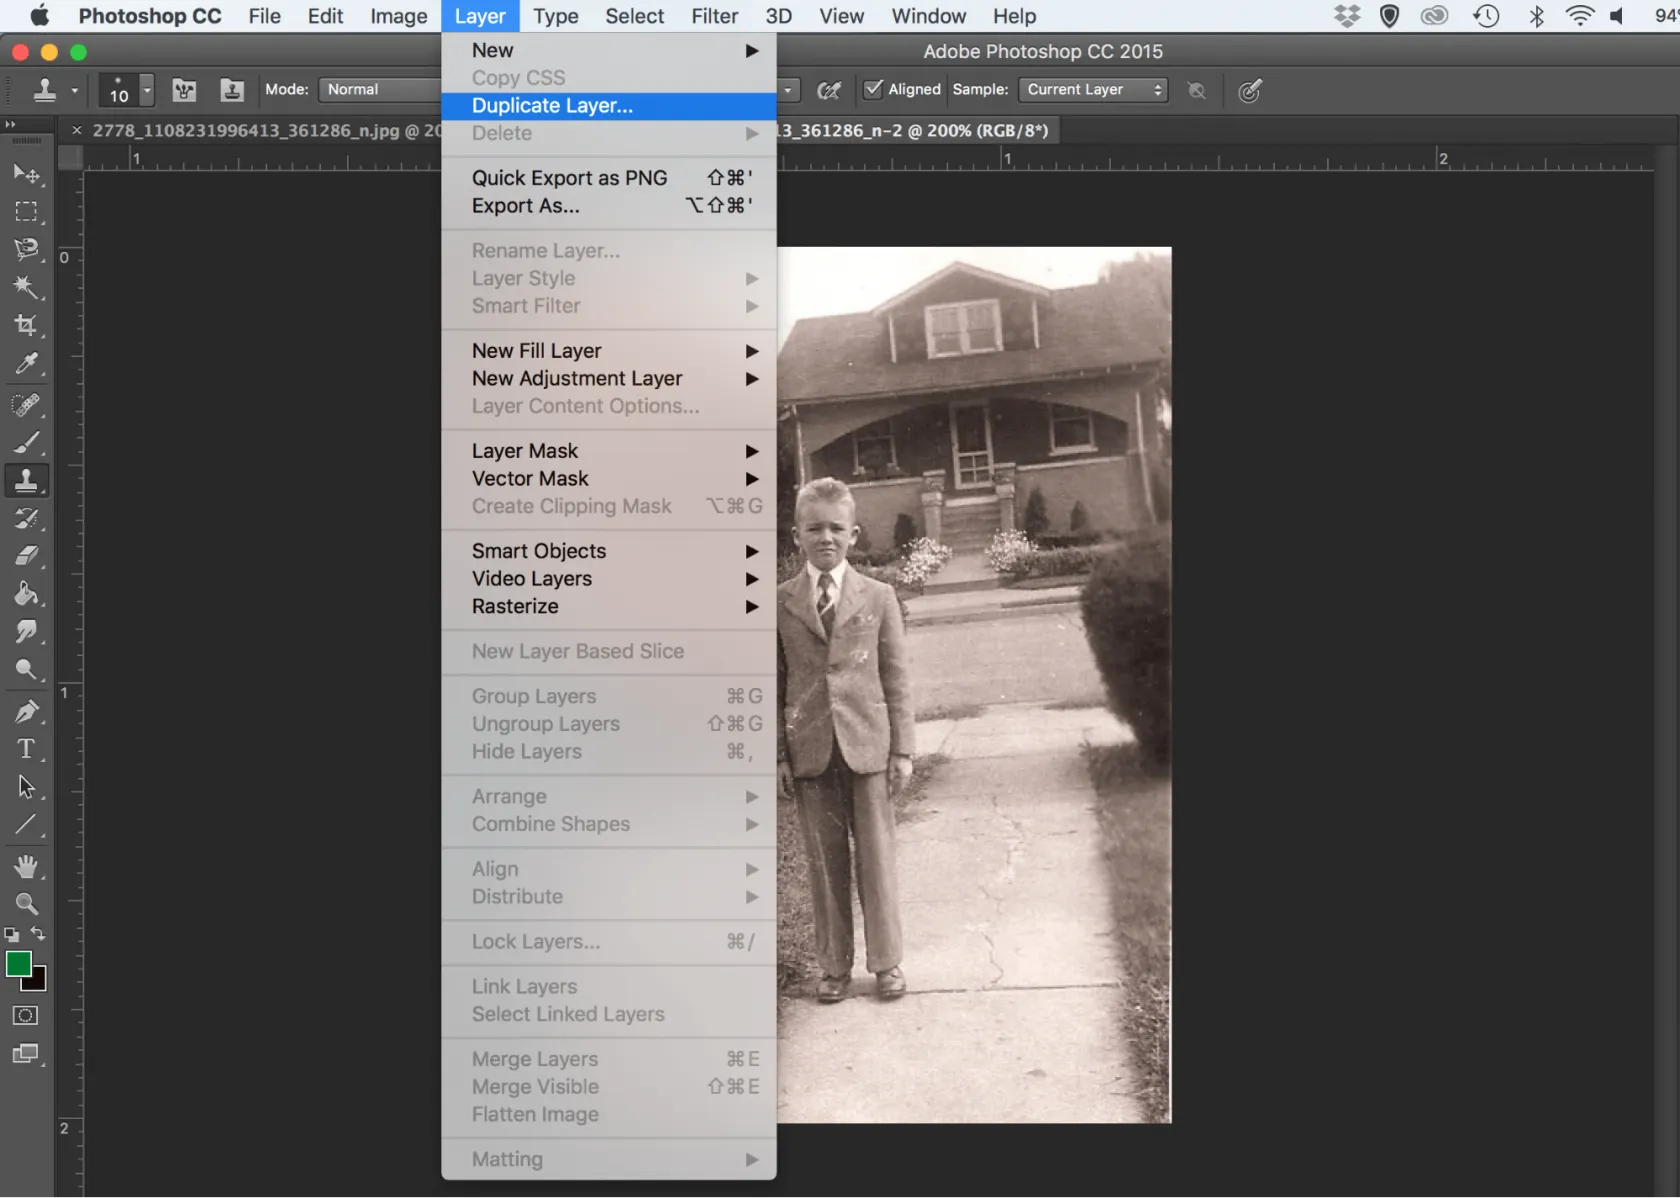
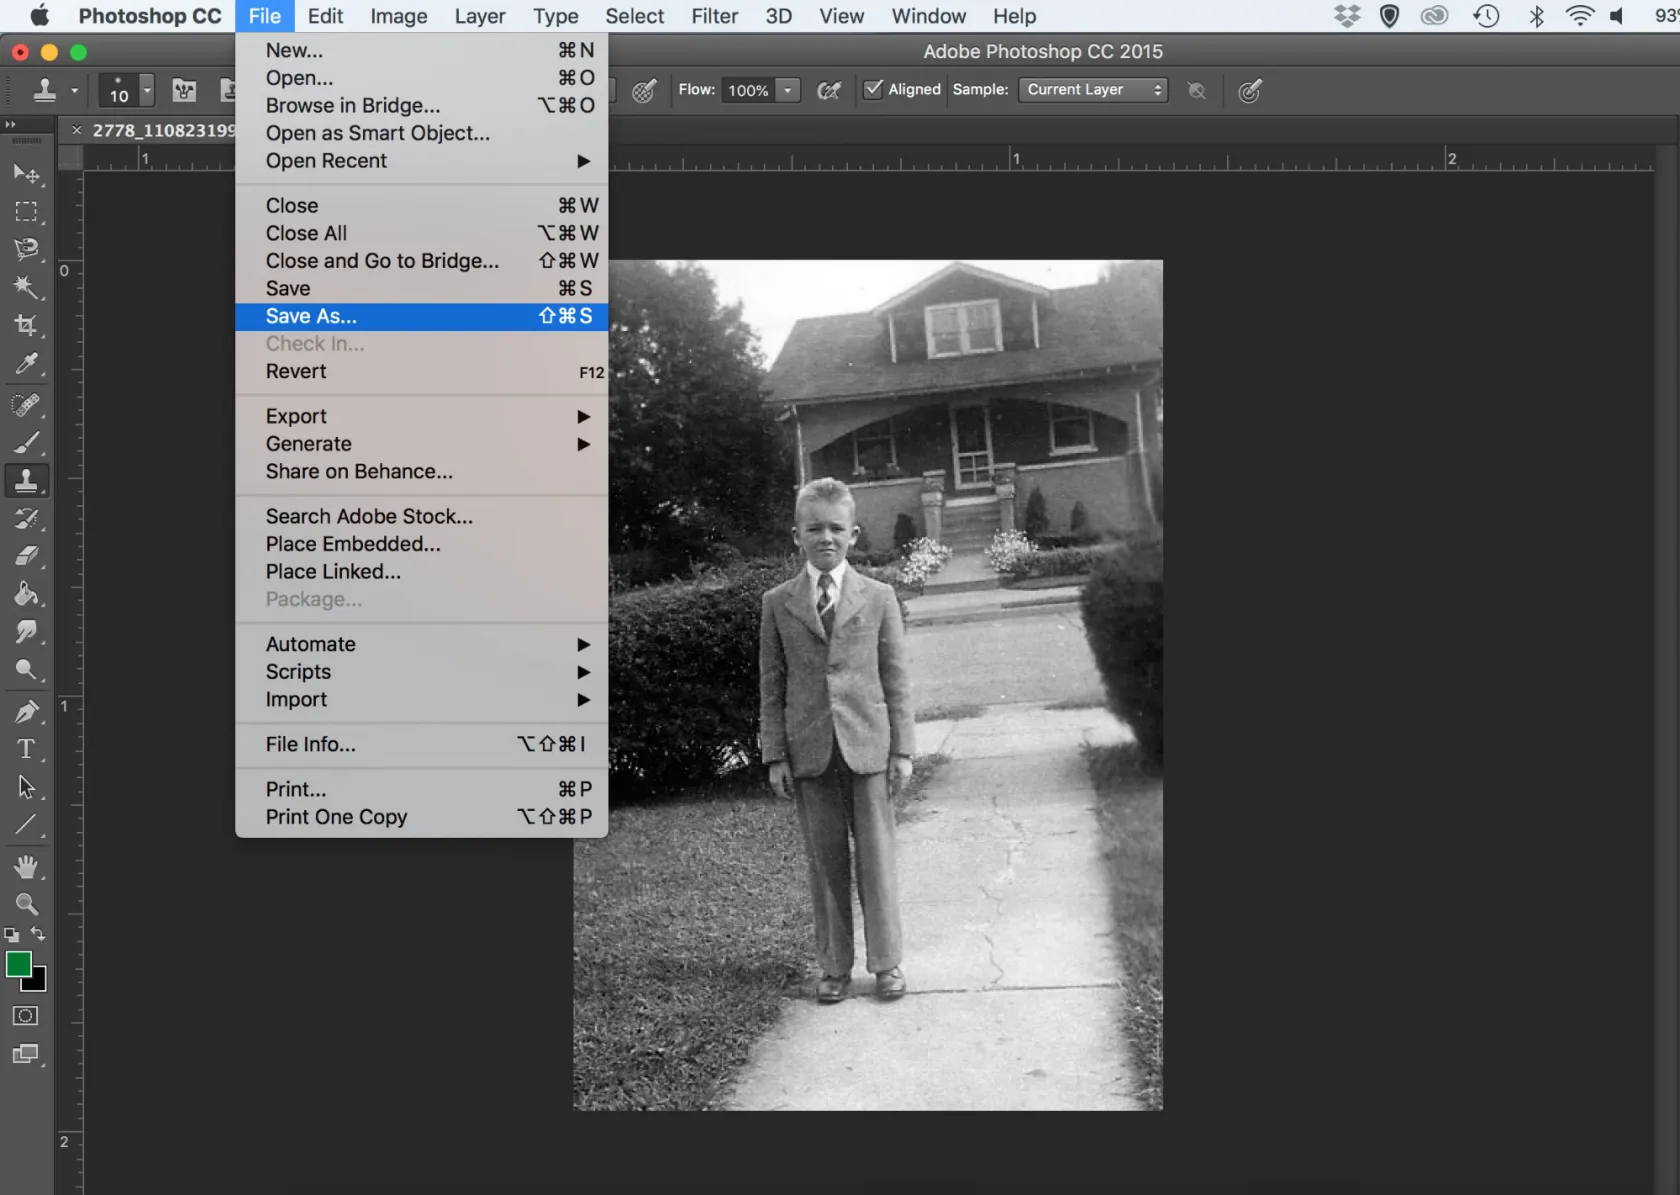
Open the working copy and save a PSD file. Keep the original image layer intact; duplicate it for pixel-based edits or create a separate retouching layer.
Straighten the picture and crop unwanted scanner edges. Preserve a full scan before removing original borders, handwritten notes, or other information.
Use clear layer names such as “Scratch repairs” and “Tone correction.” Keep the editable layers rather than merging them simply to tidy the document.
Step 2: Correct Fading and Color Casts
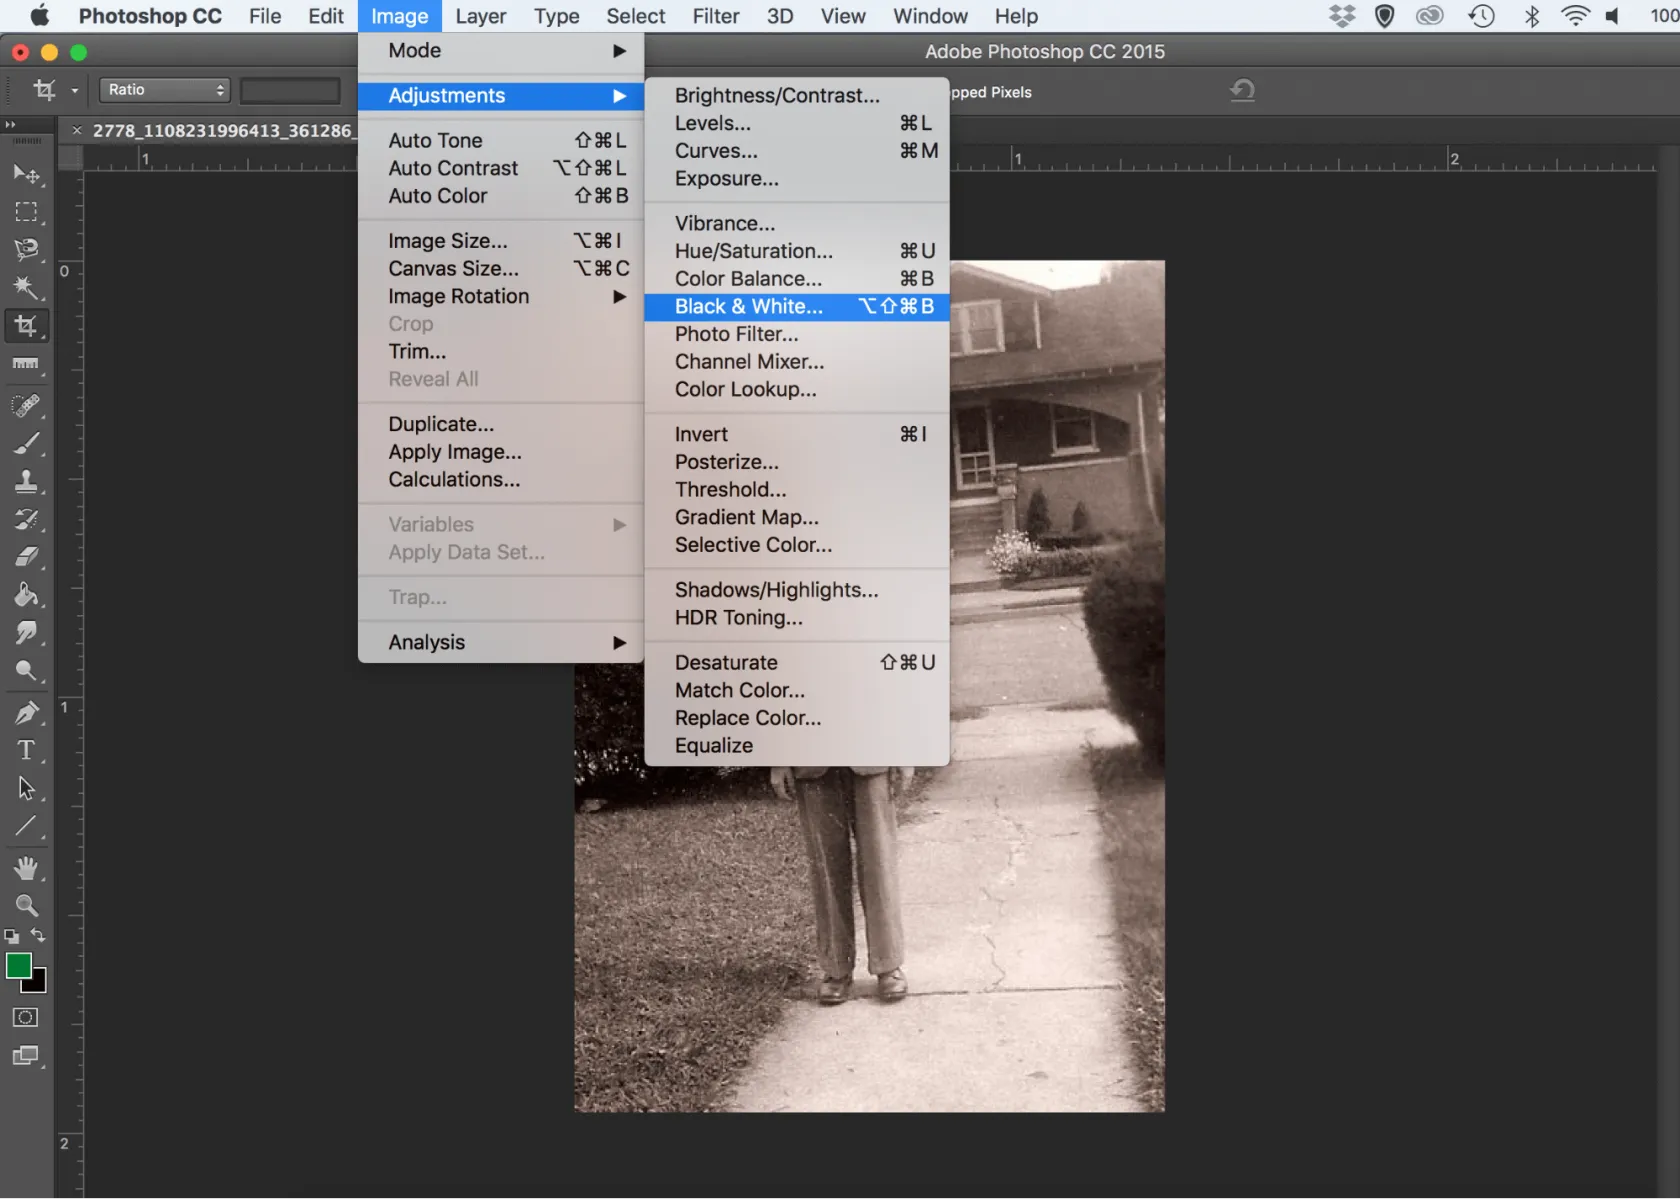
Add a Levels or Curves adjustment layer. These adjustments remain editable and can be masked to affect only part of the photograph.
Bring the light and dark tones closer to a natural range without forcing every pale area to white or every shadow to black. A gentle contrast adjustment often improves a faded print more effectively than heavy sharpening.
For color photographs, correct an unwanted cast using color adjustments or individual Curves channels. Use a genuinely neutral area as a reference where one exists.
For a monochrome result, add a Black & White adjustment layer. Keep the sepia version too if its tone is part of the photograph’s character. Yellowing and deliberate sepia toning should not automatically receive the same treatment.
Step 3: Try Photo Restoration as a Starting Point
In Photoshop desktop, open Filter > Neural Filters > Photo Restoration and download the filter if prompted.

Adjust the image enhancement, face enhancement, and scratch-reduction controls according to the photograph. Output the result to a new layer where that option is available, so the result can be compared with the scan.
Inspect faces, lettering, clothing, and patterned backgrounds. Automated improvements can require local corrections, especially where the original is badly damaged. Use the manual repair tools below when the filter leaves marks or changes important details.
Step 4: Repair Dust, Scratches, and Creases
Use the tool that matches the damaged area:
- Spot Healing Brush: A starting point for small isolated spots surrounded by suitable texture.
- Healing Brush: Useful when choosing a source and blending it with the surrounding tone.
- Clone Stamp: Useful where copying a specific texture or edge provides more control.
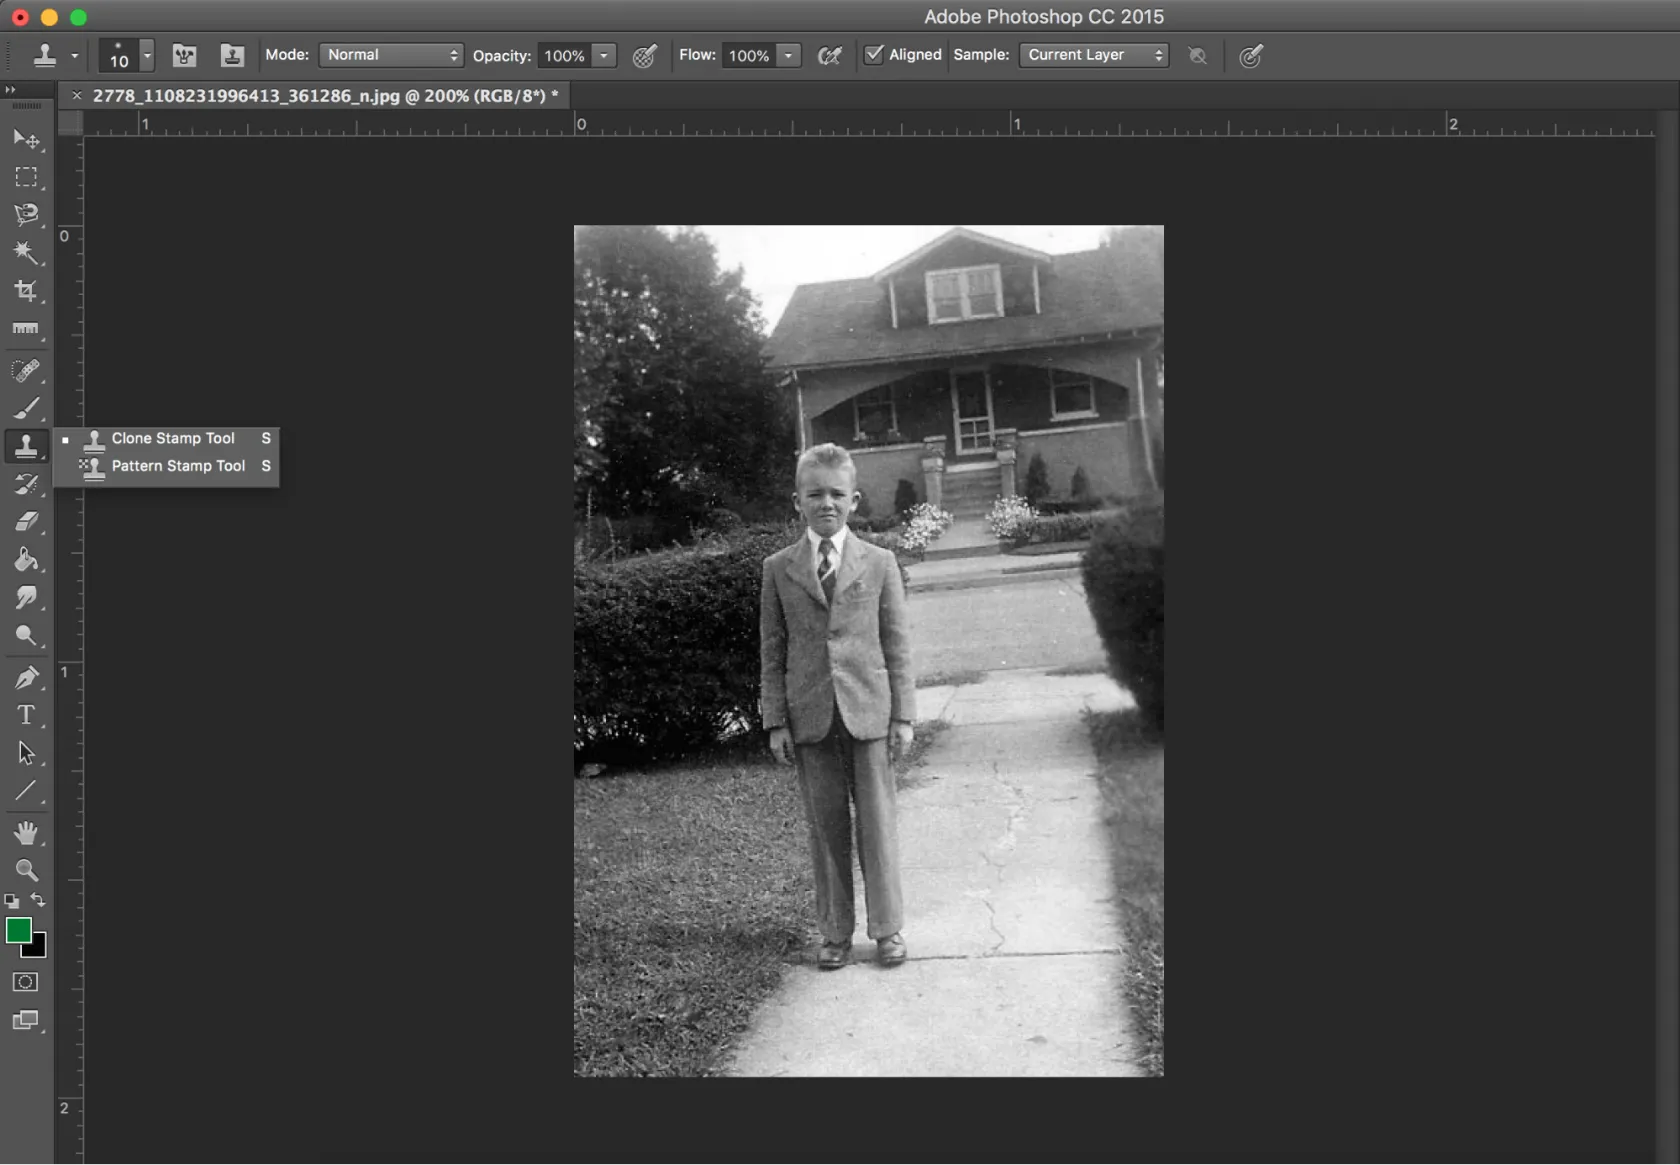
With Clone Stamp, choose a clean source using Alt-click on Windows or Option-click on macOS, then paint over the damage. When working on an empty retouching layer, set sampling to include the source layers.
Use a brush close to the width of the defect and work in short strokes. Change the source frequently to avoid repeated patterns. A scratch crossing a jacket, face, and background should be repaired in separate sections.
Step 5: Reduce Fine Defects Without Smearing Detail
Photoshop’s Filter > Noise > Dust & Scratches uses Radius and Threshold controls. Radius affects the area examined; Threshold affects which pixel differences are treated.
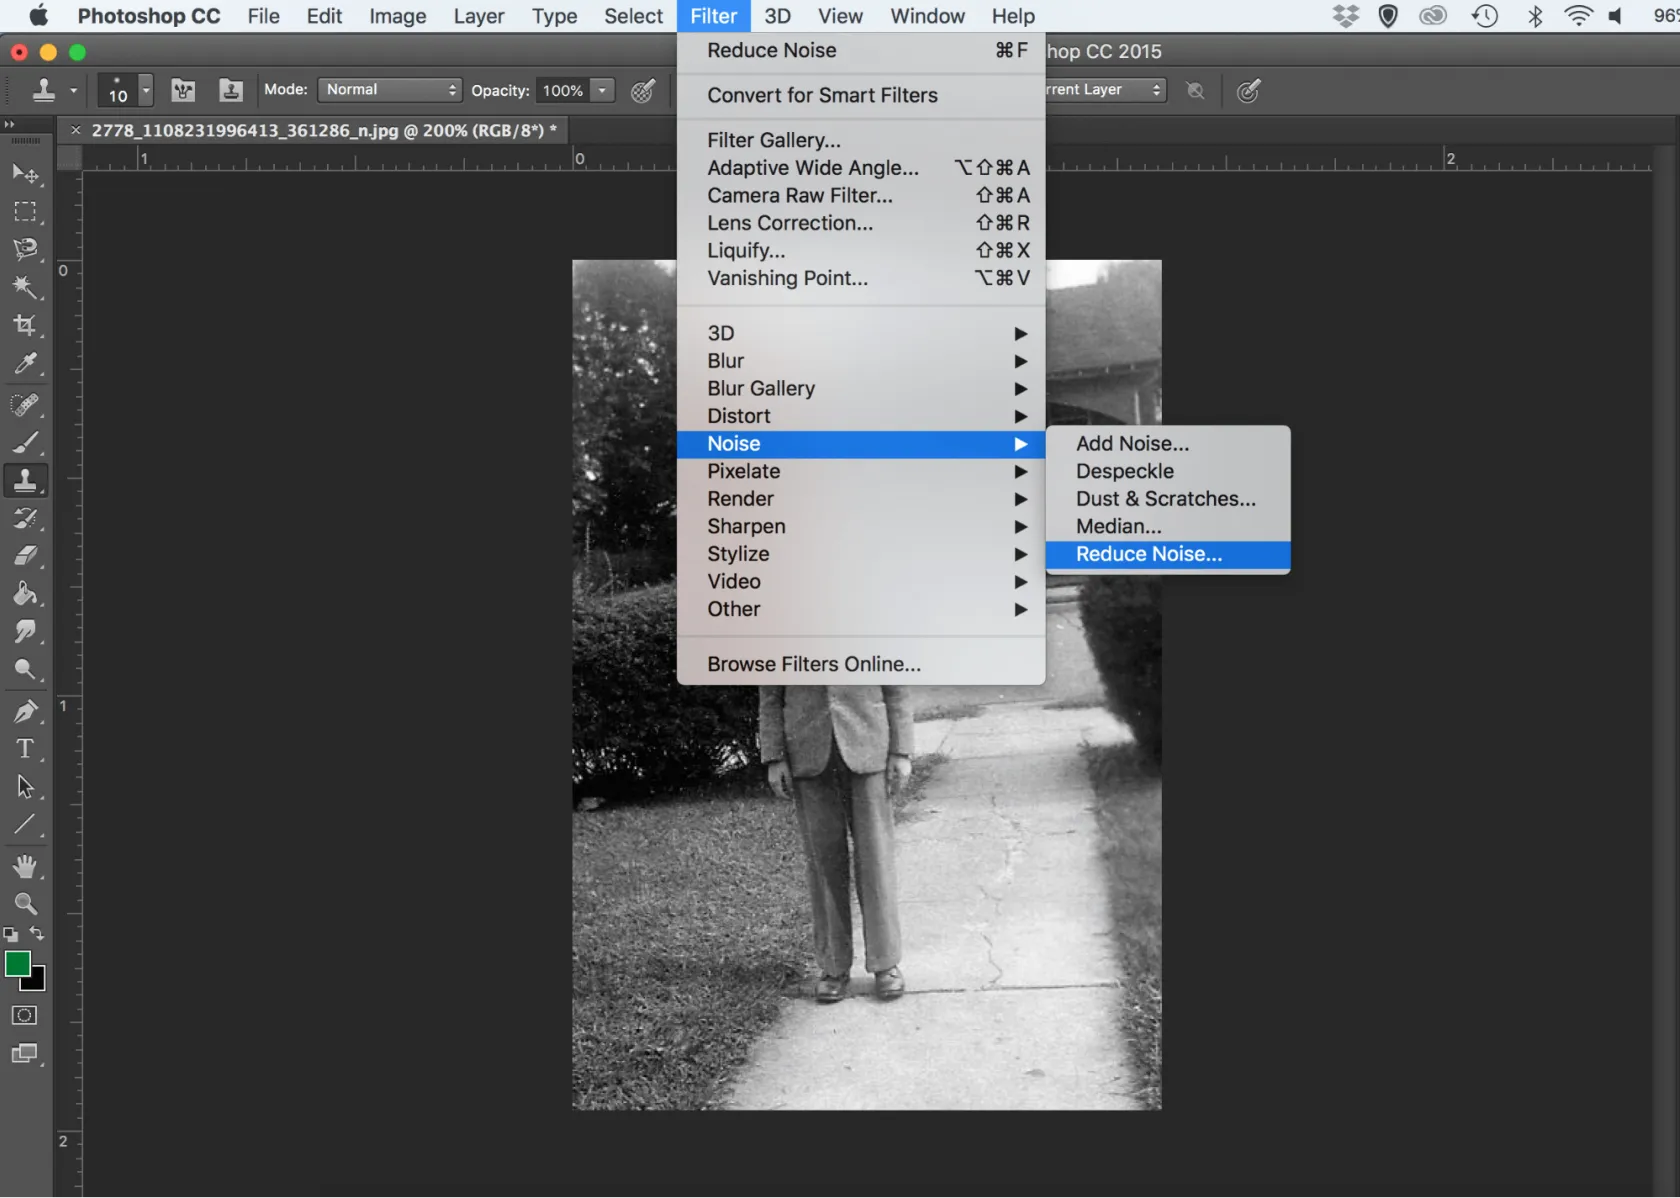
Apply the smallest effective correction and inspect the image at 100%. Where possible, restrict the effect to affected areas using a mask or selection.
Use noise reduction separately when unwanted noise remains. Heavy smoothing can remove natural film grain, fabric texture, and facial detail along with the defects.
Step 6: Save an Editable File and Export Copies
Keep the layered PSD for future changes. Save a TIFF copy for a high-quality finished image and a JPEG for convenient sharing.
For everyday screen viewing, JPEG in sRGB is a practical choice. For printing, follow the lab’s requested dimensions, profile, and file format. Check the exported file before sending or ordering a print.
Photoshop or Luminar: Which Approach Fits the Photo?
| Need | Photoshop | Luminar |
| Precise, selective repair | Layers, masks, healing, and cloning support detailed local work | Clone and Erase support local cleanup after restoration |
| Automated starting point | Photo Restoration Neural Filter | Restoration with Full, Color, and Scratches modes |
| Editable workflow | Layered PSD retains the working structure | Catalog retains edits; keep the source files too |
| Main trade-off | Manual restoration can involve substantial layer and mask work | Automated results still need inspection and sometimes manual repair |
Choose according to the damage and the amount of local control needed. A few dust marks can be repaired manually; a heavily damaged image may benefit from an automated starting point followed by detailed retouching.
Exclusive Tools of Endless Possibilities in One Editor
Tips for a Natural-Looking Restoration
Separate Restoration From Colorization
Removing a scratch and adding color answer different questions. One repairs a visible defect; the other introduces an interpretation.
When using AI to colorize black-and-white photos, keep a restored monochrome version alongside it. Historical references can guide clothing, uniforms, and surroundings, but an attractive result does not prove the colors are accurate.
Check Identity and Important Details
Compare the scan and the result at the same zoom level. Examine eyes, teeth, facial contours, jewelry, lettering, and distinctive clothing.
AI can synthesize plausible details where information is weak or missing. For a family record, preserving someone’s recognizable features matters more than producing the smoothest face.
Enlarge Only After Cleanup
Complete the restoration at the working resolution before preparing a larger copy. An AI image upscaler can help produce a larger output, but it does not create a verified record of lost details.
Check the enlarged result and apply final sharpening for its intended size. Changing only the ppi value without resampling does not add pixels.
Preserve the Photograph’s Context
Use descriptive filenames and retain dates, names, and notes where known. Keep at least one backup separate from the working device.
Digitization reduces the need to handle the print, but the original still needs appropriate storage. For extensive physical damage, seek a photograph conservator. For complex digital reconstruction, a skilled retoucher may be useful.
Preserve a Clearer Copy of the Memory
Begin with a good digital capture, repair the most distracting damage, and refine the tones gradually. Keep the original scan alongside the restored version so future edits remain possible. A successful restoration makes the photograph easier to appreciate while preserving its recognizable details and history.
FAQ
Often its appearance can be improved. Scratches, fading, and small tears may be repairable, while large missing areas require reconstruction. The result cannot be assumed to reproduce details that no longer exist.
For many small family prints, 600 ppi is a useful starting point. Choose the resolution according to the print’s size, visible detail, scanner capability, and intended output.
A smartphone can create a usable digital copy when the print is evenly lit, sharply focused, and free from glare. A flatbed scanner or careful camera setup may capture more consistent detail.
No. Keep an original sepia or color appearance when it matters. A neutral black-and-white version can be useful, but save it separately from the untouched scan.
No guarantee is possible where facial detail is missing. AI may generate plausible features. Compare the result with the scan and other photographs of the person before accepting significant changes.