Keep more of a macro, product, or landscape photo sharp. Follow this focus stacking workflow for capture, merging, inspection, and final editing.
A nearby flower and a distant mountain may not both appear sharp at the aperture you want to use. The challenge is even greater in macro photography, where only a narrow part of a small subject may be in focus.
Focus stacking works best when the camera, subject, and lighting remain consistent. It cannot recover details that are blurred in every frame, and it is less reliable when the subject moves between exposures.
This guide explains when focus stacking is useful, how to capture a sequence with overlapping areas of focus, and how to merge the images in Luminar or another suitable desktop application.
Don’t feel like reading the whole breakdown? We’ve pulled together a quick summary below.
Key Takeaways
- Change focus distance between frames, not focal length. Keep the framing and exposure consistent throughout the series.
- Focus bracketing is capture; focus stacking is the merge. Some cameras automate the first stage, and some offer an in-camera composite.
- Overlap the sharp zones. A missing slice of focus cannot reliably be reconstructed during blending.
- Frame count depends on the subject. A landscape may need a short sequence, while close macro work can require many more images.
- Inspect the result closely. Halos, movement, focus gaps, and alignment changes can require retouching or a new capture.
What Is Focus Stacking?

Focus stacking combines photographs of the same scene, captured at different focus distances, to create an image with an extended depth of field. Each source frame contributes the areas that are in focus. Software aligns the frames and blends those areas into a composite.
The finished image is a composite, not a single exposure with greater depth of field. Keep this in mind when planning the capture: each area you want to appear sharp needs to be in focus in at least one frame.
You do not need to make everything sharp. You can stack the flower’s center and petals while leaving the distant background soft. Choose the focus range you want instead of assuming that maximum sharpness everywhere is the goal.
Focus Stacking vs. Other Image-Merging Techniques
| Technique | What changes between source frames | Main purpose |
| Focus stacking | Focus distance | Combine sharp areas across the subject’s depth |
| Exposure blending or HDR merging | Exposure | Combine recorded information from brighter and darker regions |
| Panorama stitching | Camera direction or framing | Cover a wider field of view |
| Noise-reduction stacking | Repeated captures of the same scene | Reduce certain random noise through combination |
Focus stacking does not inherently create an HDR appearance, increase saturation, or raise image resolution. Sharpening is different too: it changes the appearance of detail within an image rather than supplying an in-focus capture of a missing region.
Focus Bracketing vs. Focus Stacking
Focus bracketing means recording the sequence with different focus distances. You can do it manually or with a compatible camera’s automatic focus-shift function.
Focus stacking means combining that sequence. A camera that offers focus bracketing does not necessarily create the final composite itself. Check the model’s instructions for compatible lenses, file formats, and whether a computer merge is required.
Exclusive Tools of Endless Possibilities in One Editor
When Should You Use Focus Stacking?

Macro and Close-Up Photography
At close distances, depth of field can be extremely limited. A small change in focus may move the sharp region from the front of a subject to another feature only slightly farther away.
Stacking is especially useful for controlled subjects such as minerals, small objects, and still plant details. Fine structures, reflective surfaces, and overlapping edges can still create blending challenges.
Living insects and moving flowers are less predictable. Subject movement may be slight in the scene but significant at high magnification.
Product and Food Photography
A photograph may need to describe a label, curved surface, and rear edge together. A controlled setup lets you stabilize the camera and keep lighting consistent while shifting focus.
Consider whether all that detail serves the image. A product description may benefit from greater sharpness, while a lifestyle photograph may work better with selective focus.
Landscapes With Close Foreground Detail
A nearby rock or flower can be difficult to keep sharp along with a distant background. A short focus sequence may help when changing aperture or focus placement does not provide the desired result.
Keep the camera in the same position. Walking between exposures changes perspective and creates a different merging problem.
Interiors and Detailed Still Scenes
Stacking can help when a nearby object and a distant part of an interior both need definition. It is less useful when people move through the frame or lighting changes markedly during the sequence.
When One Photograph Is Enough
Before stacking, test a suitable single exposure. Better focus placement, a different aperture, or a small change in composition may solve the problem with less work.
Portraits and moving subjects often benefit from a single well-timed frame. A stack is an option, not a requirement for professional-looking photography.
What Equipment Do You Need?

Start with a camera that gives you repeatable control over focus, a stable support, and software capable of focus merging. An interchangeable lens is useful for many applications but is not a universal requirement.
A tripod makes consistent framing easier. A remote release or self-timer can reduce disturbance from pressing the shutter. For a small indoor subject, controlled lighting can make the process more repeatable.
Automatic focus bracketing is convenient, but manual focus changes can work. The important requirements are adequate overlap and consistency, rather than a particular camera brand.
How to Capture a Focus Stack

1. Compose and Stabilize the Scene
Mount the camera and establish the final framing. Keep a little extra room around important edges because alignment can require cropping.
For an arranged subject, position it before starting the sequence. Consider the photography composition first; extra sharpness will not resolve an unclear arrangement.
Avoid touching or moving the camera after the first frame. Wait for a still moment if outdoor conditions allow one.
2. Set Consistent Exposure and Color
Manual exposure is a straightforward starting point because it holds aperture, shutter speed, and ISO steady. Use a fixed white balance or apply consistent RAW processing later.
Choose settings that retain the detail you need. The exposure triangle remains relevant: the aperture must provide useful sharp zones, while shutter speed must account for any movement.
Keep ISO low when practical, but do not sacrifice a necessary shutter speed merely to reach the lowest number. On a tripod with a truly static subject, a longer exposure may be suitable.
3. Choose an Aperture for the Subject
A moderate aperture can provide a useful balance between depth of field and fine detail. Depending on the setup, a value around f/5.6 or f/8 may be worth testing, but neither is a universal prescription.
Very small apertures increase diffraction, while a very wide aperture produces thinner sharp zones and may require more frames. At high magnification, these tradeoffs become particularly important.
Check a test image at a useful magnification. Keep aperture fixed through the stack so its depth-of-field and rendering characteristics remain consistent.
4. Start at the Nearest Required Detail
Identify the closest part of the subject that needs to be sharp. Focus on it, or slightly in front when your camera’s focus-shift method requires that approach, and make the first frame.
Do not start halfway through the subject and expect the merge to recover the missing front section.
For a manual sequence, use magnified live view if available. For automatic bracketing, follow the camera’s instructions rather than switching the lens to manual focus by default; automated focus control may require autofocus operation.
Elevate Your Photography with Our Advanced Software
5. Move Focus Gradually Through the Scene
Advance focus toward the farthest required detail. Make small enough changes that the sharp area in one photograph overlaps the next.
There is no universal number of frames or focus-ring rotation. The required spacing depends on magnification, aperture, lens, and subject depth. Automatic step-width numbers are also model-specific rather than interchangeable measurements.
For a first landscape test, capture several overlapping distances rather than assuming that “foreground, middle, background” always covers everything. For macro work, expect a more closely spaced sequence.
6. Verify Coverage Before Packing Up
Review the nearest, middle, and farthest sections across the source frames. Check for movement, gaps, camera shifts, and exposure changes.
If an important region is soft in every photograph, capture a better sequence while the setup is still available. A few additional well-placed frames are more useful than many redundant ones that miss the same area.
Prepare the Files for Merging

Keep each sequence together and preserve the originals. Remove obvious accidental frames, but do not discard overlapping captures simply to make the stack smaller before checking coverage.
If the stacking application accepts your camera’s RAW files, you may be able to merge them directly. When preparing files in a separate RAW photo editor, apply consistent white balance, exposure, and lens treatment across the series.
Avoid making different local edits or strong sharpening adjustments to individual frames before the merge. Those differences can complicate blending. If an intermediate export is required, use matching dimensions and a suitable high-quality format such as TIFF.
How to Focus Stack in Luminar
Luminar on desktop combines a focus-merging tool with general photo adjustments. It is useful when you want to merge a supported sequence and continue refining exposure, color, and framing in the same application.
Its Focus Stacking tool supports up to 100 source photographs. That is a software capacity, not a target number for every shoot. Check that Focus Stacking is available in your installed version and license before planning a large workflow around it.
Merge the Sequence
- Import or locate the sequence in Luminar’s Catalog.
- Open Extra and find Focus Stacking in the merge tools, or use the Focus Stacking area shown in your version.
- Select the source photographs and drag them into the Focus Stacking window.
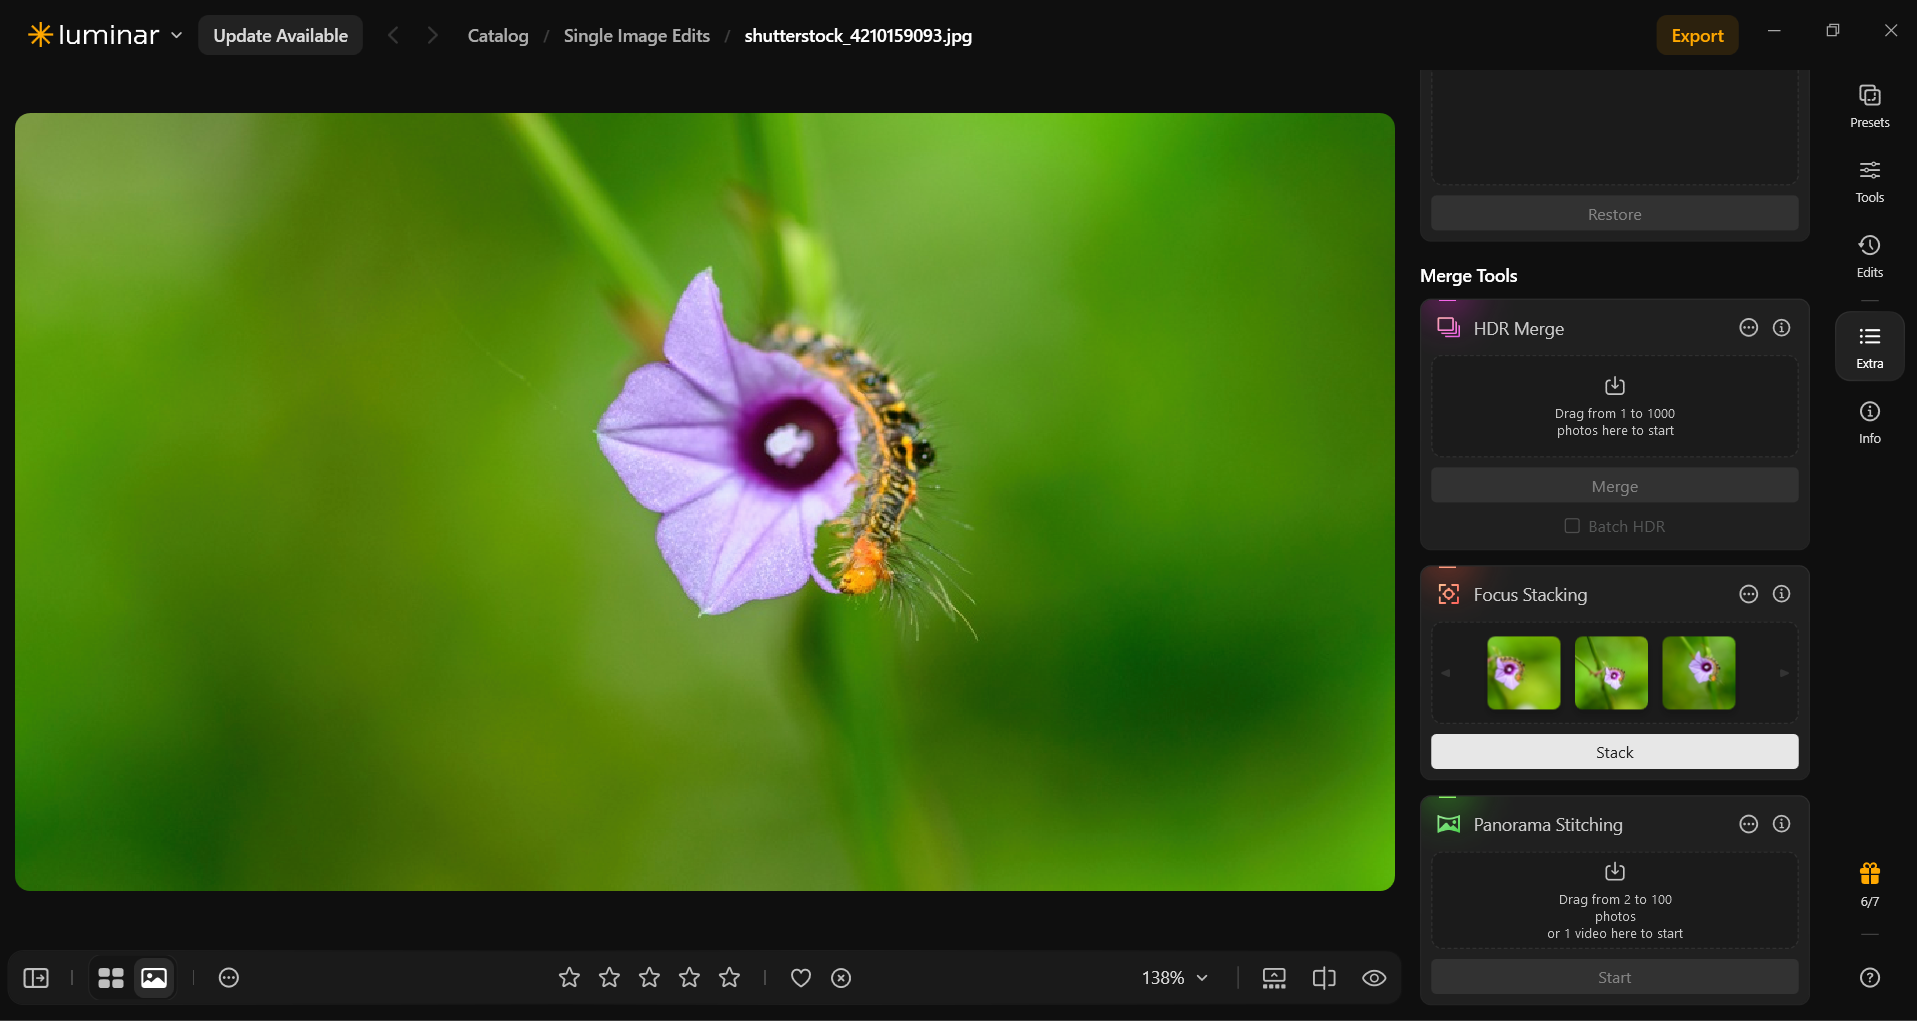
- Open the gear icon to review options such as Auto Alignment and Chromatic Aberration Reduction. Auto Alignment also provides reference-image selection.
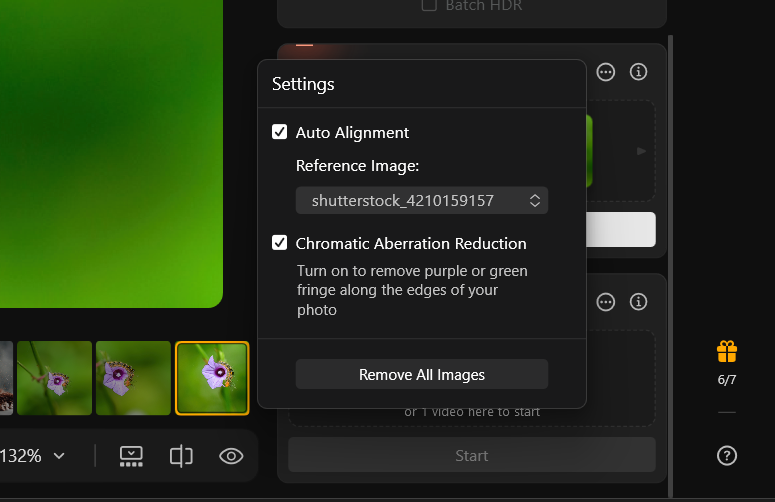
- Click Stack.
- Review the merged TIFF in the Focus Stacking folder.


The merge happens through the dedicated Focus Stacking tool. It is not a “Focus” blend mode in the ordinary Layers panel.
| Pros | Cons |
| Dedicated merge workflow sits alongside normal photo editing tools | The documented limit is 100 source images |
| Alignment and chromatic-aberration options help prepare the merge | Alignment cannot solve every movement or overlap problem |
| A merged TIFF can be inspected and edited afterward | Automated selection still needs review around difficult edges |
Other Desktop Workflows

Photoshop: Automatic Blending With Layer Control
Photoshop suits a workflow where the composite may need manual mask correction after the initial merge. It places the source images in layers, aligns them, and uses Auto-Blend to build the result.
A common desktop sequence is:
- Choose File > Scripts > Load Files into Stack and load the source images as layers.
- Select the relevant layers and choose Edit > Auto-Align Layers.
- With the layers still selected, choose Edit > Auto-Blend Layers.
- Select Stack Images, confirm, and inspect the resulting masks and composite.
Keep an editable layered version if you may need to correct the blend later. This is different from using Smart Object stack modes such as Median for other stacking purposes.
| Pros | Cons |
| Layer masks support detailed manual correction | The workflow involves several steps and familiarity with masks |
| Useful when stacking is part of a broader composite edit | Large layered documents can require substantial memory and storage |
Helicon Focus: Dedicated Stacking and Source Retouching
Helicon Focus is designed around focus-stack processing. Its rendering methods provide different approaches to combining a sequence, and its source-based retouching tools can help repair regions where the initial result chooses an unsuitable detail.
Load the sequence, render a test with an appropriate method, inspect difficult boundaries, and compare alternatives when needed. The best method depends on the subject and stack; one setting does not guarantee a clean result for every arrangement.
This approach is useful when focus stacking is a regular part of macro or product work and you want dedicated control over the merge. General color finishing may still fit better in your normal photo editor.
| Pros | Cons |
| Dedicated rendering methods offer control over difficult stacks | Choosing a method and tuning it requires evaluation |
| Source-based retouching helps refine local merge errors | It adds a specialist application to the workflow |
Where Lightroom Classic Fits
Lightroom Classic can organize and prepare a sequence, then send selected photographs through Photo > Edit In > Open as Layers in Photoshop. The Auto-Blend focus merge is performed in Photoshop, rather than by that Lightroom Classic command itself.
Do not confuse organizing photographs into a catalog stack with combining their sharp areas into one image. The word “stack” describes both, but the operations are different.
Inspect and Finish the Composite

Check the image at normal viewing size and close up. Pay particular attention to thin details, overlapping edges, the nearest and farthest required areas, and anything that moved during capture.
Look for Alignment and Focus Breathing
Some lenses change the apparent framing or magnification as focus changes. Stacking software may compensate by aligning and scaling frames, which can leave edges that need cropping.
Use photo cropping tools after evaluating the merge so you preserve the details that matter. Leave the source files intact in case a different alignment or blend is needed.
Distinguish Halos From Missing Focus
A bright or soft fringe around an overlapping edge may be a blending problem. A consistently soft band through the subject may indicate a missing focus interval.
Inspect the source frames to tell the difference. A clean source region may support retouching; a region that is never sharp usually calls for a new capture rather than more aggressive sharpening.
Finish Tone and Detail Conservatively
Once the merge is sound, adjust exposure, color, and local brightness as needed. Apply sharpening for the intended output size rather than using it to conceal a faulty blend.
Keep an editable or high-quality master alongside the final sharing file. A smooth-looking preview does not prove that the full-resolution result is free from artifacts.
Your AI-Powered Photo Editor for MacOS and Windows
Common Focus Stacking Problems
| Problem | Likely cause | What to try |
| A soft band remains across the subject | Focus steps left a gap | Capture smaller steps with overlapping sharp zones |
| Leaves, legs, or petals look doubled | The subject moved between frames | Use a still subject or a more suitable moment; inspect source options |
| Fine edges have halos | Blur overlap or blending decisions caused artifacts | Compare methods or retouch from a clean source frame |
| The frame shifts or needs a large crop | Camera movement or focus breathing affected alignment | Stabilize the setup and allow some framing margin |
| Brightness or color varies across regions | Lighting or processing changed between frames | Keep capture and source preparation consistent |
| The result contains no more useful detail than one frame | The sequence was redundant or one exposure already covered the subject | Reassess whether stacking is necessary |
A Simple Exercise to Start With

Choose a static object with visible depth, such as a small ornament or a textured product. Place it under steady light and mount the camera on a tripod.
Make one carefully focused single exposure. Then capture an overlapping sequence from the nearest to the farthest detail you want sharp. Merge the sequence and compare the result with the single frame.
Check where stacking actually helps, where the background changes, and whether any edges need correction. This controlled exercise makes it easier to recognize the same issues in a landscape or a more demanding macro setup.
Capture the Detail Before Trying to Merge It
A successful focus stack begins with coverage: stable framing, consistent light, and overlapping sharp areas across the intended focus range. Software can combine that information, but it cannot reliably supply a sharp region missing from every source photograph.
Start with a still subject and a manageable sequence. Inspect the merge before applying a final look, and keep selective focus when it better serves the photograph.
FAQ
It combines sharp areas from photographs taken at different focus distances into one composite with greater apparent depth of field. It does not guarantee higher resolution or recover details blurred in every source frame.
There is no fixed number. Subject depth, magnification, aperture, and focus-step size determine coverage. Use enough frames for the sharp zones to overlap across every required area.
No. Bracketing captures the sequence; stacking merges it. Some cameras automate bracketing, and some can also create a composite. Check the particular model’s capabilities.
Movement makes stacking less reliable because the subject’s position or shape changes between frames. A faster sequence may help in some situations, but a stable subject and consistent conditions are a better starting point.
Use a single exposure when it provides the depth of field and image quality you need. Consider stacking when that is insufficient and the scene remains stable enough for several captures. Stopping down further can increase diffraction, while stacking introduces its own blending risks.