Night photography opens up scenes that look completely different after sunset. City lights become colorful trails, the Milky Way appears above dark landscapes, and a flashlight can turn an ordinary location into a light-painting canvas.
The challenge is that cameras receive much less light at night, so you need to think carefully about stability, exposure, focus, and composition. The right settings depend on what you’re photographing, but the basic principles are easy to learn.
In this guide, we’ll cover practical night photography techniques for stars, the Milky Way, light painting, lightning, and other low-light scenes. We’ll also look at how to process night photos and reduce noise without losing important detail.
Key Takeaways
- Use a sturdy tripod whenever your night photography requires a slow shutter speed.
- Shoot RAW when possible to retain more flexibility for exposure, white balance, and noise adjustments.
- For Milky Way photography, start with a wide aperture, a relatively high ISO, and a shutter speed short enough to keep stars sharp.
- Manual focus is usually more reliable than autofocus in very dark conditions.
- Light pollution, moonlight, weather, and the visibility of the Milky Way all affect your results.
- Light painting works best when you control both the camera exposure and the movement of your light source.
- Never prioritize a lightning photograph over personal safety. If you can hear thunder, seek appropriate shelter.
- Post-processing can help balance exposure, control color, and reduce high-ISO noise, but it cannot fully recover badly clipped highlights or severely blurred images.
The Milky Way
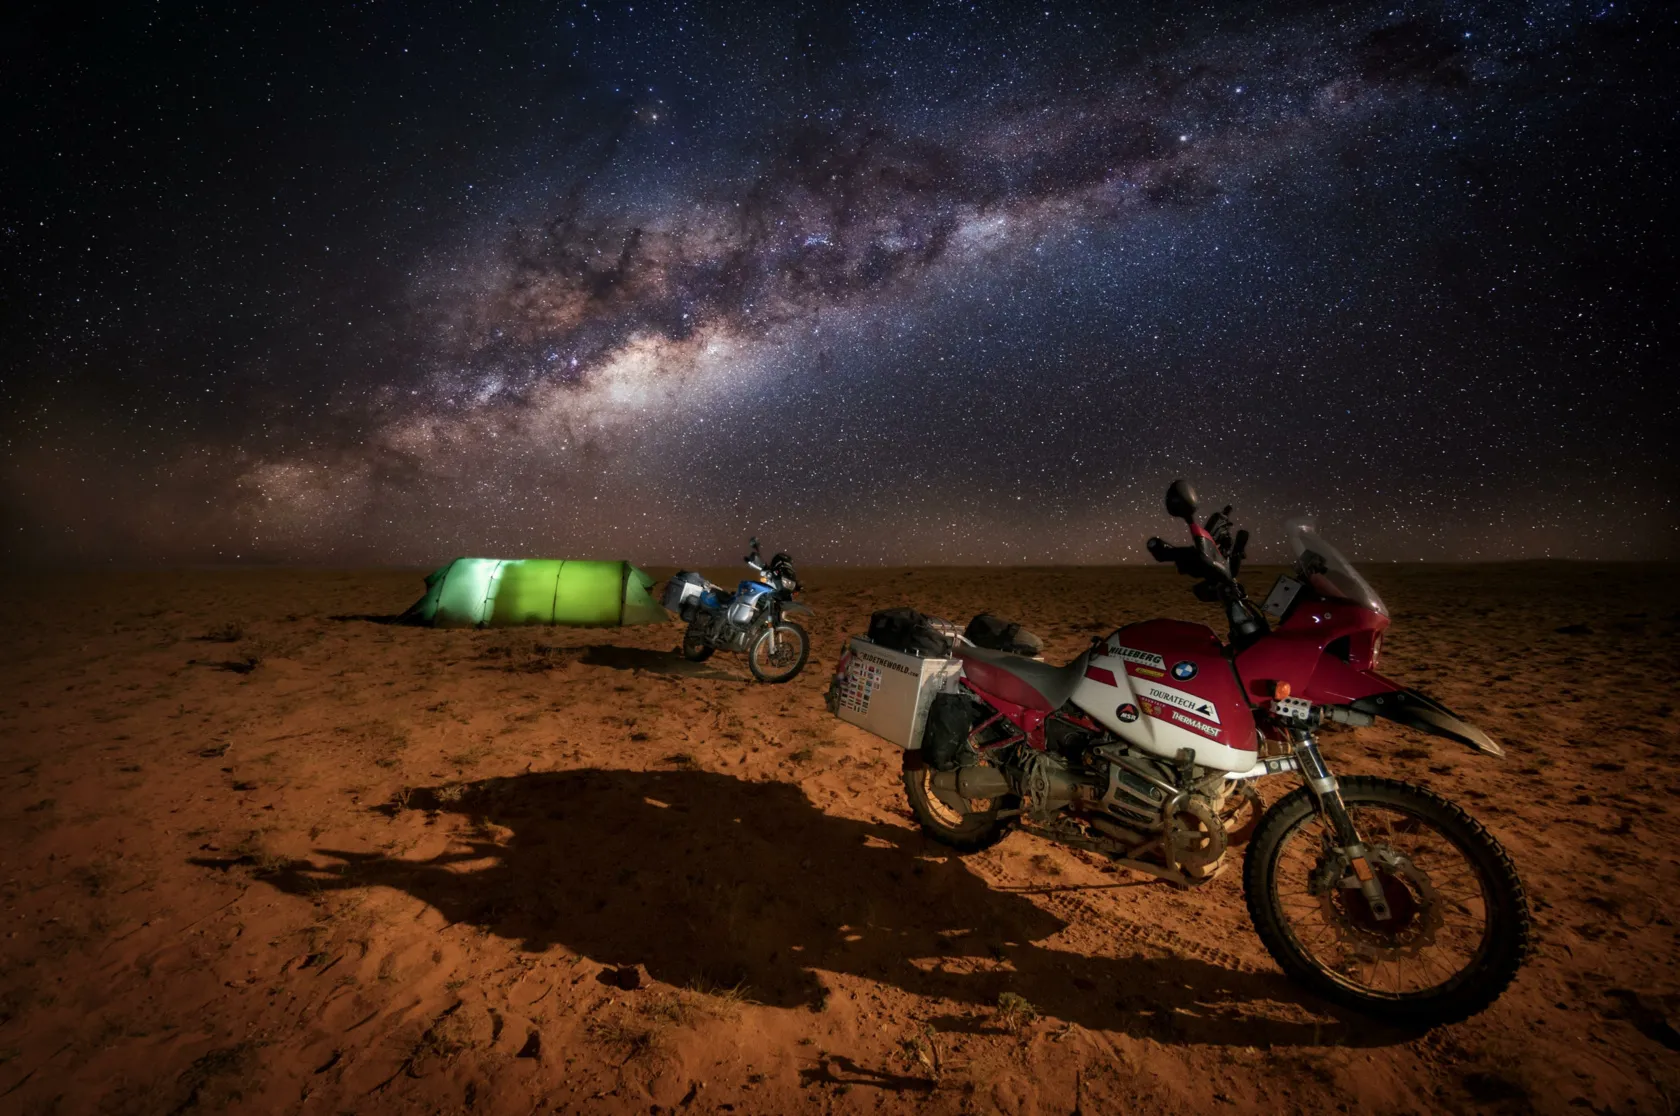 Photo by Simon & Lisa Thomas
The Milky Way is one of the most recognizable subjects in night photography. A dark sky, an interesting foreground, and careful exposure can turn a simple landscape into a striking night scene.
You don’t need specialized astronomical equipment to photograph the Milky Way. A modern interchangeable-lens camera can capture it, and some advanced smartphones can also produce useful night-sky images.
The main challenge is collecting enough light while keeping the stars sharp.
Because Earth rotates, stars appear to move across the frame during a long exposure. The longer the shutter remains open, the more likely that movement is to become visible as trails.
For sharp stars, your goal is therefore to use enough exposure to record the Milky Way without making the stars visibly streak.
Exclusive Tools of Endless Possibilities in One Editor
What You’ll Need for Night Sky Photography
You don’t need a huge amount of equipment to get started. The essentials are:
- A camera with manual exposure controls
- A sturdy tripod
- A lens suited to the composition you want
- A clear view of the sky
- Spare batteries
- A flashlight or headlamp
A wide-angle lens is popular for landscapes because it allows you to include a large portion of the sky and an interesting foreground.
A fast lens with a wide maximum aperture, such as f/2.8 or wider, can also be helpful because it lets more light reach the sensor.

Photo by Nathan Anderson
Helpful Accessories
Some additional equipment can make a night shoot easier:
- A remote shutter release
- A headlamp, preferably with a red-light mode
- Extra batteries
- Warm clothing
- A lens cloth
- A phone with a sky or astronomy-planning app
- A lens hood to help reduce stray light
A remote release isn’t essential if your camera has a self-timer, but either option can reduce camera movement when you press the shutter.
Night Photography Exposure Basics

Night photography requires you to balance the three parts of the exposure triangle: aperture, shutter speed, and ISO.
There is no single set of night photography settings that works for every scene.
For example, a cityscape photographed from a tripod may allow you to use ISO 100 and a long exposure. A handheld street photograph may require a much higher ISO and a faster shutter speed. A Milky Way image requires a different approach again.
Use a Tripod for Long Exposures
A tripod keeps your camera stable while the shutter is open. This is particularly important for landscapes, architecture, light trails, and other static subjects.
Place the tripod on stable ground and make sure all legs and locks are secure.
If your camera or lens has image stabilization, check the manufacturer’s guidance before using it on a tripod. Some systems should be disabled for certain tripod-based exposures, while others can detect tripod use automatically.
Use Manual Exposure When You Need Control
Manual mode gives you direct control over shutter speed, aperture, and ISO.
Start with a test exposure, inspect the result and histogram, and then adjust one setting at a time.
Your camera’s preview can be misleading on a dark screen, so don’t judge exposure only by how bright the image looks on the LCD.
Use a Timer or Remote Release
Even when your camera is mounted on a tripod, pressing the shutter can introduce movement.
Use a remote release or the camera’s self-timer. If your camera supports electronic or electronic front-curtain shutter modes, these can also help reduce mechanical vibration in situations where it matters.
Night Photography Techniques for Low Light

RAW capture is particularly useful for night photography because it gives you more flexibility when adjusting exposure, white balance, highlights, shadows, and color during editing.
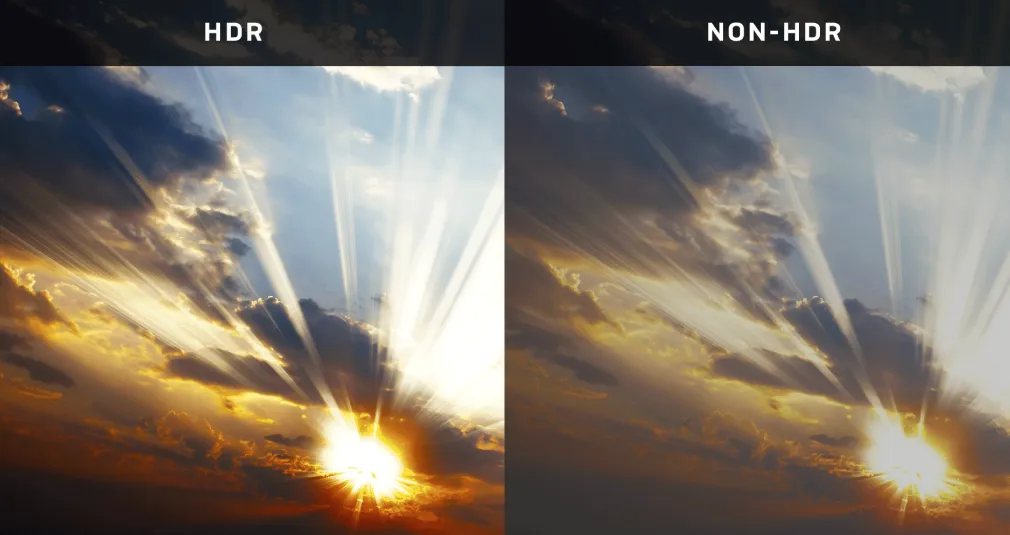
Bracketing can also be useful when a scene contains both very dark areas and bright artificial lights. Instead of forcing the entire scene into one exposure, you can capture multiple exposures and combine them later when appropriate.
Luminar includes HDR Merge for combining multiple exposures into a single image with a broader range of tones.
For star trails, the approach is different. Rather than trying to freeze the stars, you intentionally record their apparent movement over time. This can involve a sequence of exposures that are later combined into a single image.
A Starting Point for Night Photography Settings

Instead of memorizing one fixed combination of settings, use the following principles as starting points.
Aperture
A wider aperture lets more light reach the sensor. This is particularly useful for stars and other very dark scenes.
For a Milky Way landscape, you might begin around f/1.4–f/2.8 if your lens allows it. For a cityscape or light painting scene, you may choose a smaller aperture if you need greater depth of field or want to control the amount of light entering the camera.
Shutter Speed
The required shutter speed depends on the subject.
For stars, you generally want a relatively short exposure to minimize visible star movement. A starting point might be around 10–25 seconds, but the appropriate value depends on focal length, sensor size, composition, and how much star movement you can tolerate.
For light trails or static landscapes, several seconds or even several minutes may be appropriate.
ISO
Increasing ISO makes the camera more sensitive to the available light but can also increase visible noise.
For Milky Way photography, ISO 1600–3200 is a reasonable starting range on many modern cameras, but your camera, lens, aperture, sky brightness, and desired result may call for a different value.
For a brightly lit city scene on a tripod, you may be able to use a much lower ISO.
Focus
Autofocus often struggles when the scene is extremely dark.
Switch to manual focus and use your camera’s magnified live view to focus on a bright star or distant light. Once you’ve achieved accurate focus, avoid accidentally moving the focus ring.
Don’t assume that simply turning the ring to the infinity mark always produces the sharpest stars. The exact infinity position can vary between lenses.
White Balance
When shooting RAW, you can adjust white balance later, so there is no single correct setting.
A cooler white balance can emphasize the blue tones of a night scene, while a warmer setting can make artificial lights and illuminated foregrounds feel more inviting.
Choose a setting that supports the atmosphere you’re trying to create.
Where Should You Go for Night Sky Photography?

Photo by Jason Hahn
For Milky Way photography, dark skies make a major difference. Light pollution from cities, roads, buildings, and other artificial sources can make faint stars harder to capture.
Look for locations with minimal artificial light and an interesting foreground, such as:
- Mountains
- Rock formations
- Lakes
- Old buildings
- Trees
- Desert landscapes
- Remote roads
But darkness isn’t the only consideration.
Check the weather forecast before leaving. Clouds can hide stars, while high winds can make a tripod less stable.
The Moon also affects the appearance of the night sky. A bright Moon can illuminate the landscape, which may be useful for certain compositions, but it can also reduce the contrast of faint stars.
A moonless period is often useful when your priority is maximizing the visibility of the Milky Way.
Finding the Milky Way

Knowing where and when the Milky Way will appear is part of planning the photograph.
Its visible position changes with time, location, and season. Astronomy and sky-planning apps can help you determine when the Milky Way will be visible and where to point your camera.
Before the shoot, check:
- The Milky Way’s position
- Moon phase and position
- Cloud cover
- Light pollution
- Weather conditions
- Sunrise and sunset times
- Your planned composition
Good planning can save you from arriving at a beautiful location only to discover that the Milky Way is behind the horizon or hidden by clouds.
Night Photography Settings for Starscapes

Photo by Evgeny Tchebotarev
Use these settings as starting points rather than fixed rules:
| Setting | Starting point | What to adjust |
| Aperture | f/1.4–f/2.8 | Open wider for more light; stop down if needed for lens performance or depth of field |
| ISO | 1600–3200 | Increase if the image is too dark; lower it if you have enough light |
| Shutter speed | About 10–25 sec | Shorten it if stars become visibly streaked |
| Focus | Manual | Focus carefully on a bright star or distant light |
| White balance | Around 3500–4500K | Adjust for the desired sky and foreground color |
| File type | RAW | Gives more flexibility during editing |
These values are only a starting point. A fast full-frame setup under a very dark sky may require different settings from a crop-sensor camera with a slower lens.
Take a test shot, zoom in on the stars, check the histogram, and adjust.
Lighting Foreground Objects
A strong night-sky photograph often combines the sky with an interesting foreground.
Moonlight can naturally illuminate mountains, buildings, trees, and other subjects. You can also introduce your own light using a flashlight or portable light source.
The key is subtlety.
Light the subject from an angle rather than pointing a powerful light directly at the camera. Move continuously during the exposure if you’re illuminating a scene yourself so that you don’t appear in the photograph.
If the foreground becomes too bright, reduce the intensity of the light, move farther away, shorten the time you illuminate the subject, or adjust the exposure.
Colored gels can be used with compatible lights to introduce different colors, but keep the effect controlled. Too much artificial color can quickly overpower the natural atmosphere of the scene.
Post-Processing Night Photos in Luminar
A RAW night photograph may look relatively flat or dark straight out of the camera. Editing can help reveal the detail and color that you intended to capture.
A practical workflow is:
- Correct exposure and white balance.
- Recover highlights where possible.
- Open shadows carefully without making the scene look artificially bright.
- Adjust contrast and color.
- Apply selective adjustments to the sky or foreground.
- Reduce noise.
- Add sharpening carefully.
- Make final adjustments to the overall mood.
Luminar provides tools for adjusting image quality, including Noiseless AI for reducing luminance and color noise. It can be particularly useful for high-ISO night photographs, where aggressive noise reduction can otherwise remove fine star or landscape detail.

Don’t try to remove every trace of noise. Excessive noise reduction can make stars, foliage, buildings, and other fine details look unnaturally smooth.
You can also use the color and tonal controls to decide how your night scene should feel. A cool blue balance can emphasize the darkness of the sky, while warmer tones can work well with streetlights, windows, and illuminated architecture.
The goal is not to make the night look like daytime. Preserve enough darkness to make the photograph feel like a night photograph.
Light Painting

Photo by Daniil Silantev
Light painting is a creative long-exposure technique in which you use a handheld light source to illuminate a scene or create shapes and lines in the frame.
Because the camera records light over time, you can create effects that would be impossible to see in a normal exposure.
What You’ll Need
The basic setup is simple:
- A camera with manual exposure controls
- A sturdy tripod
- A remote shutter release or self-timer
- A flashlight or other controllable light source
- Optional colored gels
You don’t necessarily need a DSLR or a dedicated Bulb mode. Bulb mode is useful when you need exposures longer than your camera’s standard shutter-speed range, but many light-painting photographs can be created with exposures of 30 seconds or less.
Elevate Your Photography with Our Advanced Software
Night Photography Settings for Light Painting
There is no universal light-painting exposure because the result depends heavily on the brightness of your light source and surroundings.
As a starting point, try:
- ISO: 100–400
- Aperture: Around f/5.6–f/8
- Shutter speed: Start around 10–30 seconds
Then adjust based on the result.
If the light painting is too bright, reduce the light source’s intensity or shorten the exposure. If the scene is too dark, increase exposure time, open the aperture, or raise ISO.
Manual focus is usually the easiest option. Illuminate the area you want to photograph, focus carefully, then switch to manual focus so the camera doesn’t attempt to refocus in darkness.

Photo by Evgeny Tchebotarev
Where to Take Light-Painting Photos
Your location should support the idea you’re trying to create.
Interesting subjects include:
- Abandoned or historic structures where access is legal
- Vehicles
- Architectural features
- Open landscapes
- Industrial-looking environments
- Empty roads or paths
- Large indoor spaces where photography is permitted
If you’re creating shapes or letters entirely with light, look for a relatively dark background so the light trails remain visible.

Photo by Paul Carmona
How to Paint With Light
The technique depends on what you want to create.
Drawing With Light
Place your camera on a tripod and compose the scene.
Start the exposure, then move a flashlight through the frame to create lines or shapes.
If you’re writing words, remember that the camera records the scene from the opposite perspective. You may need to write the letters backward so they appear correctly in the final photograph.
Turn the light off whenever you move to a new part of the composition where you don’t want a visible trail.
Lighting Existing Objects
If you’re illuminating a building, tree, vehicle, or other object, move the light across the subject rather than leaving it pointed at one area.
Moving the light source helps distribute illumination more evenly.
Take a test shot after each attempt. If one part of the subject is too bright, change your position or reduce the amount of time you illuminate it.

Photo by Evgeny Tchebotarev
Experiment With Colored Light

Photo by Michael Rogers
Colored gels can change the mood of a light-painting photograph without changing the basic technique.
You can use colored gels with compatible flash or LED light sources, or experiment with different portable lights.
Try using one dominant color rather than adding several colors at once. This can make the final composition easier to control.
The important thing is to treat colored light as part of the composition rather than an effect added simply for the sake of it.
Photographing Storms and Lightning

Photo by Josep Castells
Lightning can produce spectacular photographs, but it is also the most safety-critical subject covered in this guide.
Do not photograph lightning from an exposed outdoor position if a storm is close enough to pose a threat.
If you can hear thunder, you are close enough to be struck by lightning. The National Weather Service recommends moving to a substantial enclosed building or a hard-topped enclosed vehicle. It also advises staying away from open fields, hilltops, isolated trees, water, and metal objects.
A camera is never worth risking your life.
Safer Ways to Photograph Lightning
The safest approach is to photograph from an appropriate shelter, such as a substantial building or an enclosed hard-topped vehicle.
You can position your camera before conditions become dangerous and use a remote release if appropriate, but don’t remain outside to operate the camera once lightning is threatening.
Don’t rely on a plastic bag as protection for either yourself or your equipment. Weather protection for a camera does not make an unsafe location safe.

Photo by Andras Kovacs
Night Photography Settings for Storms
Lightning is unpredictable, so your settings should be treated as starting points rather than fixed rules.
| Setting | Starting point | Why |
| ISO | 100–400 | Helps control noise and bright lightning |
| Aperture | Around f/5.6–f/8 | Provides a useful balance of exposure and depth of field |
| Shutter speed | Several seconds to around 10–20 sec | Gives you time to capture a strike |
| Focus | Manual | Prevents autofocus from hunting in darkness |
| White balance | RAW or a chosen Kelvin value | Gives you control over the storm’s color |
The correct exposure depends heavily on how bright the lightning is, how close the storm is, how much ambient light surrounds you, and what you want the final image to look like.
Review each exposure and adjust accordingly.

Photo by Tim Martin
Compose Before You Start Shooting
Lightning can illuminate the landscape for a fraction of a second, revealing objects that may be difficult to notice through the viewfinder in the dark.
Before shooting, carefully compose the frame.
Look for:
- Power lines
- Buildings
- Trees
- Roads
- Horizon lines
- Reflections
- Strong foreground elements
A wide-angle lens can increase your chances of including a lightning strike, while a longer lens can produce a tighter composition with more emphasis on the storm.
Your choice should depend on the composition rather than a rule that one focal length is always better.
Review Every Few Shots

Night photography involves experimentation.
After taking a photograph, check the image at high magnification and ask:
- Are the stars sharp?
- Is the subject properly exposed?
- Are highlights clipped?
- Is the foreground too dark?
- Is there too much noise?
- Is the composition balanced?
- Did unwanted light enter the frame?
Make one adjustment at a time and take another test shot.
This process is much more reliable than trying to memorize a fixed set of night photography settings.
Other Forms of Night Photography
Once you understand the basics of exposure, you can apply them to many other subjects after dark.
Try photographing:
- City streets
- Architecture
- Reflections
- Car light trails
- Bridges
- Ferris wheels
- Neon signs
- Night markets
- Portraits with artificial light
- Moonlit landscapes
- Star trails
The exposure triangle remains the foundation, but the settings change according to the scene.
A moving subject usually requires a faster shutter speed. A static landscape can tolerate a longer exposure. A bright city may require a much lower ISO than a remote Milky Way scene.
Your AI-Powered Photo Editor for MacOS and Windows
Night Photography Safety Considerations
Night photography requires more preparation than shooting during daylight.
Before visiting an unfamiliar location, consider visiting during the day first. This lets you identify terrain, access points, hazards, and possible compositions before darkness makes them difficult to see.
Also:
- Tell someone where you’re going.
- Carry a charged phone and flashlight.
- Wear appropriate footwear for the terrain.
- Bring extra batteries.
- Be careful around roads and moving vehicles.
- Keep away from unstable cliffs, steep slopes, and bodies of water.
- Check local access restrictions before entering private or restricted property.
- Avoid working alone in unfamiliar or remote locations when possible.
For thunderstorms, follow official weather warnings and prioritize shelter over photography. A hard-topped enclosed vehicle or substantial enclosed building is significantly safer than remaining outdoors.
Conclusion: Make the Most of Night Photography
Night photography isn’t about finding one perfect combination of aperture, ISO, and shutter speed. It’s about understanding how those settings interact with the available light and your subject.
Start with a stable camera, carefully chosen composition, manual focus when necessary, and a test exposure. Then adjust your settings based on what you see.
For astrophotography, pay particular attention to light pollution, moonlight, focus, and star movement. For light painting, experiment with the direction, intensity, and color of your light source. For lightning, make safety the first consideration.
Once you’ve captured your images, thoughtful editing can help reveal details, balance tones, and control high-ISO noise. Luminar’s current image-quality tools, including Noiseless AI, can be useful when refining low-light photographs without treating noise reduction as a substitute for a good exposure.
The best night photography settings are the ones that support the photograph you want to create. So take your tripod, plan your location, check the conditions, and start experimenting after dark.
FAQ
There is no universal setting. For a Milky Way photograph, start with a wide aperture, ISO around 1600–3200, and a shutter speed around 10–25 seconds, then adjust according to your camera, lens, sky brightness, and desired star sharpness. For cityscapes or light painting, lower ISO and longer exposures may work better.
The appropriate ISO depends on the scene. A dark Milky Way scene may require ISO 1600–3200 or higher, while a tripod-mounted cityscape may work at ISO 100–400. Use the lowest ISO that still gives you the exposure and shutter speed you need.
Use manual focus when autofocus struggles. Magnify the live view and focus carefully on a bright star or distant light. Take a test shot and check sharpness at high magnification before starting the full sequence.
Find a dark location with minimal light pollution, check the Milky Way’s position before the shoot, use a tripod and wide-aperture lens, focus manually, and start with a shutter speed around 10–25 seconds and ISO around 1600–3200. Adjust the settings based on your equipment and conditions.
Not if the storm is close enough to pose a lightning risk. If you can hear thunder, seek shelter in a substantial enclosed building or a hard-topped enclosed vehicle. Do not use an open field, hilltop, isolated tree, or body of water as a shelter.