Discover professional retouching methods to balance dynamic range, eliminate artifacts, and achieve a flawless, believable photographic finish.
For several years now, people have been complaining about AI’s perfectly polished images while at the same time longing for human imperfection. Right now, there’s a push to bring back blur, imperfect shots, and other flaws. There’s currently a debate over whether we should reintroduce technical flaws into AI-generated images or, on the contrary, focus on learning to write better prompts for AI to make our work easier.
Don’t feel like reading the whole breakdown? We’ve pulled together a quick summary below.
Key Takeaways
- Texture Over Plastic Skin: To eliminate the “extreme airbrushing” and oily effect on faces, introduce fine photographic Grain. When properly integrated based on lighting conditions, it breaks up flat pixels and mimics a real camera sensor.
- Technical Repair Comes First: No creative styling can hide an image’s AI origin if glaring anatomical errors, repeating texture patterns, or halo effects are left unaddressed.
- Restoring Depth and Dimension: Realism is restored by establishing natural light-and-shadow behavior. This includes split-toning, selectively emphasizing textures, and using Dodge & Burn to guide the eye.
- Ethical Standards & Transparency: AI retouching tools should be used to correct algorithmic flaws rather than enforce unrealistic beauty standards.
- Smart Exporting: Incorrect saving parameters can compress fine noise into ugly digital blocks. Always export web images in the sRGB color space, format appropriately.
Essential Tools for Editing AI Images
The main problem is that people use AI algorithms to correct the perfect image generated by the base AI. Sometimes it doesn’t understand what it means to restore natural imperfections, the technical limitations of real lenses, and the physics of light. To do this, you’ll need a bunch of tools, like an AI prompt photo editor and a few other helpers. This could range from classic graphic editors to tools for color specialists and smart AI plugins.
Adobe (Photoshop/Lightroom)

AI often produces colors that are too digital and overly sharp object outlines. In Lightroom, you can experiment with the Clarity and Dehaze sliders, moving them to the left to tone down the excessive sharpness. After that, use the Grain tool to add basic digital noise that mimics the behavior of a real camera sensor.
In Photoshop, you may utilize Generative Fill or classic cloning tools to remove background objects and minor anatomical imperfections. For advanced retouching, use Frequency Separation, which separates color and texture. This allows you to transfer microscopic pixels to the AI-generated image.
Capture One Pro

Neural networks tend to “smudge” shadows and create unnatural, unwanted hues, such as a greenish or purplish cast on the skin. Color adjustments in Capture One can restore skin tones to their natural appearance. In addition, the grain-adding algorithm integrates a lighting-dependent noise mask into the pixel structure, closely mimicking the behavior of true digital noise from a high-end camera.
Skylum Luminar

AI generators often suffer from flat backgrounds, which makes it look as if the subject was simply cut out and pasted onto the background. Luminar AI adds realistic 3D fog or haze that physically wraps around three-dimensional objects in the photo. Relight AI also helps provide lighting accents between the foreground and background if the generator got the light sources wrong.
Your AI-Powered Photo Editor for MacOS and Windows
Step-by-Step Guide to Basic AI-Generated Photo Adjustments

Be both bold and subtle. This is probably the hardest part of working with AI. You need to deliberately disrupt the digital sterility of the frame without turning it into a messy collage.
- Step 1. Slightly reduce the overall contrast of the image. Lift the shadows to restore detail in the darkest areas, and tone down the highlights. This will create more gradual transitions and a softer histogram.
- Step 2. Adjust the color palette. To do this, lower the overall saturation by 5-10 units. If possible, go to the HSL panel and separately tone down the brightness and saturation of the color that stands out the most.
- Step 3. In Lightroom or similar software, move the Clarity or Texture slider slightly into the negative range (around -5 or -10). If your software has a Lens Blur feature, apply a minimal blur radius to the background.
- Step 4. Find the Grain tool. Set the Size to the minimum, and adjust the Coarseness and Intensity so that the noise becomes noticeable only when you zoom in on the frame.
Don’t be lazy—do one or even two extra checks. Before saving the result, check whether any grain-induced blemishes have appeared on the face. And what about the perspective? Make sure the main subject is clearly visible with no unnecessary visual clutter.
Enhancing Details and Colors in AI Photos
In true-to-life photography, light wraps around objects, naturally highlighting their texture. AI often distributes sharpness and saturation evenly across the entire frame, which flattens the depth and makes the image look like a collage.
- Tone separation. Light and shadow rarely share the same hue. To add cinematic depth to the frame, try making the highlights slightly warmer and the shadows cooler or neutral-gray.
- Highlighting object texture. A person’s face should remain relatively soft, while clothing, tree bark, stone, or architecture should be emphasized. To do this, use micro-contrast tools such as Clarity or Texture. They don’t introduce fine digital noise and sharpen large and medium-sized details.
- Dodge & Burn. You can “bring out” flat images by manually or using smart filters (such as Accent AI) to lighten areas where light naturally falls and slightly darken the opposite side.
Typically, all these adjustments and masks were applied manually in traditional software. When you’re in a hurry, the Luminar AI suite can come to the rescue. Features like Structure AI or Accent AI automatically recognize surface types and the three-dimensional depth of the frame and adjust the highlights using a few sliders. 
Correcting Imperfections and Artifacts
Before moving on to creative styling, adding color, or applying a glossy finish, the image must be cleaned of purely technical “clutter.” Artificial intelligence often fails at the micro level. If obvious AI glitches are left unaddressed, even the most expensive film emulation or perfect skin tone won’t convince the viewer of the frame’s authenticity.
The first red flag that stands out is a violation of the laws of physics and anatomy. Extra or fused fingers, symmetrical earrings of completely different shapes, or buttons that seem to be embedded in the fabric. Here, you can use the Clone Stamp and Healing Brush tools in Photoshop or Affinity Photo.
AI tends to repeat itself when it comes to complex, fine textures. A generated brick wall, tree leaves in the background, sand, or a pattern on a sweater often overlap. Use the Patch Tool or a spot brush to slightly “break up” this perfect sequence.
Using Filters and Effects Creatively
Now that we’ve fixed the technical flaws and refined the anatomy, it’s time to focus on stylization. In photography, the mood of a shot is created by the weather, airborne dust, the characteristics of a specific lens, and the photographer’s artistic vision. We also can’t forget about additional AI photo retouching and special effects to add depth to the shot.
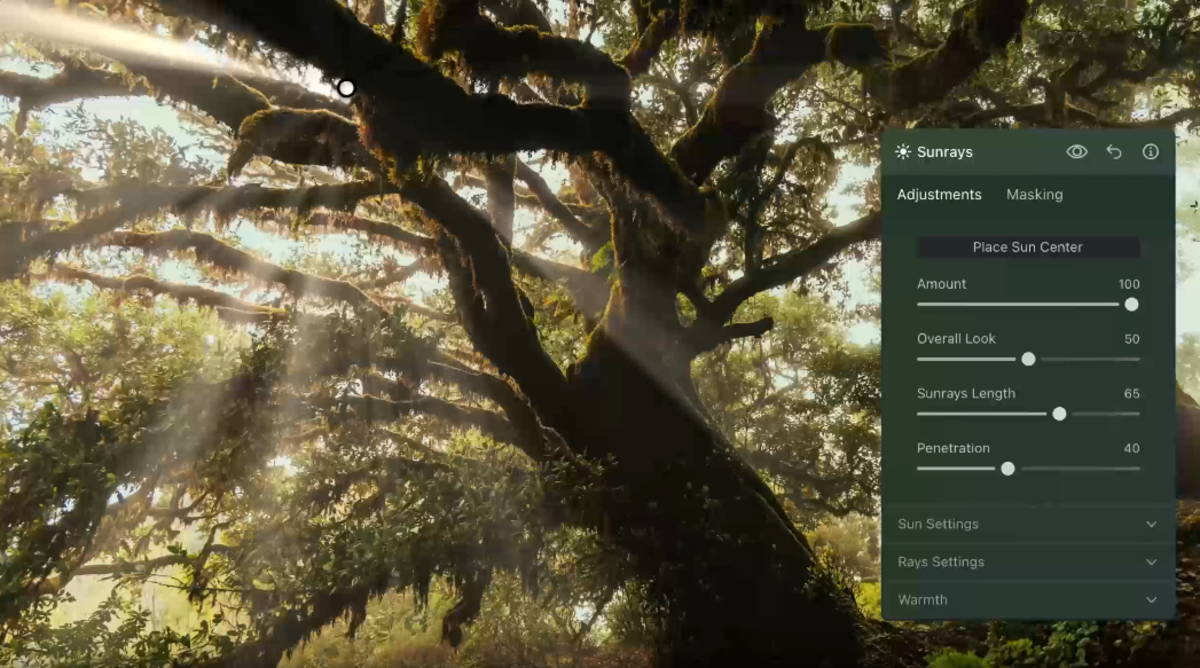
- Emulating the lighting environment and the “sun.” The Sunrays tool places a three-dimensional light source inside the scene, creating realistic rays that pierce through objects. This adds dynamism and analog warmth to a flat image.
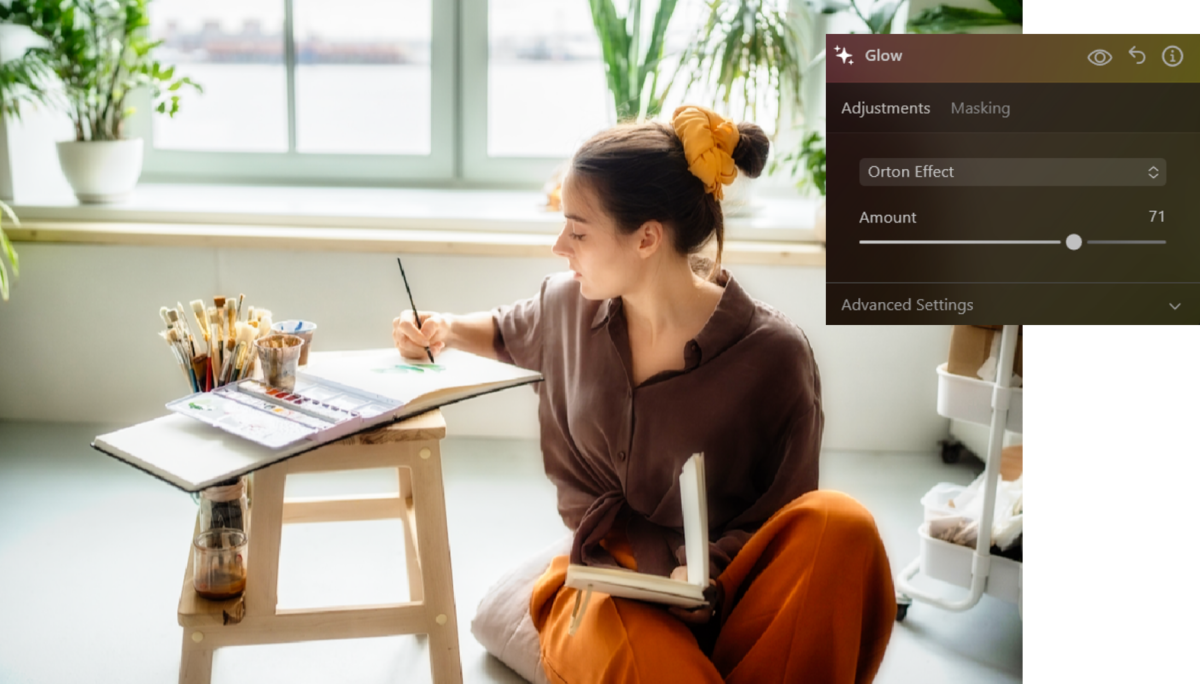
- Orton Effect & Glow. Use the so-called Orton Effect or a soft glow. These tools slightly blur the bright areas of the frame and blend them with contrasting shadows. As a result, the model’s skin takes on a beautiful glossy sheen, while landscapes or interiors come to resemble footage from a high-budget movie.
- Look Up Tables. Reduce the filter’s opacity to 30-40% so that it merely enhances the existing colors rather than completely covering them up.


Creative effects should fit the mood of your photo. For example, sunbeams would be out of place in a gloomy evening alley. Add a soft, misty glow from streetlights to hide any minor imperfections in the background rendering.
Best Practices for Ethical AI Photo Editing

Where is the line between artistic refinement and outright deception of the viewer? Adhering to ethical standards for image editing helps maintain the audience’s trust and protect the creator’s digital reputation.
Let’s take a portrait as an example. Neural networks often tend to adjust faces to fit artificial standards of beauty. Here, you can use a face AI editor and focus on subtle adjustments to lighting, removing digital glare, or correcting asymmetry in the eyes and lips.
The main ethical conflict arises when a fully generated image is passed off as a documentary photo or a real news shot. If a photograph is used for artistic purposes, marketing, or a blog, indicate its origin. A short caption like “AI-generated & edited by…” works perfectly, since the viewer has the right to know whether they are looking at a real moment captured by a camera or at a product of the collaborative creativity of humans and algorithms.
Exclusive Tools of Endless Possibilities in One Editor
Saving and Exporting Your Edited Images
Incorrect export settings or excessive compression by social media algorithms can turn delicate skin textures and subtle background noise into grainy digital blocks.
- JPEG—minimizes the appearance of new digital artifacts around fine details;
- PNG—preserves the full dynamic range and gradient flow in shadows;
- WebP—delivers excellent texture clarity with a substantially smaller file size.
Before clicking the “Save” button, check that “Auto-Sharpen” is turned off in the export settings. Professional graphics editors often enable this by default for print or screen use, but for an AI-processed image, it can reintroduce that same aggressive digital oversharpening.