Improve your photo quality by learning how to upscale an image in Photoshop. Get clean, high-resolution results using the software’s native resizing tools.
Stretching a small photo up to print size or a larger canvas used to accept some blur as the price of doing business. Photoshop’s newer AI tools, instead of typically spreading the same pixels across a bigger canvas, study the image and fill in texture and edges. This guide walks through how that process works, which Photoshop versions support it, and how to AI upscale in Photoshop an old scan or prepare a small graphic for print for a clean result.
Don’t feel like reading the whole breakdown? We’ve pulled together a quick summary below.
Key Takeaways
- Next-generation upscaling technology: Exclusive to Photoshop 2026 (version 27.0), the new Generative Upscale feature bypasses traditional pixel interpolation.
- Alternative options for older versions: Users who haven’t updated to the 2026 release can still enlarge images using Camera Raw’s Super Resolution, which relies on standard machine learning for a 2x boost. Alternatively, third-party plugins like Luminar Neo can bring AI upscaling directly into older Photoshop workspaces.
- File preparation: Before running the tool, check your file is in RGB mode (8 or 16 bits per channel) and run basic noise reduction and color correction to prevent grain and artifacts from being magnified.
- Model selection matters: The tool offers specific models tailored to different subjects. Use Firefly Upscaler for outdoor scenery and foliage, Topaz Gigapixel with the Face Recovery toggle for accurate portraits, and Topaz Bloom’s Creativity slider for stylized, interpretive results.
- Credit management and testing: Because generating new details consumes processing time and Adobe generative credits, it is best practice to run a 2x test on a single image before committing to a heavy 4x batch process.
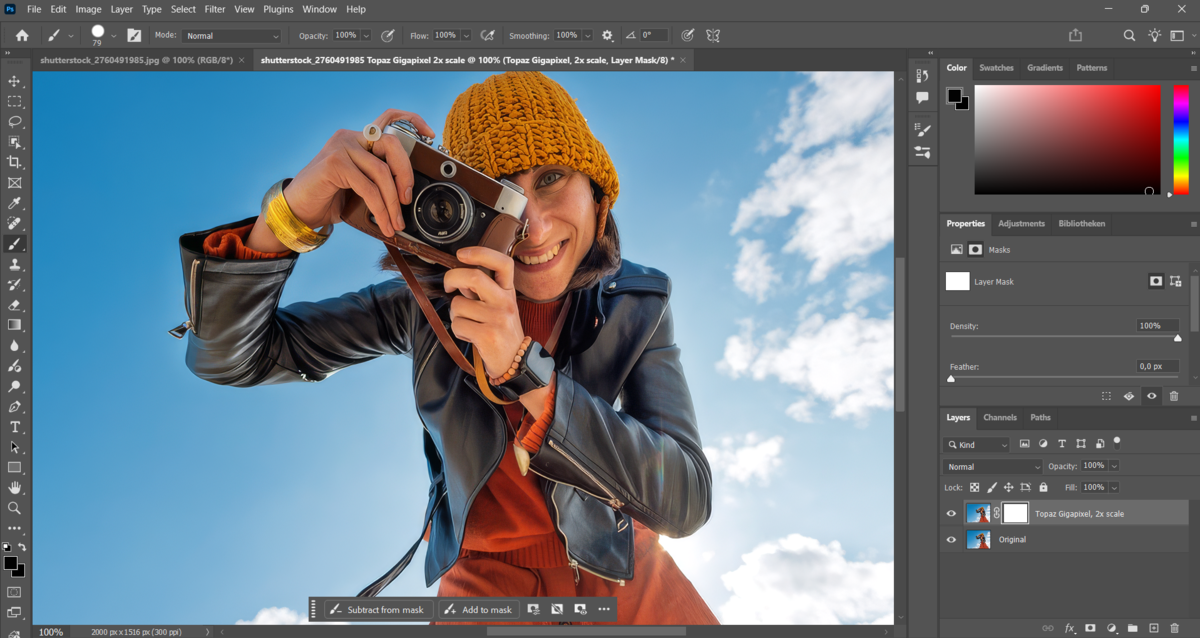
- Non-destructive comparison workflow: Photoshop safely preserves your original file by outputting the upscale into a brand-new document. This new file includes both a standard upscaled layer and a generative detail layer, letting editors to easily toggle visibility and inspect the AI modifications.
Understanding Generative Upscale in Photoshop

If you are wondering can Photoshop AI upscale smaller files for print or heavy crops, the 2026 (27.0) release offers a built-in solution. The new Generative Upscale feature bypasses traditional pixel interpolation to reconstruct textures from scratch. It expands an image by 2x or 4x and generates subtle details in hair and fabric, and sharpens edges. Photoshop provides the result as a new document; you can passably edit the original file directly, so the source image stays untouched no matter how the upscale turns out.
Exclusive Tools of Endless Possibilities in One Editor
Photoshop Versions Compatible with Generative Upscale
If you are asking does Photoshop have AI upscaling, the short answer is yes, though the technology behind it varies by version. The 2026 release features Generative Upscale for rebuilding textures like hair and fabric from scratch. Users on older versions aren’t left behind either, as Camera Raw’s Super Resolution handles basic 2x upscaling using standard machine learning.

Camera Raw’s Super Resolution tool has offered machine-learning-based doubling for several years, and it still works well for modest size increases. For folks not ready to update the program, the Luminar Neo plugin for Photoshop adds its own AI upscaling tools directly inside older Photoshop versions.
Preparing Your Image for Upscaling
A little cleanup before upscaling saves a lot of frustration afterward, since Generative Upscale amplifies whatever texture and noise are already in the file. Start by fixing obvious color casts, cropping out distracting edges, and running basic noise reduction on anything shot at a high ISO, since grain tends to turn into odd artifacts once the file gets bigger.
Photoshop also has some practical limits worth checking before starting: the source file needs to be in RGB mode at 8 or 16 bits per channel, and there’s a maximum starting file size the feature will accept, so extremely large source images may need to be upscaled in smaller stages instead of one big jump. Working from the cleanest possible scan or photo, rather than trying to fix everything during the upscale itself, tends to produce noticeably better results.
Step-by-Step Guide to Using Generative Fill for Upscaling
The Generative Upscale dialog box holds everything needed for the job, and the process works the same whether the source is a tiny product photo or a decades-old family print.
- Open the low-resolution image in Photoshop and confirm it’s in RGB mode.
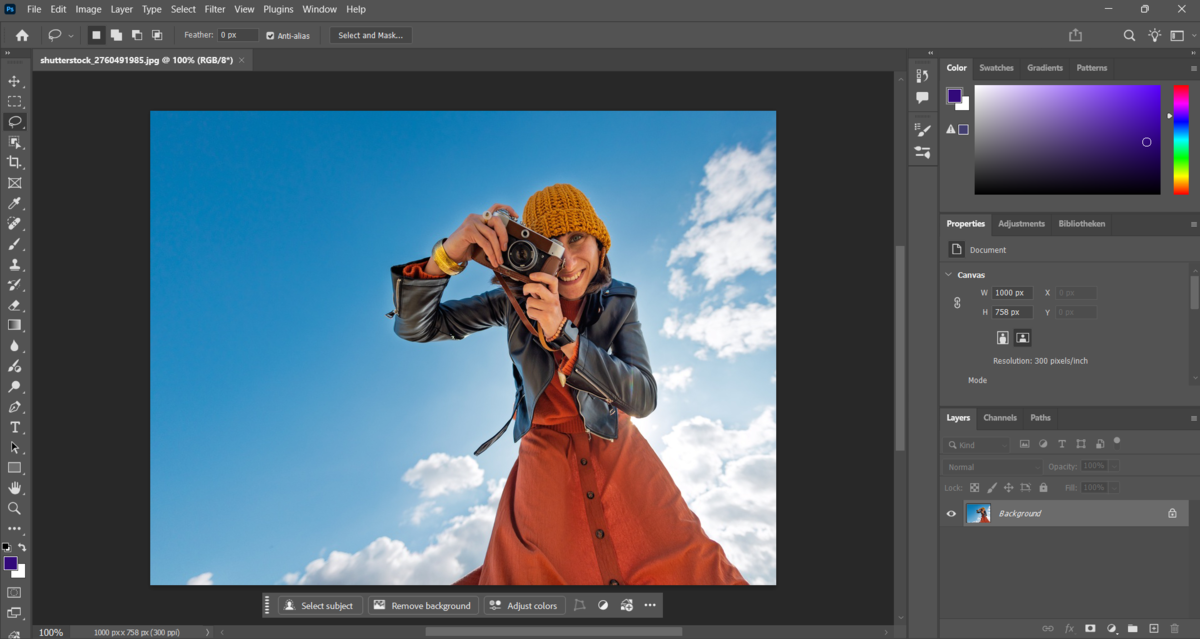
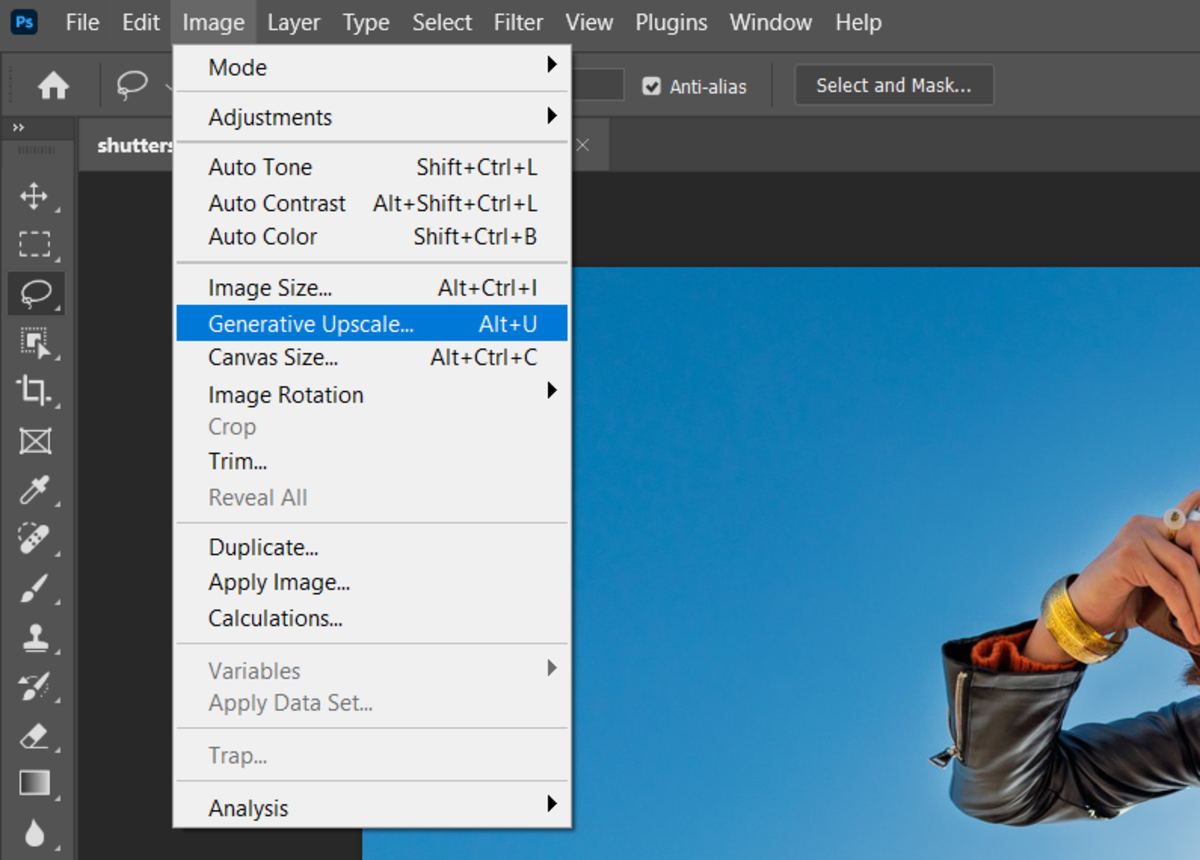
- Go to Image. Generative Upscale to open the dialog box.
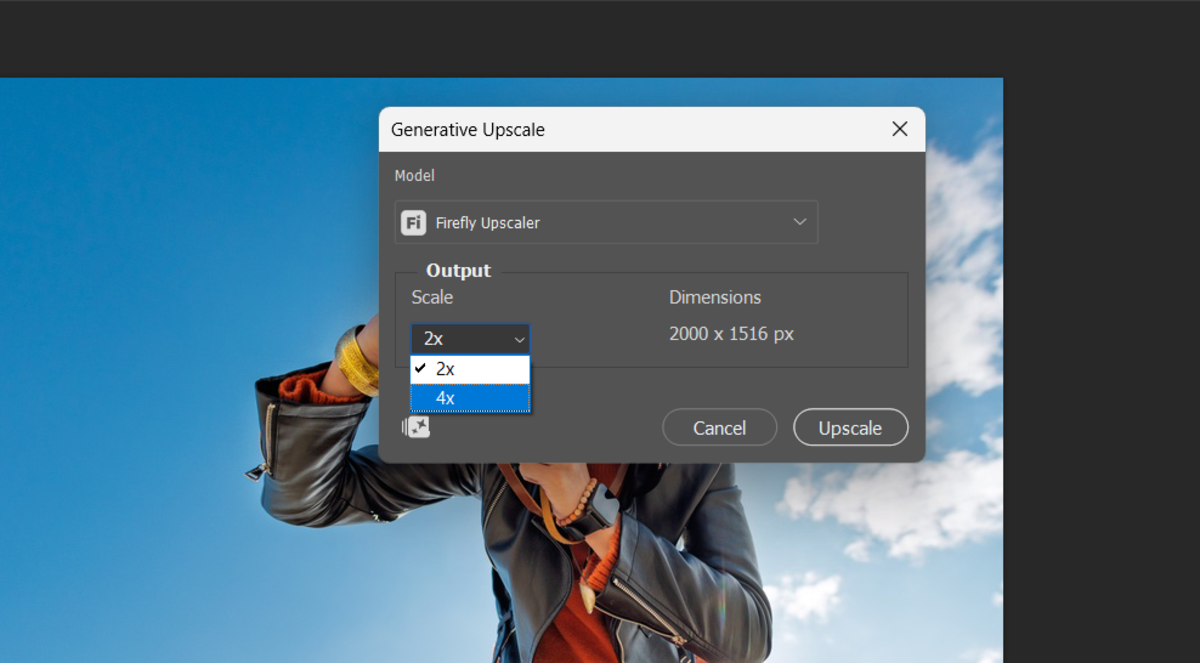
- Choose a scale of 2x or 4x. Depending on how much enlargement the image needs.
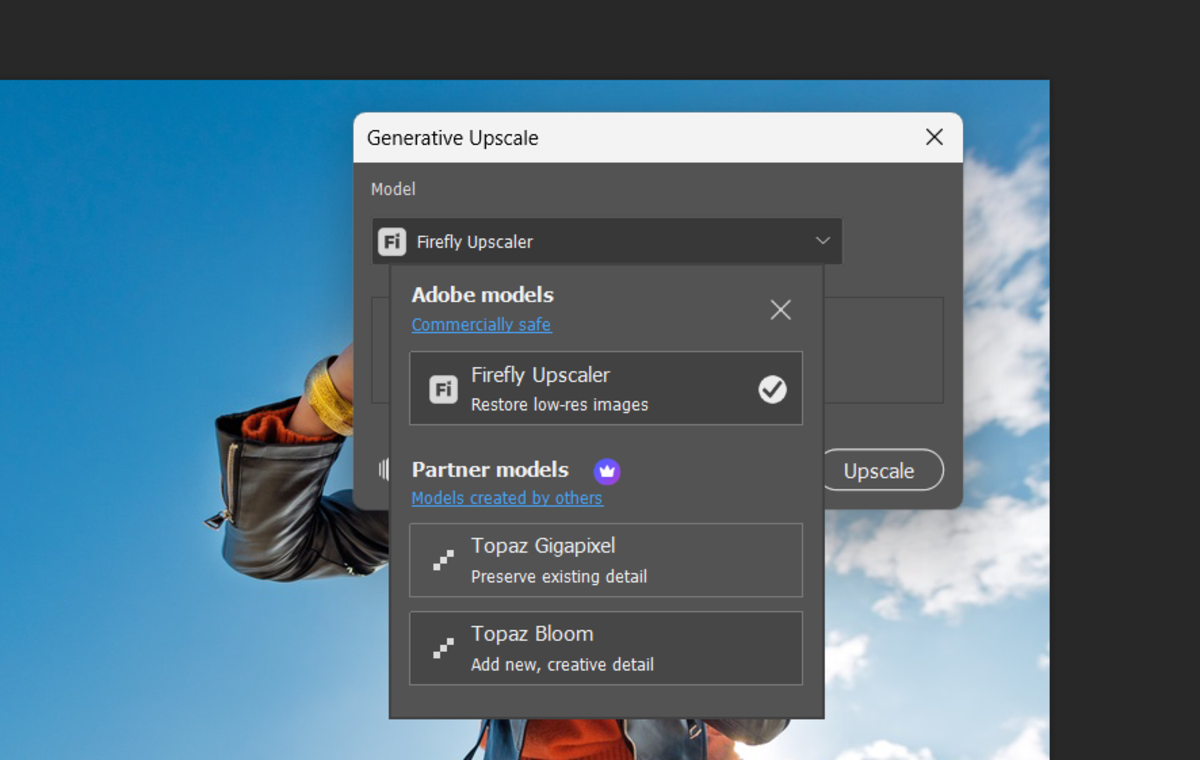
- Pick a model—Firefly Upscaler, Topaz Gigapixel, or Topaz Bloom—based on the subject in the photo.
- Click Upscale and wait one to three minutes, depending on your computer’s speed.
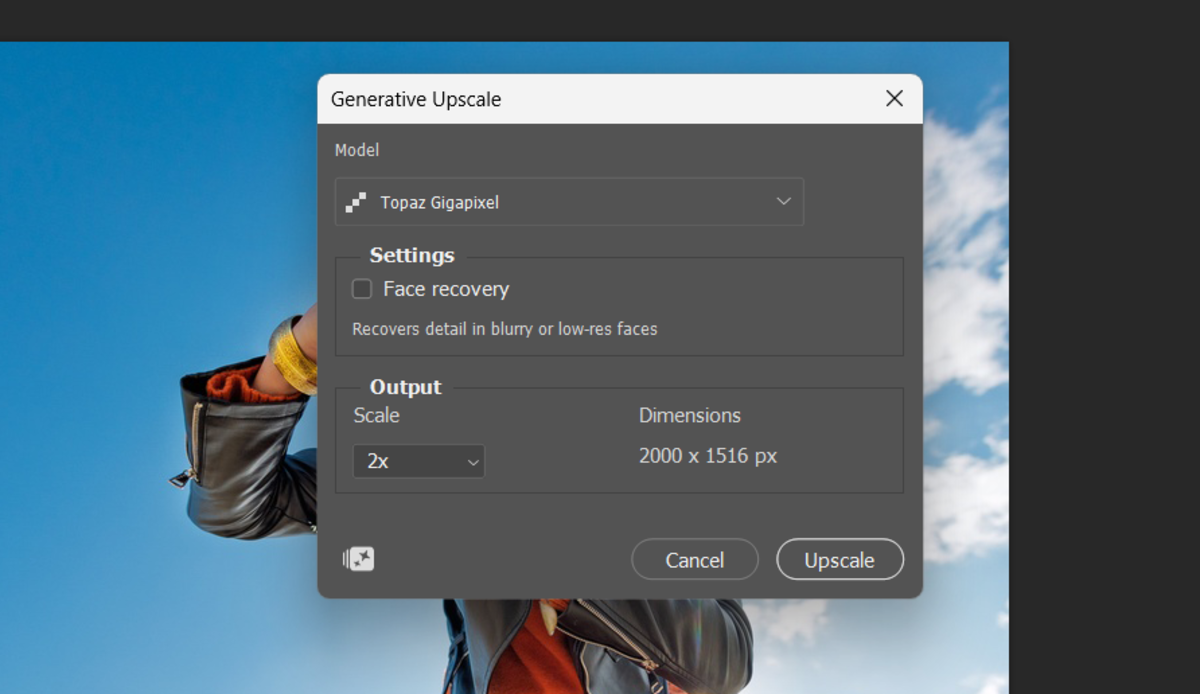
- Review the new document Photoshop creates, which includes both a standard upscale layer and a generative detail layer for comparison.


Each attempt uses some of Adobe’s generative credits when Topaz Gigapixel or Bloom is selected, so it’s worth reviewing a single test run at a smaller scale before committing credits to a full 4x upscale on a large batch of images.
Your AI-Powered Photo Editor for MacOS and Windows
Selecting the Right Upscale Model and Size

An AI upscale Photoshop session starts with picking the right model for the subject, since the three options behave differently. Firefly Upscaler tends to work best on outdoor shots and natural scenes, rebuilding texture in foliage, water, and sky.
Topaz Gigapixel focuses on real-world photography and uses a Face Recovery option to accurately reconstruct facial details. Topaz Bloom, however, handles upscaling interpretively. Its Creativity slider ranges from 0 to 10, letting you choose between keeping the original look or generating a heavily stylized result.
| Model | Best suited for | Notable setting |
| Firefly Upscaler | Outdoor scenery and natural scenes | 2x or 4x scale only |
| Topaz Gigapixel | Portraits and real-world photos | Face Recovery toggle |
| Topaz Bloom | Stylized or artistic results | Creativity slider (0-10) |
Photographers working mainly with people tend to lean on Topaz Gigapixel by default, while anyone restoring scenery or product shots from an old scan often gets a more natural result from Firefly. For a second AI model outside Photoshop entirely, some editors run a comparison pass through Luminar Upscale AI before deciding which output to keep for a final print or delivery.
Reviewing and Comparing Upscale Results
Barely Photoshop finishes processing, the new document includes two layers such as the standard upscale, built with ordinary resizing, and the generative layer, built with added AI detail. Toggling the generative layer on and off at max zoom demonstrates every extra detail the model added.
Photos of recognizable people need a closer look here, since small, well-intentioned changes to a face can read as wrong to someone who knows the person in the photo. Product shots and decorative images tend to tolerate more creative interpretation. Photographers who want a broader set of comparison tools for this kind of review sometimes keep Luminar open alongside Photoshop to check a second AI-driven version vis-a-vis.
Enhancing Photos with Face Recovery and AI Restoration
Face Recovery inside Topaz Gigapixel is used to polish specifically portraits and old photographs where facial detail has degraded to low resolution, faded, or has scanning artifacts. Turning it on before an upscale run rebuilds features like eyes, eyebrows, and skin texture with noticeably more definition.
They pair well with Photoshop’s other restoration tools, for instance, maintaining Photo Restoration or Colorize on an old black-and-white print first.

Elevate Your Photography with Our Advanced Software
Tips for Maximizing Image Size and Quality After Upscaling
Photoshop image upscaling holds up best when a few habits become routine rather than afterthoughts, since most quality problems trace back to the source file or a rushed setting rather than the AI model itself.
- Avoid heavily compressed JPEGs. Generative Upscale needs actual pixel data to rebuild textures accurately.
- Don’t default to a 4x batch right away. The 4x option eats up more generative credits and processing time.
- Always save the upscale as a new document instead of flattening it. It could leave room to rerun the process if the first attempt looks off.
- Your client can easily toggle visibility and compare the changes.
For anyone routinely upscaling scans, product shots, or portraits, building these checks into a repeatable action inside Photoshop turns a multi-step process into a single click.